
Yesterday, when I opened my inbox, two mails were forced me to write this article. Here is what one email says:
Hi,
I have upgraded my Windows 7 to Windows 8. When I hit the F8 key, I’m not able not enter the Safe mode. I have also tried Shift + F8, but with no good luck. I want to use free WiFi from college campus using Safe mode with networking. Please help me to enter into Safe boot.
I have got similar queries from other readers also. Hence, I have finally decided to write on this. So without wasting your time anymore, lets start the tutorial…
Page Contents
Workaround : Add Or Remove Safe Mode Option To Boot Manager
1. Press  + R and type the msconfig command and hit Enter key.

2. Now switch to Boot and select the Safe boot under Boot options. Also check the Make all boot settings permanent option. Restart the system.

The only drawback of this method is appearance of Safe mode again and again even if we don’t need it. Hence the query is unsolved. So here comes the next and tricky part and the actual tutorial starts now.
How To : Add Safe Mode Option To Boot Manager
1. Open administrative Command Prompt, type following command followed by Enter key:
bcdedit /enum /v

2. Note down the identifier as located below (in notepad). Be careful and copy the identifier and don’t mess up with inherit or something like that.

3. Now type following command and hit Enter key:
bcdedit /copy <IDENTIFIER STRING HERE> /d “Windows 8 Safe Mode”
e.g. bcdedit /copy {b4aacc93-efa1-11e0-84aa-83305f6d4ba0} /d “Windows 8 Safe Mode”

NOTE:
Do not copy and paste the identifier string here, otherwise Windows will generate the “A description for the new entry must be specified” error. So I recommend you to type the whole command instead of pasting it. Here is more clarity:

4. Close the Command Prompt. Now you can see the Safe mode boot option in System Configuration Utility (msconfig.exe).

Now here again check the Safe boot and Make all boot settings permanent options. Click Apply followed by OK.
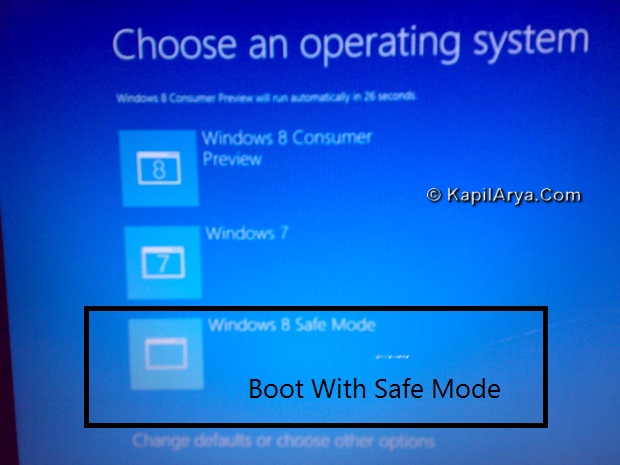
Now reboot and you will find the Windows 8 Safe Mode option on the boot manager. That’s it.

How To : Remove Safe Mode Option To Boot Manager
1. Open administrative Command Prompt, type following command followed by Enter key:
bcdedit /enum /v

Note down the identifier string.
2. Type following command now and hit Enter key:
bcdedit /delete <IDENTIFIER STRING HERE>
e.g. bcdedit /delete {b4aacc96-efa1-11e0-84aa-83305f6d4ba0}

This will immediately remove Safe Mode option from boot manager so far. You can reboot to verify.
That’s it!


AwEsOmEeee ^_^
thanks buddy for clean tuturioal again….
I want 2 ask dat i’m still using Developer Preview, will it work on dat?
^^ This works on DP as well ;)
Hi, Kapil
I’m l’l bit confused
wat will happen if i select W8 CP option instead of 3 options present??
^^ Case:1
Choose Windows 8 Consumer Preview : Taking to normal mode (even though you have made all setting permanent for safe mode).
Case:2
Choose Windows 8 Safe Mode : Takes you to safe mode.
Conclusion : Choose Safe Mode whenever required! ;)
Brilliant, thanks !!
Can I add Windows 7 Safe Mode to this boot selection screen as well?
@ Leomate, POINTLESS!!! Press F8.
However use same procedure.
thanks 4 outstanding way.. lolz u can add ur name boot option also.. awsome no??
thank you kapil arya solving my problem.. god bless you mate :)
^^ You’re welcome.
why we can’t copy n paste d identifier
anyway lovely article ;)
thnks.. thnx and thanksssss :d