].")

UPDATE : In Windows 8.1, Microsoft has restored Windows button, so you can right click over it to to get power options.
Windows 8has lots of hidden possibilities in it. We’re regularly posting on them since its release. As we all know that Windows 8 doesn’t have direct shut down, lock computer, restart options due to absence of Start Menu and Start Button. Most of users are not adopted till now for these changes.
So today in this article, I’m going to share you the way to add such power options to Desktop context menu using registry’s manual method. After adding such power options, you can easily preform power operations in a handy way on Windows 8. So here we go:
Page Contents
How To : Add Power Options To Desktop Context Menu In Windows 8
1. Press  + R and put regedit in Run dialog box to open Registry Editor (if you’re not familiar with Registry Editor, then click here). Click OK.
![]()
2. Navigate here:
HKEY_CLASSES_ROOT\Desktop\Background\Shell
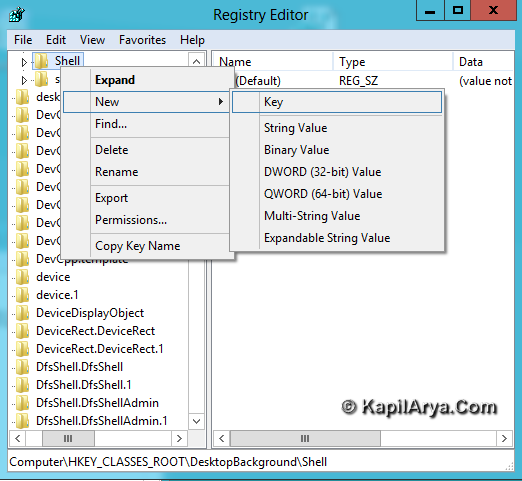
In left pane, right click on Shell and pick New – > Key. Name the key like Shut Down, Restart etc. Let us assume we name the key as Lock Computer.
3. For previously created Lock Computer key, create two strings in right pane with name icon and Position.
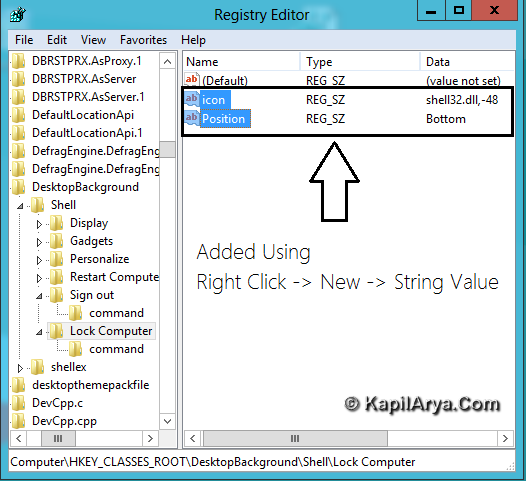
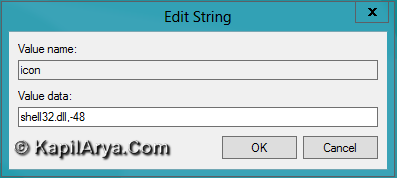
Now right click on icon, select Edit String. Put following Value data for corresponding operations:
For Lock Computer – shell32.dll,-48
For Shut Down – shell32.dll,-28
For Restart – shell32.dll,-290
For Sign Out – shell32.dll,-45
Similarly put Value data Bottom for Position.
4. Now create the sub key under previously created key in step 1 using same procedure. Name this sub key as command.
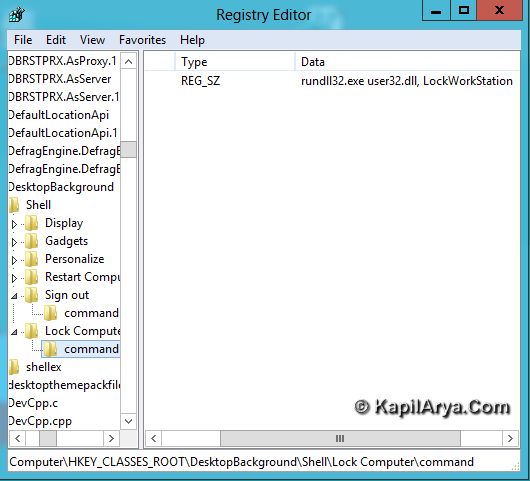
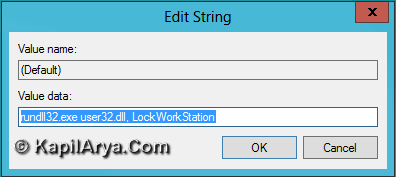
Click over this sub key, you’ll find Default string in right pane. Right click on it and pick Modify and enter following Value data:
For Lock Computer – rundll32.exe user32.dll,LockWorkStation
For Shut Down – shutdown.exe -s -t 00 -f
For Restart – shutdown.exe -r -t 00 -f
For Sign Out – shutdown.exe -L
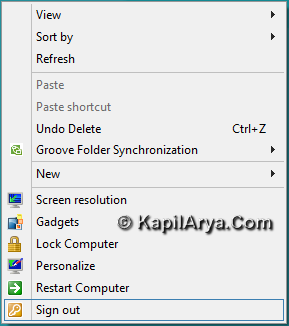
Exit the Registry Editor, press + D to access Desktop. Right click to get results (as shown in first image of this post).
How To : Change Default Icons For Power Option Entries So Added
The above method implements default icons with options. However you can assign different icons using following method:
1. Download IconViewer using below link and install it:
2. Access here:
C:\Windows\System32\shell32.dll
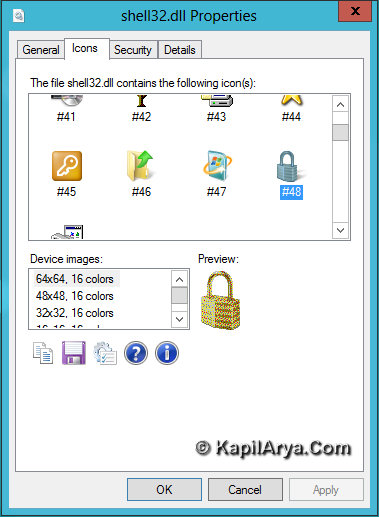
Now right click on it and pick Properties. In Properties window, switch to Icons tab. Note your favorite icon number after #.
Use this icon number in step 2 of main tutorial (after shell32.dll,-).
Download Direct Registries
For the sake of simplicity and save your time, we’ve created direct registry scripts which will do the same work in seconds. You just need to download and run them. Here are the links:
Download Registry For Lock Computer
Click on above downloaded file and run it. You’ll get following prompt:
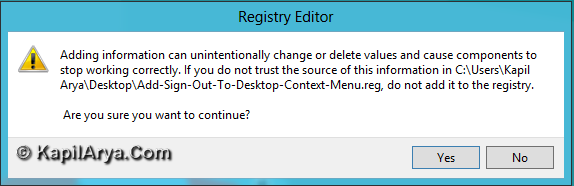
Press Yes then you’ll get this:
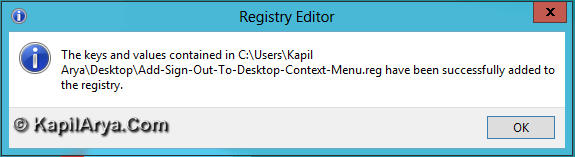
In this way you’ve successfully added your desired power option to context menu.
That’s it!


")


10 Comments
Add your comment
great Kapil; its a very good read here :D :)
I guess this works on Windows 7 as well ?!
Anyway nice article man!
me added the options…. yippiee!!!
thanks dude! its gr8…………..
thankxxxxx
works on 7 :)
nice :)
gud article kapil
I always appreciate a great article or piece of writing. Thanks for the contribution.
Heya i’m for the first time here. I found this board and I to find It truly useful & it helped me out a lot. I’m hoping to offer one thing back and aid others like you helped me