
After starting your Windows 10, if you receive a screen with some stages, this article is for you. If your system is quite older, this could be more frequent on your system. Recently, one of my colleagues started his Windows 10 Pro system. The system was working perfectly in the last session. He installed some of the available updates few days back. But yesterday suddenly when he started the system, he received the following screen. It mentioned ‘Fixing C Stage 1’ and a scan was being performed.
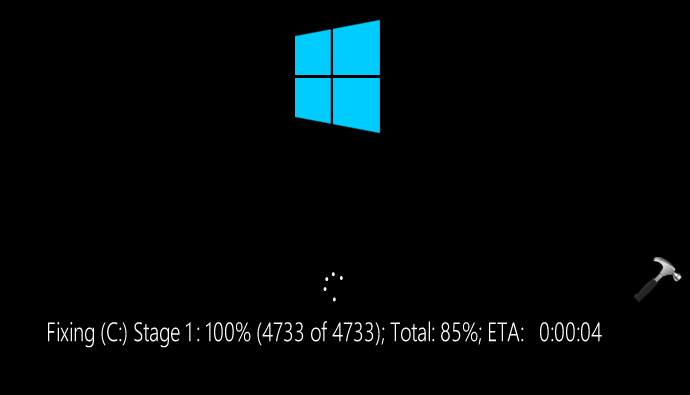
As you can see in the screenshot above, there is Fixing (C:) Stage 1 which takes few minutes to complete. After that, there is second stage and another drive which again takes few minutes to complete. This keeps going on with all the drives present on system. After that, finally system allowed the client to login. There is no surety that it will not appear again on next reboot. This is very time consuming and annoying for those who face it.
So the question is.. why did this happened? Well, this is actually disk checking performed by system automatically in case if it detects something is wrong with current configuration. If your system is quite older, this could be more frequent on your system and you may need to make changes to your configuration. Here is the workaround for this, which you can try and see if it helps you to fix.
How to stop Fixing C Stage 1 in Windows 10
1. Run regedit command to open Registry Editor.
2. In left pane of Registry Editor window, go to:
HKEY_LOCAL_MACHINE\SYSTEM\ControlSetControl\Control\Session Manager

3. In the right pane of Session Manager, locate the multi registry string (REG_MULTI_SZ) named BootExecute. You need to make sure its Value data is set to autocheck autochk *. If its Value data is already set to that value, and still you are facing the problem, you can set it to autocheck autochk /k:C * instead.
4. Close the Registry Editor and reboot your system to make changes effective.
After restarting the system, you will no longer face this problem.
Hope this helps!


Hey Kapil, thanks for your post. In my case Stage 1 is running since more than a day, it is progressing very slowly….. at this stage it is not allowing me to go to command prompt, should I wait until everything finishes…. or is there any other way out?
I have SSD – two drives (This computer is old, but performance wise never had an issue). Though since last some days if I was not working on it for 10-15 mints, it would automatically restart. Thought to share as this restarting might be related to this current fixing (C:) drive issue.