By default, Mac no longer supports the Shift+Delete shortcut to delete files or folders permanently. In Windows, its handy to use the same shortcut to erase files without moving them to trash and then delete permanently. In this guide, we’ll see how to add a permanently delete option to the context menu of files or folders in Mac, so that using it, you can easily delete a file permanently. Have a look, what we’re going to do:

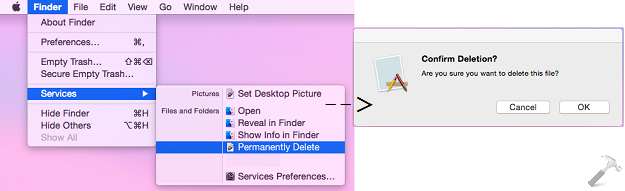
But just adding the permanently delete option isn’t enough, because if we accidentally chosen this option, we would immediately loose the file or folder. Hence, we need to add a confirmation prompt as well, which pops up when you click permanently delete option, like this way:
So without wasting any more time, here is the how-to part:
TIP : Add “Permanently Delete” Option To Context Menus In Mac
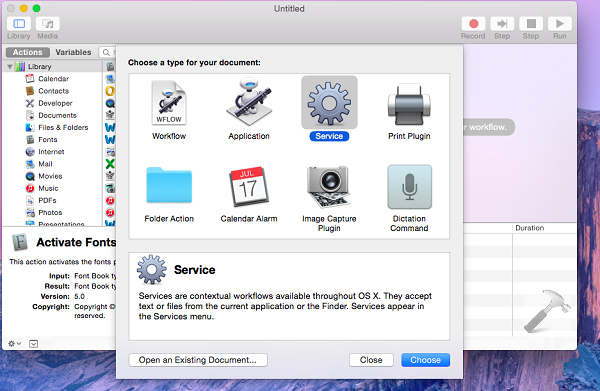
1. Search for Automator in your Mac and open it. Choose Service as new document type:
2. Moving on, first choose the option files or folders for Service receives selected label and choose Finder.app for in label. Now from the left pane options, search Ask for confirmation and pick the same. You can now add you own messages which should appear at delete confirmation prompt, as shown in below image:

3. Finally and more importantly, we have to add the script which deletes content by skipping Trash folder. So from the left pane, choose Run Shell script. Now in the workspace, select /bin/bash option for Shell. Also set Pass input to as arguments and now add following code in the script box:
for f in “$@”
do
rm -rf “$f”
done
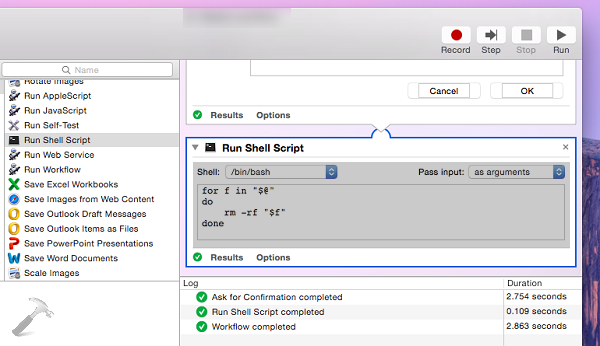
We’re almost done now and our script is ready to work. You can now click Run to test the script. Save this Automator service and go to any file or folder, right click and you’ll get the permanently delete option there.
That’s it!