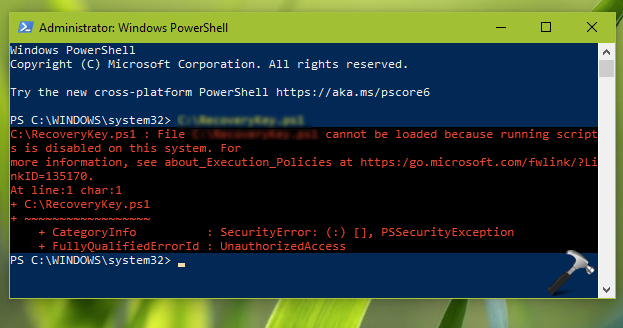
By default, Windows will not allow you to run PowerShell scripts on your system. When you try to run any of the PowerShell scripts, you’ll receive an error saying that scripting is disabled on the system.
Here is the screenshot of such error:
So how you can allow running PowerShell scripts in such case. Well, to do that, you need to change Windows PowerShell execution policy. Following values are possible for execution policy:
- AllSigned: This value means all scripts plus configuration files needs to be signed in by trusted publisher.
- Bypass: It means no warnings and nothing is blocked.
- RemoteSigned: This value means all scripts plus configuration files downloaded from the Internet needs to be signed in by a trusted publisher.
- Restricted: This value means you’re not allowed to run any configuration files or scripts.
- Default: This value means default execution policy. On Windows client edition, this is set to Restricted, while on Windows Server editions, it is set to RemoteSigned.
- Undefined: This means no execution policy is set. When Undefined value is used, the Restricted value is in effect.
- Unrestricted: There is no restriction and you can run all configuration files and runs all scripts. For an unsigned script from the Internet, you may prompted for permissions to run it.
To change Windows PowerShell execution policy, try either of methods mentioned below:
Page Contents
Change PowerShell Execution Policy In Windows
Method 1 – Change PowerShell Execution Policy Using Windows PowerShell
1. Right click Start Button or press  + X keys and select Windows PowerShell (Admin).
2. In administrative Windows PowerShell window, paste following and press Enter key:
Set-ExecutionPolicy <VALUE>
Substitute <VALUE> with values described in the above section.
For example, to set execution policy to RemoteSigned, I’d execute Set-ExecutionPolicy RemoteSigned command.

3. While changing execution policy, you’ll asked for confirmation. Type Y to confirm the option.
In this way, you’ve successfully changed execution policy. You can now close Windows PowerShell.
Method 2 – Change PowerShell Execution Policy Using Registry
We recommend you to create a System Restore point first, before editing registry.
1. Press + R and type regedit in Run dialog box to open Registry Editor. Click OK.
2. Go to registry location HKEY_LOCAL_MACHINE\SOFTWARE\Microsoft\PowerShell\1\ShellIds\Microsoft.PowerShell.
3. In the right pane, look for ExecutionPolicy named registry string. Double click on it and set any of these values as per your requirement: AllSigned, Bypass, RemoteSigned, Restricted, Default, Undefined, Unrestricted.
4. Close Registry Editor and reboot to make changes effective.
That’s it!