If your laptop is equipped with light sensor, it can detect light level at surroundings. So the sensor can use changes in surrounding light level to change brightness of your system automatically. This feature is called adaptive brightness. The main aim of this feature is adjust your system brightness accordingly to surrounding light.
This feature is only available on devices equipped with light sensor. In this article, we’ll show you how you can enable adaptive brightness in your Windows 10.
Page Contents
Enable Adaptive Brightness In Windows 10
Method 1 – Using Settings App
1. Right click Start Button or press  + X keys and select Settings.
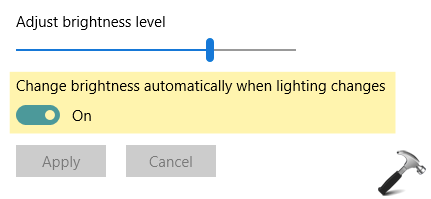
2. In the Settings app, navigate to System > Display.
3. In the right pane of Display, Under Brightness and color, turn On the Change brightness automatically when lighting changes option to enable adaptive brightness or turn Off the option to disable it. Click Apply.
4. Your setting would be saved and applied immediately. So you can now exit Settings app.
Method 2 – Using Power Options
1. On Taskbar, right click battery or power icon and select Power options. If battery icon is missing from taskbar, refer this fix first.
2. In the Power Options window, pick a power plan and click Change plan settings link.
3. Under Edit Plan Settings window, click Change advanced power settings link.
4. Moving on, in Power Options window, expand Enable adaptive brightness. Set the options On battery and Plugged in to On or Off to enable or disable adaptive brightness, respectively.

5. Click Apply, followed by OK.
Method 3 – Using Intel HD Control Panel
If you’ve Intel HD Graphics card installed, you can use these steps to activate adaptive brightness.
1. Go to Desktop, right click and select Intel Graphics Settings option.
2. In the Dashboard, click on Power icon.
3. In the ‘On Battery’ section, change slider for Display Power Saving Technology and Enable it to activate adaptive brightness. Click Apply.
4. Similarly, go to ‘Plugged In’ section and turn on adaptive brightness.
That’s it!