
If you’re not able to install or upgrade your Windows 11 to a latest version i.e. Version 25H2 as of today, this article may interest you. During the process of upgrade or installation, you might receive We couldn’t update system reserved partition error. In this article, we will see how you can deal with this message and complete your upgrade or installation.
Here is the error screenshot:
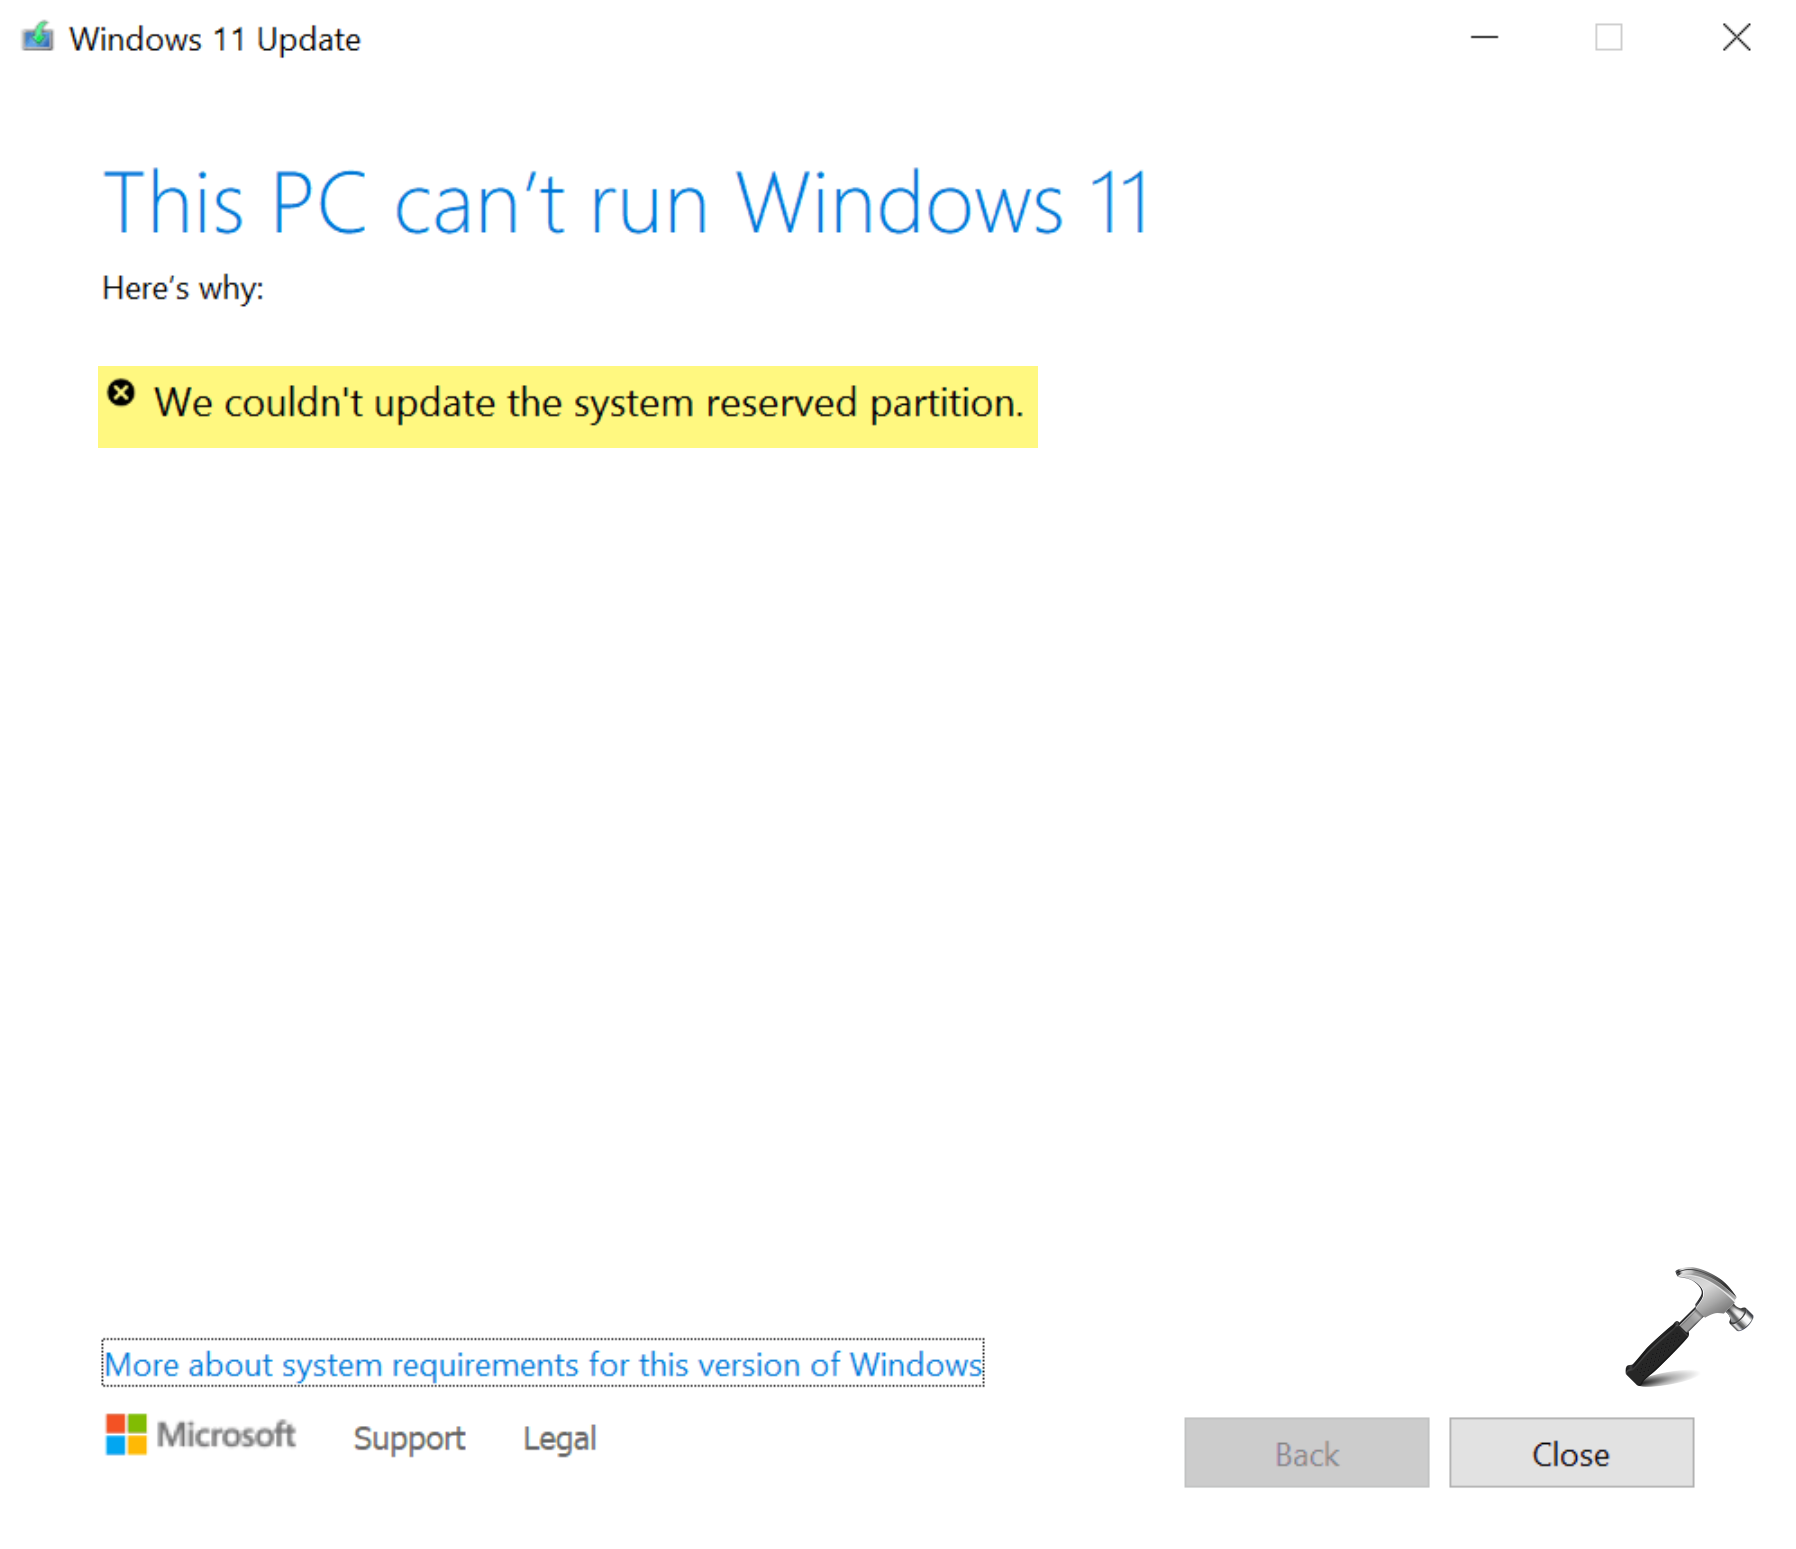
This error code is often accompanied with error code 0xc1900104, or error code 0x800f0922. When this error appears, you won’t be able to proceed further while installing or updating your Windows 11. You have to apply below fix first then you can retry the installation or upgrade process.
Page Contents
Fix: We couldn’t update system reserved partition in Windows 11
Reasons behind this error
Now let’s get to the basics first. Here, the System Reserved Partition (SRP) is a small partition on your Windows installation not having any drive letter assigned and is hidden. It has basically two things:
- The Boot Manager and Boot Configuration Data: When your computer starts, the Windows Boot Manager reads the boot data from the Boot Configuration Data (BCD) Store. This helps you to start your Windows.
- BitLocker Drive Encryption: When you opt to enable BitLocker Drive Encryption, SRP plays an important role. BitLocker writes data to SRP which help you to start your encrypted Windows installation.
When the SRP is full or doesn’t have a free space, then this error may occur. Some third-party app may write up to SRP and make it full. Once it is full, and when you perform upgrade or installation, the title error may occur.
To resolve this problem, you need to at least free up 15MB, if you’re installing. While if you’re upgrade, make at least 13MB free on SRP.
How to fix System Reserved Partition error?
For Windows 11, you should have System Reserved Partition in GPT partition style. Because Windows 11 can’t be installed with MBR partition style.
Here’s how you fix it:
1. Open administrative Command Prompt, if you’re upgrading. If you’re installing, you can instead use Windows RE Command Prompt.
2. Assign a drive letter ‘Y’ to SRP. Type following and press Enter:
mountvol y: /s
3. Now execute Y: command to go to SRP. Then type following and press Enter:
cd EFI\Microsoft\Boot\Fonts
4. So you should be now in Fonts folder. Execute this command del *.*. This should delete unnecessary fonts and free up space in SRP.
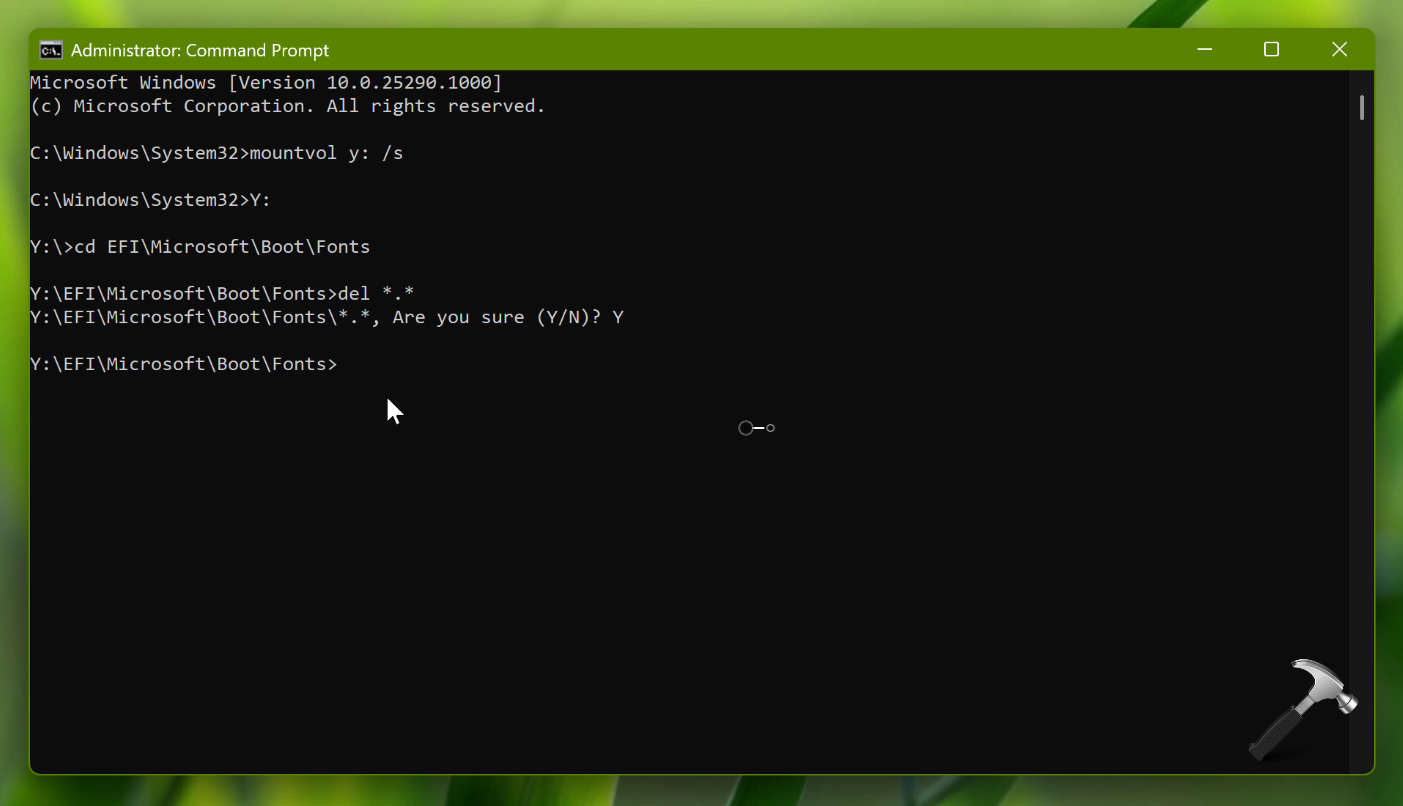
5. You can now close Command Prompt.
Re-try with upgrade or install, and this time error should not occur. With inputs from Microsoft support article.
Video fix
You can also checkout this video fix for further assistance:
That’s it!


Why doesn’t Microsoft fix its known problems! The EFI system restore partition is too small
when Windows 11 creates it. When you need to apply updates then they don’t work. Why don’t you automatically
change the size of that EFI partition when an upgrade requires more space??? You purposefully stop the
user to adjust the partition size in Disk Management. So, how do we fix this MAJOR FLAW YOU CREATED??
It workred! Many thanks. But I agree with Mike that Microsoft could fix it by itself.
^^ Glad it helped 😎
I followed the instructions to delete the fonts on the EFI drive, but more space is still needed. Microsoft gives no hint on the next steps. Right now, I can’t install the Windows 11, 24H2 Update. No idea what to do now.
Same as the others. Even after deleting the fonts, the free space is 14.58 MB and it’s still not enough it seems. I have plenty of other files in my EFI partition but I don’t want to delete a random one and mess up with my working OS boot. Please Microsoft, provide solutions for this, or at least default the EFI to 150MB, as 100MB is obviously not enough. I don’t get why they do such stupid mistake, which they are aware of since they offer to delete the fonts. Like, why are the fonts here in the first place if they are disposable ?
What a mess Microsoft has made with windows 11. It is so complicate the even their hotshots at Microsoft can’t fix the messes they have introduced with each so called upgrade, or fix, or whatever the reasons they keep messing with it. It is just plain crazy and does not make sense. The average person on the street user (80 percent of users) are overwhelmed by what is going on. Let us re-release Windows XP, the best there was, and start over. I personally am going to buy an Apple Mac and make my computer life much easier even though they are expensive but will sure save a lot of Microsoft’s terrible programming problems.
It worked! Thank you!
^^ Glad it helped!
That didnt help me at all
I repeated the steps above, but nothing worked. Any other ways to fix it!!!!
After a long time, you just saved a soul. It worked and I’m grateful to you.
^^ Glad to help 😎
Worked perfectly, thank you for this
^^ Glad to help 😎
Hey Kapil. Thank you for this fix. I have tested and run this for some computers in our environment with mixed results. One of my colleagues raised some important concerns about deleting the font files from this partition: Do the deleted files get reloaded at some point? When deleted, does this create issues in the future with booting and/or bitlocker recovery screens? I look forward to hearing from you on this.
^^ Fonts won’t be re-created. These won’t encounter to boot issues as per previous experiences. Fonts are the safest files to resolve this issue.
Perfekt bro Dankeschön ,nach ewigen hin und her bin ich hier gelandet, und du hast es so easy gezeigt und erklärt . kann diese scheiss 24H2 endlich installieren . dankeschön
Microsoft sollte dich dafür bezahlen das du ihre drecksarbeit gemacht hast .
^^ Freut mich, dass ich helfen konnte!
I ran the fix as you suggested, but it did not solve the problem. I note that the reserve partition before and after the fix was listed as healthy, and 100 percent free. Any other suggestions?
Sadly this is a known “workaround” that doesn’t work in some cases. When I try to mount the EFI I get the all too common “The parameter is incorrect” in spite of all parameters being correct “mountvol y: /s”
How about instructions on how to increase the size of the partition?
G’day, Yes, I too am in the camp for which removing the .fonts files only leaves the available space in the system reserve partition with some 13.7MB. As others have documented apparently the 15MB value is fixed.
As a next step I attempted a “Reset This PC”. Alas…No Joy…the process begins normally but eventually ends and indicates that the reset was unsuccessful and the original O.S. is returned. So no lost functionality but no progress on the “insufficient SRP” problem.
I’m thinking there may be two options:
1) Create a boot disk and boot from that in order to Reset this PC back onto the solid state drive.
2) Look for a third party utility that ACTUALLY CAN alter the size of the SRP partition. I am reluctant because of an inherent fear of utilities carrying their own agenda and repartitioning this very important directory seems risky. I’ll need to do some serious research.
I’d welcome your thoughts. :)
did exactly that but still the same error, ie doesn’t work.
Hello,
Trying to update to Windows 11 version 24H2 and keep getting this same SRP error message and “Install error – 0xc1900201” problems. I’ve cleaned the SRP of fonts as demonstrated above aswell as anything else useless I could find on it. Currently have 33MB of free space on disk 0 partition 1, surely this is enough?
Any advice/help would be much appreciated. Thank you!
-Jager Hawkins
GOD! YOU SAVED ME!!!!
This worked for me but could you update one thing, can you add Y: to the “cd EFI\Microsoft\Boot\Fonts” so it will take you automatically to the Fonts folder on the Y drive
Just use the free version of Aomei.
Guide here:
[LINK REMOVED]
How about Microsoft fixing this issue? Why don’t they fix it!!