The volume slider is a vital tool for regulating the audio output on your computer. Yet, there are instances where you may encounter issues with it. There are several troubleshooting steps to address this issue and restore the functionality of the volume slider. Below, we’ll outline some effective fixes to fix the Windows 11 volume slider not working to help you resolve the problem and regain control over your audio settings.
The volume slider is a fundamental component of audio control in computing devices. It offers users a simple and intuitive way to manage their audio output levels for a better listening experience.

Issues with the volume slider in Windows 11 can occur due to various reasons, including
- Software glitches or bugs within the operating system
- Conflicts with other programs or drivers
- Corrupted system files
- Incorrect settings or configurations
- Updates or changes to the operating system
- Hardware-related issues such as faulty audio drivers or malfunctioning sound cards
- Hardware compatibility issues
Page Contents
Fix: Windows 11 volume slider not working
Below are some solutions to resolve the issue:
Fix 1: Restart the PC
Rebooting the system can effectively resolve various issues and temporary bugs that may be affecting the functionality of the volume slider. When you restart your PC, it closes all running programs and processes, clears temporary files, and resets system configurations. This action can help refresh the operating system and its components, potentially resolving any underlying issues causing the volume slider to malfunction.
Fix 2: Restart Windows Explorer
1. Open Task Manager and go to the “Processes” tab.
2. Right-click on “Windows Explorer” and click on “Restart“.

Fix 3: Update Windows
1. Open the Settings App and go to “Windows Update“.
2. Click on “Check for updates“.

Windows will check and install the latest update.
Fix 4: Re-enable Audio Device
1. Press the Windows key + X. Select “Device Manager“.
2. Expand the “Sound, video, and game controllers” option.
3. Right-click on the Audio device and click “Disable device“.

4. A dialog box will appear. Click on “Yes” to confirm.

5. Again, right-click on the audio device and click “Enable device“.
Fx 5: Re-Install Audio Device
1. Press the Windows key + X. Select “Device Manager“.
2. Expand the “Sound, video, and game controllers” option.
3. Right-click on the Audio device and click “Uninstall device“.

4. A dialog box will appear. Click on “Uninstall” to confirm.

Restart the PC and the device will automatically be installed.
Fix 6: Run Audio Troubleshooter
1. Navigate to “Settings => System => Troubleshoot”.
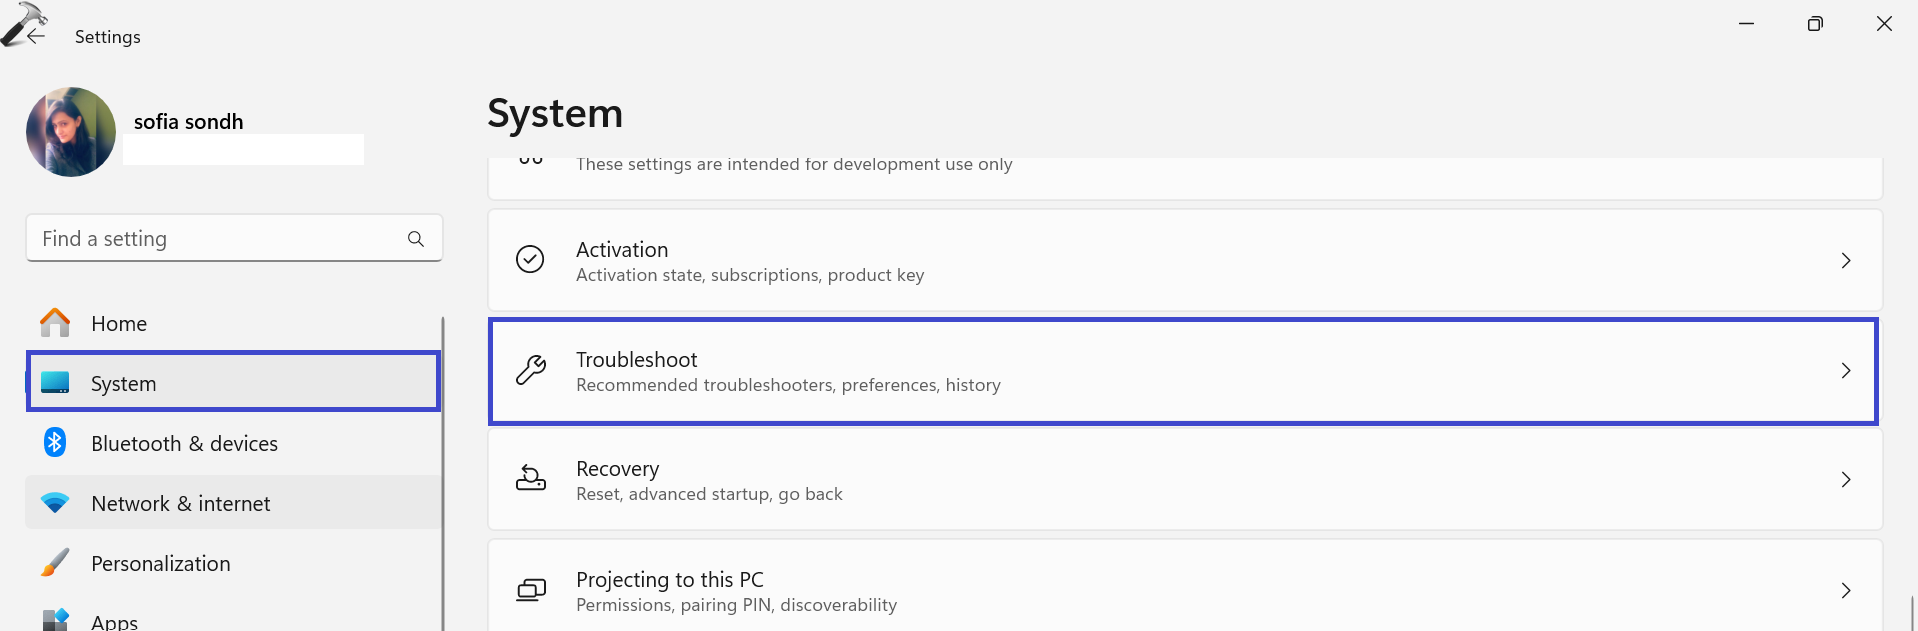
2. Click on “Other troubleshooters“.

3. Now, click on “Run” next to Audio.

Fix 7: Reset Audio Settings to Default Values
1. Navigate to “Settings => System => Sound“.

2. Scroll down to the “Advanced” section. Click on “Volume mixer“.

3. After that, click on the “Reset” option.

That’s It!