Some of the technologies you will use on your Windows may require matching of cipher suites. For example, Microsoft 365 and Azure provides slightly different support for cipher suites. Hence, it is really important that you properly configure SSL cipher suite order in Windows so that you can use these technologies seamlessly. In this article, we will use the policy to configure SSL cipher suite order as per your requirement.
Basically, a cipher suite has its own unique name using which we can recognize it. This name describes the algorithmic contents for the cipher suite. To understand what cipher suite represents, let us take example of TLS_ECDHE_RSA_WITH_AES_256_GCM_SHA384.
This cipher suite represents following information:
- TLS defines the protocol for the cipher suite.
- ECDHE indicates the key exchange algorithm being used.
- RSA authentication mechanism during the handshake.
- AES is the session cipher.
- 256 session encryption key size (bits) for cipher.
- GCM type of encryption (cipher-block dependency and additional options).
- SHA (SHA3) is hash function and it indicates the message authentication algorithm which is used to authenticate a message.
- 384 Digest size (bits).
Now back to Windows, we have a default SSL cipher suite order configured. It is used by Windows in all scenarios. However, if you ever need to customize this order, you can try below mentioned steps. This will help you prioritize a cipher suite of your choice.
How to configure SSL cipher suite order in Windows
1. Open GPO Editor by running gpedit.msc in Windows client edition and by using gpmc.msc command in Windows Server.
2. Next, open the GPO Editor window, navigate here:
Computer Configuration > Administrative Templates > Network > SSL Configuration Settings
Note: You should have Policies folder after Computer Configuration, if you’re on Windows Server.

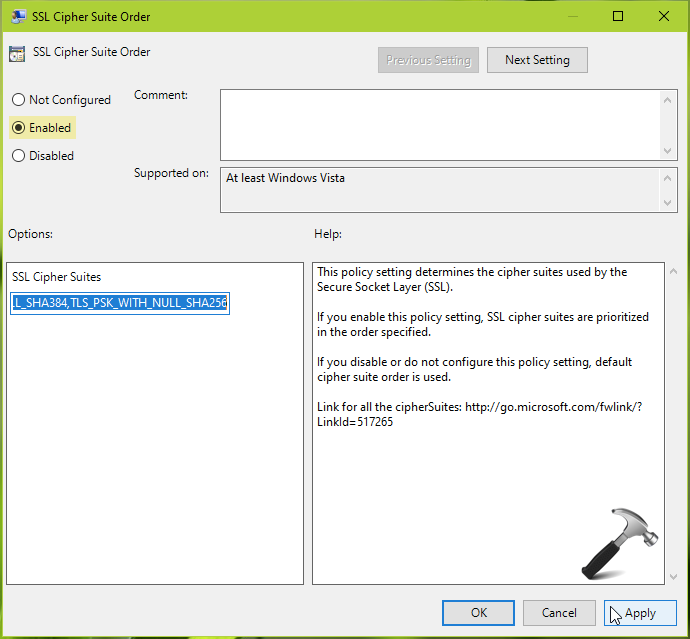
3. In the right pane of SSL Configuration Settings, locate the policy setting named SSL Cipher Suite Order. Double click on it and select Enabled. Now under Options, you’ll find a text box for SSL Cipher Suites. Click inside it and press CTRL+A and select all text. Copy this text and paste it to a Notepad file. Save the file so that we can use it for backup purpose anytime. Now press Delete key and enter the desired SSL cipher suite order in the SSL Cipher Suites box. Click Apply, OK.
4. Exit the GPO Editor and reboot your system.
After restarting the system, Windows will use your desired SSL cipher suite order.
That’s it!
Read next: Generate self-signed SSL certificate in Windows 10/Server.