
In Windows operating system, there are different type of system accounts present. Apart from the accounts you create on the operating system, there are several system accounts which are necessary for the system operation. Among these accounts, built-in administrator account is one such account. It is the hidden built-in default local administrator account and is an elevated account with administrative rights. The built-in administrator account is a system account and hence it does not require UAC permissions for operations. In this article, we’ll see how to enable built-in administrator in Windows 11.
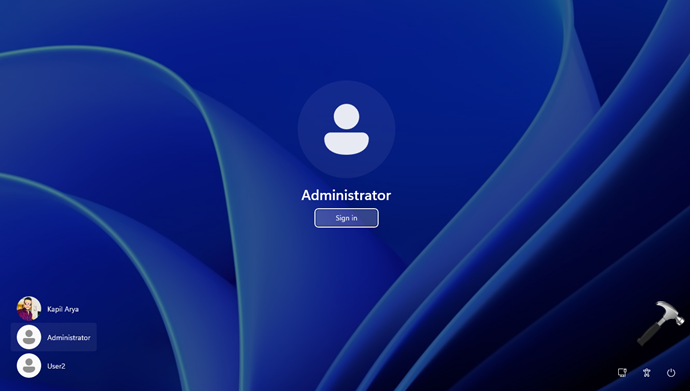
When you enable built-in administrator account, you can see it with Administrator name:
You can enable built-in administrator account with or without password. Enable this administrator account only when you are in trouble with the operating system. Don’t use this account for everyday usage. Especially, if you have lost administrative rights or if there are no admin accounts left on the system, you can enable this savior account to gain administrative rights back.
Here are the easiest methods to enable this hidden account.
Page Contents
How to enable built-in administrator in Windows 11
Method 1: Using Command Prompt
- Right click on the Start Button and select Windows Terminal (Admin).
- In Windows Terminal, click on drop-down icon and select Command Prompt.
- Type following command and press Enter key:
net user Administrator /active:yes

Once the command has been completed successfully, the built-in administrator account should be enabled on the system.
In case if you want to enable built-in administrator account with password, execute following command instead of the above one:
net user Administrator <password> /active:yes
In the above command, you need to substitute <password> with the actual password you want to use with the administrator account.
If you later want to disable built-in administrator account, you can use following command in that case:
net user Administrator /active:no
Method 2: Using LUSRMGR Snap-in
1. Right click Start Button and select Run. Type lusrmgr.msc in Run dialog box to open Local Users and Groups snap-in. Click OK.
2. In Local Users and Groups snap-in, go to Users folder and locate Administrator account. Right click on it and select Properties.

3. On the property sheet, at General tab, uncheck Account is disabled option. Click Apply, OK.

Once you execute above mentioned steps, the built-in administrator account it should be enabled on your system.
Video guide
You can check out following video for live demonstration of Method 1 and also check the additional registry method to enable built in administrator account:
That’s it!
Originally released on Feb 14, 2022.


When I right click on windows terminal (admin) nothing happens.
When I try the second option it tells me that the system can not access <windows\system32\lusrmgr.msc
Okay so i am trying to do this because the issue that I am having is that I really cant do anything, I cant do updates, my windows hello doesnt work, although my account is the primary and it shows administrator, I have no administrator rights, everything I try to do even the two suggestions listed on this page return a cant acces <windows\systems32\ and then what ever file directory name i am trying to go into. I cant do a system reset, or restore, I cant get into the registry, nothing works in command prompt, when i first turn on my computer and everything loads fine, I log in and then my screen goes blank, i have to wait for sometimes a minute sometimes 5 minutes and sometimes longer but then my screen will come on, it wont let me download apps, or even file or what have you well if its a file like the windows creation tool it will download it but then when i click on it it brings to me to the app store. I cant even connect with microsoft with quick assist with without getting the cant access the windows system 32 error.
^^ Check the video attached and enable the built-in admin using advanced recovery options.