

We all know that Windows Spotlight feature in Windows 10 automatically displays fresh images on lock screen, if it is enabled. We’ve also shared the fix, in case if Windows Spotlight feature is not working for you. Here is the link to that fix:
Fix: Windows Spotlight not working in Windows 10
Now in this article, we’ll show how you can reset Windows Spotlight feature to default or factory configuration. Re-registering or resetting Windows Spotlight will be particularity useful for you, in case if fixes mentioned in above linked article couldn’t help you. In order to re-register Windows Spotlight, you need to work with few commands and you’ve Windows Spotlight at its initial configuration. Since these commands includes PowerShell version, you can easily deploy it in domain environment as well.
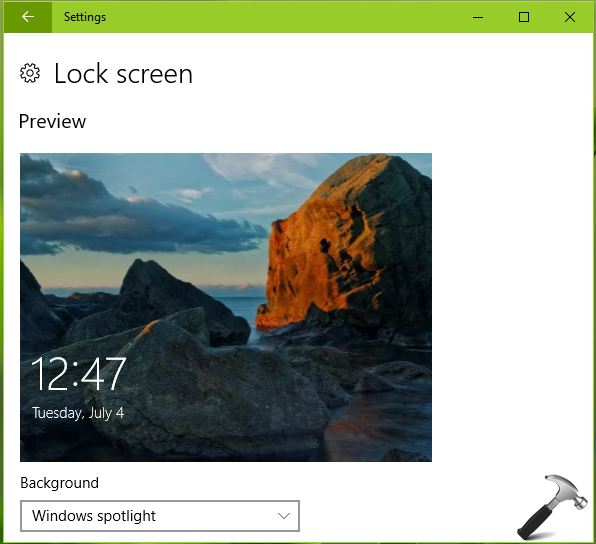
So here is how you can reset/re-register Windows Spotlight:
How To Re-register Windows Spotlight In Windows 10
1. Open administrative Command Prompt.
2. Type or paste the following command and press Enter key:
DEL /F /S /Q /A "%USERPROFILE%/AppData\Local\Packages\Microsoft.Windows.ContentDeliveryManager_cw5n1h2txyewy\LocalState\Assets"
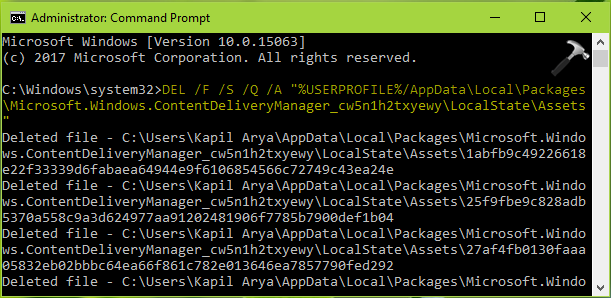
3. Once the above mentioned command executed, type in another similar command and hit Enter key:
DEL /F /S /Q /A "%USERPROFILE%/AppData\Local\Packages\Microsoft.Windows.ContentDeliveryManager_cw5n1h2txyewy\Settings"
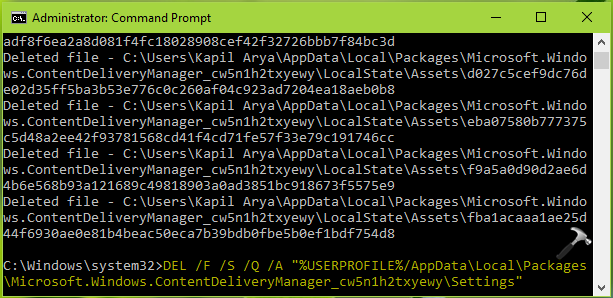
Once this command execution is successful, close Command Prompt.
4. Open Windows PowerShell and type in or paste following cmdlet and press Enter key then to execute it:
Get-AppxPackage -Name Microsoft.Windows.ContentDeliveryManager | Foreach {Add-AppxPackage -DisableDevelopmentMode -Register "$($_.InstallLocation)\AppXManifest.xml" -Verbose}
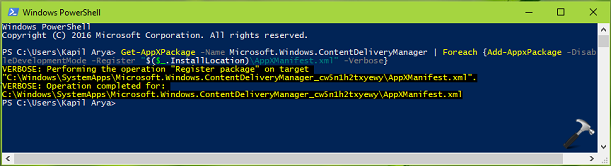
Close Windows PowerShell and reboot your machine. After restarting the machine, select Windows Spotlight against Background for your Lock Screen, under Settings app. We’re pretty sure that this time Windows Spotlight will work as you expect from it.
That’s it!

Unfortunately, the above Fix also did not work. When I log on with another nUser account, the Windows Spotlight does work.
Worked for me. Windows Spotlight was out since update to Windows 10 1703. Excellent !!
^^ Glad we could help 😎
I have the same problem with my Spotligt images. This solution doesn’t help. I see that the registry option that contains the path to asset folder is wrong.
Then go to the registry location “hkey_current_user\software\microsoft\windows\currentversion\lock screen” There you will find the “Creative” subkey. Export that ENTIRE subkey to make a backup. I then deleted the entire Subkey “Creative”. Then re-enabled Windows Spotlight. It then started to work for me. I then Looked back at the Registry, and the subkey “Creative”was recreated by Windows.
Wen I delete the key creative and re enable Spotlight the value sof the paths are
C:\Windows\SystemApps\Microsoft.Windows.ContentDeliveryManager_cw5n1h2txyewy
Instead off:
C:\Users\\AppData\Local\Packages\Microsoft.Windows.ContentDeliveryManager_cw5n1h2txyewy
^^ Thanks for your inputs on this 😊
This was no fix for me. I still have the problem. I ended up creating a new user account.
^^ Glad the issue finally sorted 😊
This fix worked for me.
However I have been having an ongoing battle since spotlight was introduced. It’s a great feature I love being shown a new photo every-so-often, but it is getting to be more trouble than its worth. Even a fresh install of windows does not seem to have resolved the issue, I can only assume that it has something to do with me linking my Microsoft Account to this PC and others.
I am fairly certain that in approximately 2 – 3 months I will again be greeted with the default cave overlooking the beach photo. I will try this fix again and would be willing to bet money that it does not resolve it a second time as has been the case with other fixes I have tried.
^^ Apperciate your comment, glad I could help 😊
For me, I had to run CMD as Administrator and then from the CMD Administrator command line I typed POWERSHELL <ENTER) and then the following: Get-AppxPackage -Name Microsoft.Windows.ContentDeliveryManager | Foreach {Add-AppxPackage -DisableDevelopmentMode -Register "$($_.InstallLocation)\AppXManifest.xml" -Verbose}
It did not work when I chose Powershell from right click on the Windows Start Menu. Why, I don't know but it's working now… Thanks….
^^ Thanks for sharing this, glad it worked finally 😊
Hi, Kapil
Your solution didn’t work for me. I can see spotlight pictures when I press win key+l, but they don’t show up at windows startup. Any suggestions?
Thanks.
^^ You may try the in-place upgrade: https://www.kapilarya.com/how-to-repair-windows-10-using-in-place-upgrade and see if it helps you.
Thanks for the tip, Kapil
Unfortunately I can’t upgrade in place because in the pop-up ‘Choose what to keep’ window there is a message which reads: «You can’t keep Windows settings, personal files and apps because your current version of Windows might be installed in an unsupported directory».
I absolutely don’t have a clue what is that suppose to mean. The only way to proceed is to choose ‘Nothing’-the other two options are inactive. This means that I will loose everything and that is something I don’t want. Is there any workaround?
Much obliged
Worked for me even though the PowerShell command resulted in some error message in red text.
^^ That’s awesome, JCommenter!
After a lot of searching this one worked for me.
Thank you very much
Spyros about:
> Your solution didn’t work for me. I can see spotlight pictures when I press win key+l, but they don’t show up at windows startup. Any suggestions?
In the Lock screen settings at the bottom there is an option:
“Show lock screen background picture on the sign-in screen”
try to set it to On
^^ Thanks for your efforts on this, much appreciated!
Your first solution worked great! Only one problem for me. If I select “not a fan” to move to another picture, The problem returns.
my problem same Tya
when i start up, walpaper locksreen just blank colour
my windows 10 version 1709 build 1629.19
Thanks, that’s magic !
Tried many methods, and without this method, I may wasting may time on other methods !
^^ You’re most welcome 😊
It goes black…. :(
Sadly, still stuck on the same damn Windows Spotlight photo as before.
^^ Tried this already? https://www.kapilarya.com/fix-windows-spotlight-not-working-in-windows-10
I have the same problem (Spotlight\Light Screen not working) with Windows 10 Home version 1709. Without ‘upgrading in place’ or ‘creating a new user’, nothing has worked for me so far. Before resorting to either of these untried methods I think it is worth mentioning that, in my case, after every attempt to fix the problem I have examined the contents of my Assets folder and have found that whilst the folder refills OK, it does not contain any Bing images! Could it be that this is the real source of the problem? Spotlight cannot operate without available images. If so, how can I force the assets folder to update itself fully, complete with images?
Waste of time, this DID NOT WORK
After failing with all the simpler solutions in File Explorer, re-registering Windows Spotlight worked on my desktop PC, but not on my laptop. Guess I’ll just have to keep looking and trying.
^^ You can try in-place upgrade on laptop and see if it fixes the issue: https://www.kapilarya.com/how-to-repair-windows-10-using-in-place-upgrade
Thanks it helped and worked for me I had lost first the info on the spotlight page and then I deleted pictures in the folder accidentally so I was getting no picture I used this fix and another to get it back. Thanks for having it there .
^^ Glad to help Rachel 😎
Worked first time. Thank You. Les
^^ Thanks for your feedback!
My Creative key was already missing upon reaching the registry path commented above:
Computer\HKEY_CURRENT_USER\Software\Microsoft\Windows\CurrentVersion\Lock Screen
Can someone explain how to recreate it?
I have tried clearing the config files and image path.
I’ve tried running the Powershell script to reset and reinstall.
Nothing works.
Also, I should mention that this all started after an Active Directory migration was done on my machine using Microsoft’s ADMT. I believe that whomever designed the profile, did not account for Windows 10 machines, only 7 and 8.
This procedure fixed my issue the first time. Work without any problem. Thank you for your advice,
^^ Glad to help Henry!
The instructions from William Cook worked for me. Something strange with having to get into PowerShell from the Admin Command prompt to issue the command.
For me, I had to run CMD as Administrator and then from the CMD Administrator command line I typed POWERSHELL <ENTER) and then the following: Get-AppxPackage -Name Microsoft.Windows.ContentDeliveryManager | Foreach {Add-AppxPackage -DisableDevelopmentMode -Register "$($_.InstallLocation)\AppXManifest.xml" -Verbose}
^^ Glad the issue is resolved. By the way, you can directly open administrative Windows PowerShell and run the cmdlet.
It hepled thanks
^^ Glad it helped!
Didn’t work for me on Windows 10 2004.😢
I tried and it did not work. I even contacted the technician and it was somehow working, but as soon as I clicked on “I do not like the image” it went back to the usual error and it stopped working.
and now Microsoft support says we need to find a solution on our own. I had recently updated to Windows 10 ver 2004.
^^ What is the error you got?
In power shell it gives a red text of why it didn’t work. :(