VPN (Virtual Private Network) helps to protect your data from hackers. Many users report that their VPN is not working. This can be because of Firewall blocks, Outdated cached DNS data, and software incompatibility. You can refer this guide to manually set up or configure a VPN on Windows 11. This tutorial will help you to fix Windows 11 VPN not working.
Here are some reasons why VPN is not working in Windows 11:
- Drivers: The system has problematic or corrupted network device drivers
- Windows Firewall: It fully blocks the VPN client network causing your VPN connection to fail.
- Third-party Apps: Third-party can interfere with VPN clients, causing VPN connection problems.
Page Contents
Fix: Windows 11 VPN not working
Method 1: Update Windows
Regular Updates to Windows 11 will fix all the issues. If you are facing issues with VPN, then update your Windows.
1. Open the Settings App and go to “Windows Update”.
2. Now, click on “Check for updates“.
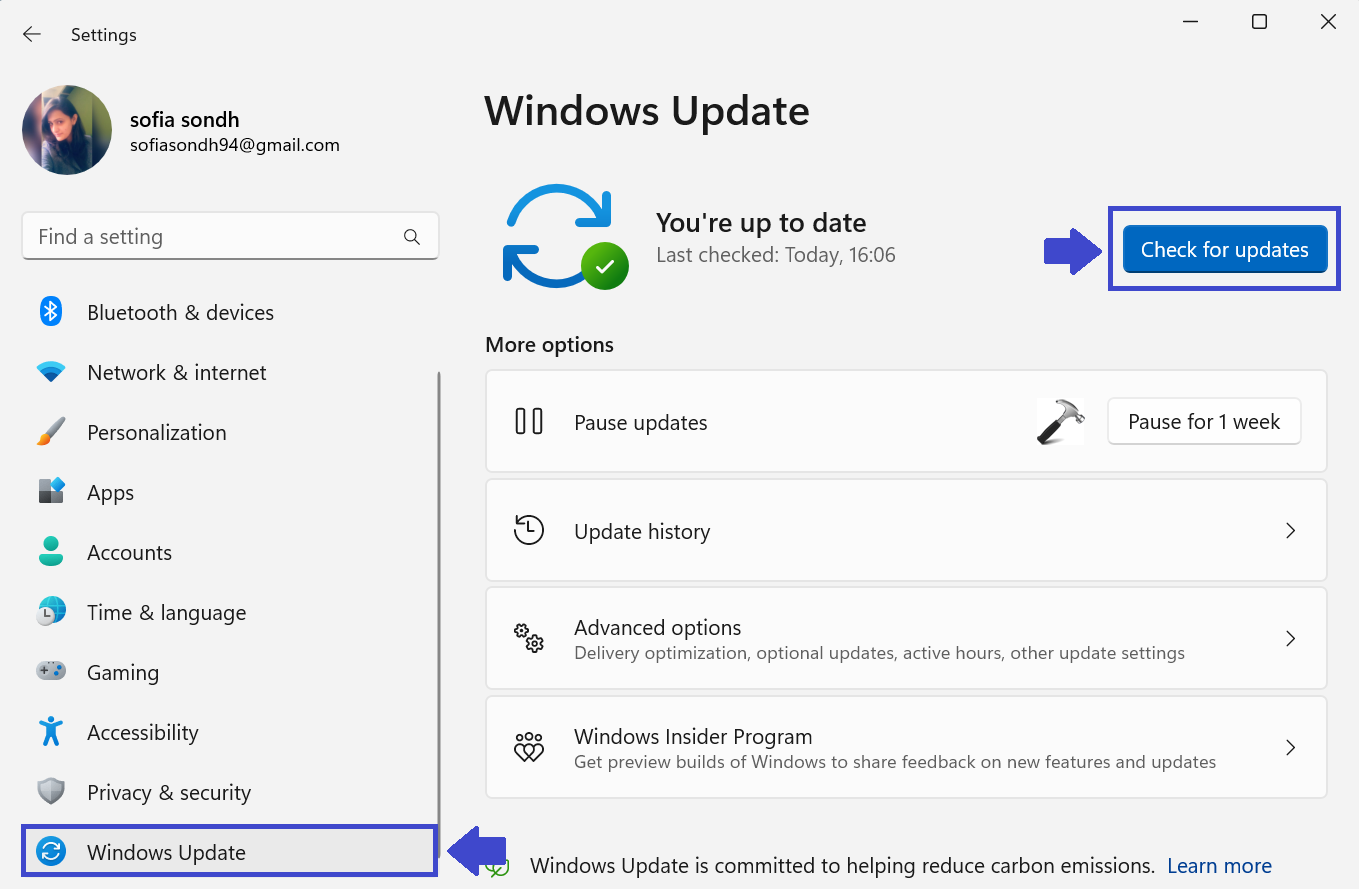
3. If update is available then Windows will download and install the new updates.
4. Restart your PC and then check whether your VPN is working or not.
Method 2: Flush your DNS Cache
Flushing the DNS Cache will remove out-of-date or corrupt DNS settings and can help you to fix your issue. Consider the below steps to flush DNS Cache:
1. Open Command Prompt and select “Run as administrator”.
2. Copy and paste the below command one by one in the sequence it’s shown:
ipconfig /release

ipconfig/ flushdns

ipconfig /renew

netsh int ip reset

4. Now, message will appear to restart the PC. No need to do.
5. Now, type the below command and hit Enter.
netsh winsock reset
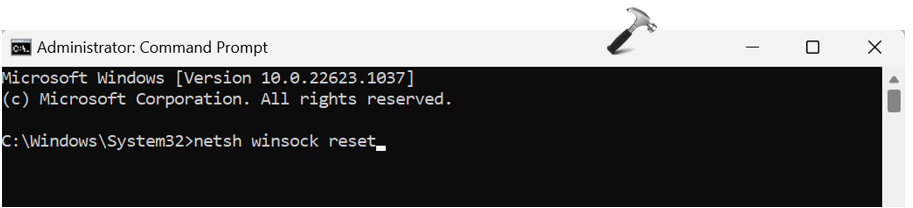
6. Restart your PC to apply the changes. Try VPN. If not working, move to the next solution.
Method 3: Fix Windows 11 VPN not working by Reinstalling WAN Miniport Drivers
WAN Miniport Drivers are the software drivers that are used for making network connections or connections to VPN servers. Re-install the WAN Miniport Drivers to solve your problem.
1. Press the Windows Key + X and select “Device Manager”.
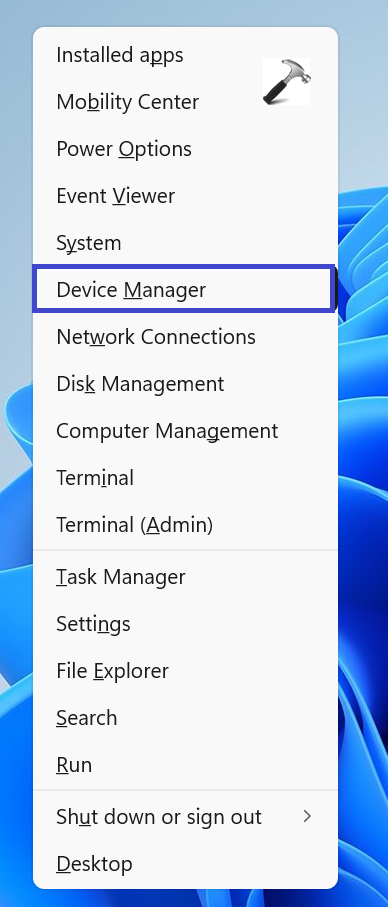
2. Expand the Network Adapters.
3. Now, right-click on “WAN Miniport (IP)” and select Uninstall Device.

4. Also, un-install WAN MiniPort (IPv6) and WAN MiniPort (PPTP).
5. Restart your PC and it will re-install these drivers. Check whether VPN is working or not.
Method 4: Re-install your VPN
Another reason can be some of the corrupted VPN files or accidently deleted files. Un-install and then re-install the VPN provider which will restore all the necessary files for your VPN. Follow the below steps to do so:
1. Open the Settings App and go to Apps.
2. Now, click on “Installed Apps”.

3. Find the VPN provider’s app. Click on three dots (…).
4. Select Uninstall.
5. Once the app is fully un-installed, download it again from the VPN’s official website and then re-install it.
6. Now, check whether VPN is working or not.
Method 5: Disable IPv6
IPv6 offers benefits over IPv4 but can cause some issues. Disable the IPv6 can help you to solve your problem.
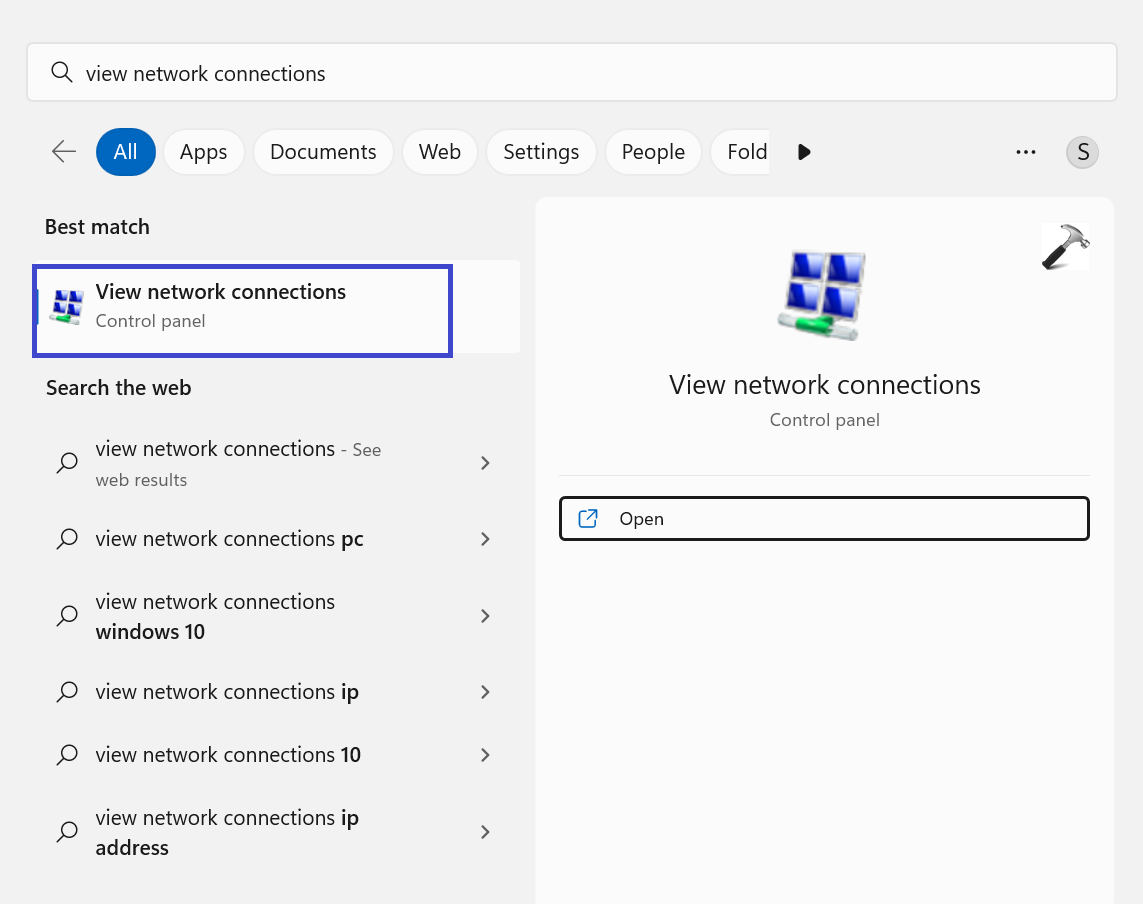
1. Open “View network connections” from the Search menu.
2. Now, right-click on “Proton/VPN” and select Properties.
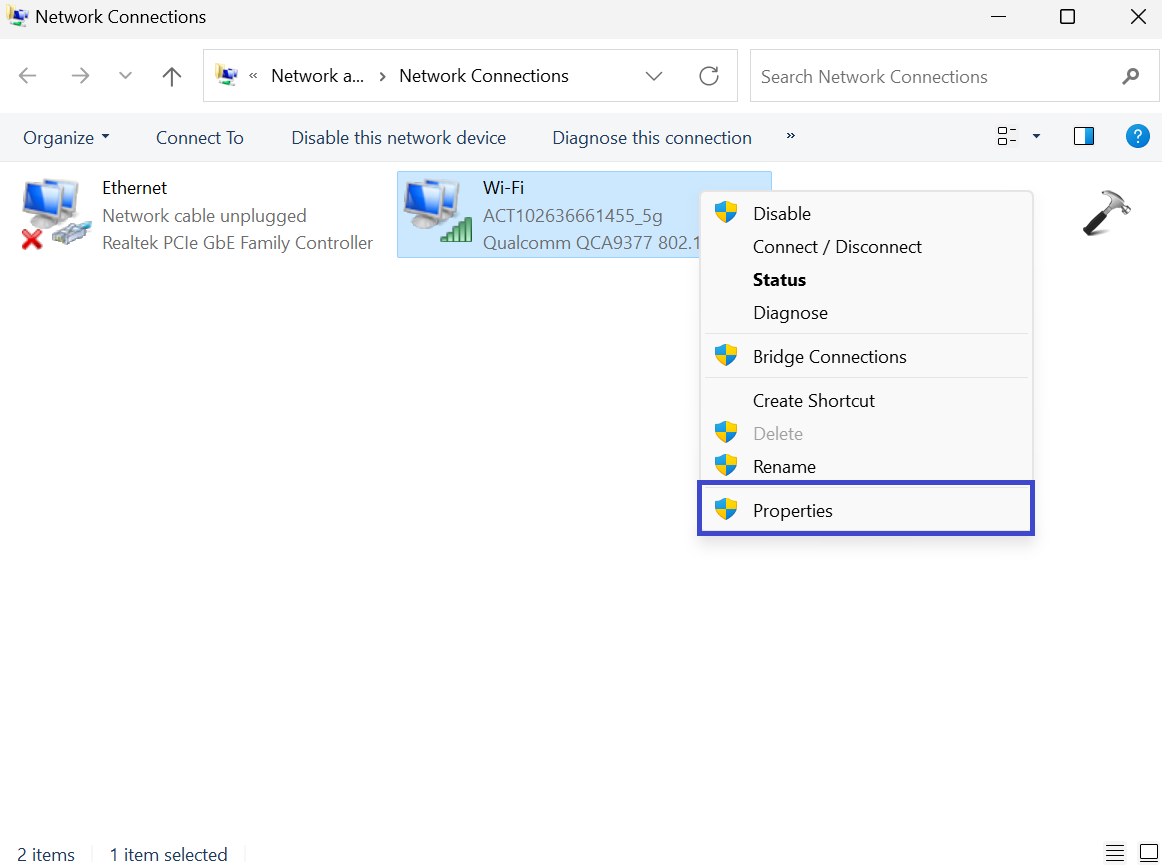
3. Here, uncheck the “Internet Protocol Version 6 (TCP/IPv6)” box.

4. Click OK.
Method 6: Disable Proxy Server Settings
A Proxy Server is a gateway between you and the Internet. Some VPN providers comes with Proxy Server functionality. Disable the Proxy Server to solve the issue. Follow the below steps to disable the Proxy Server Settings:
1. Open the Proxy Settings using Search menu.

2. Go to Manual Proxy Setup.
If “Use a Proxy Server” is on then click Edit.
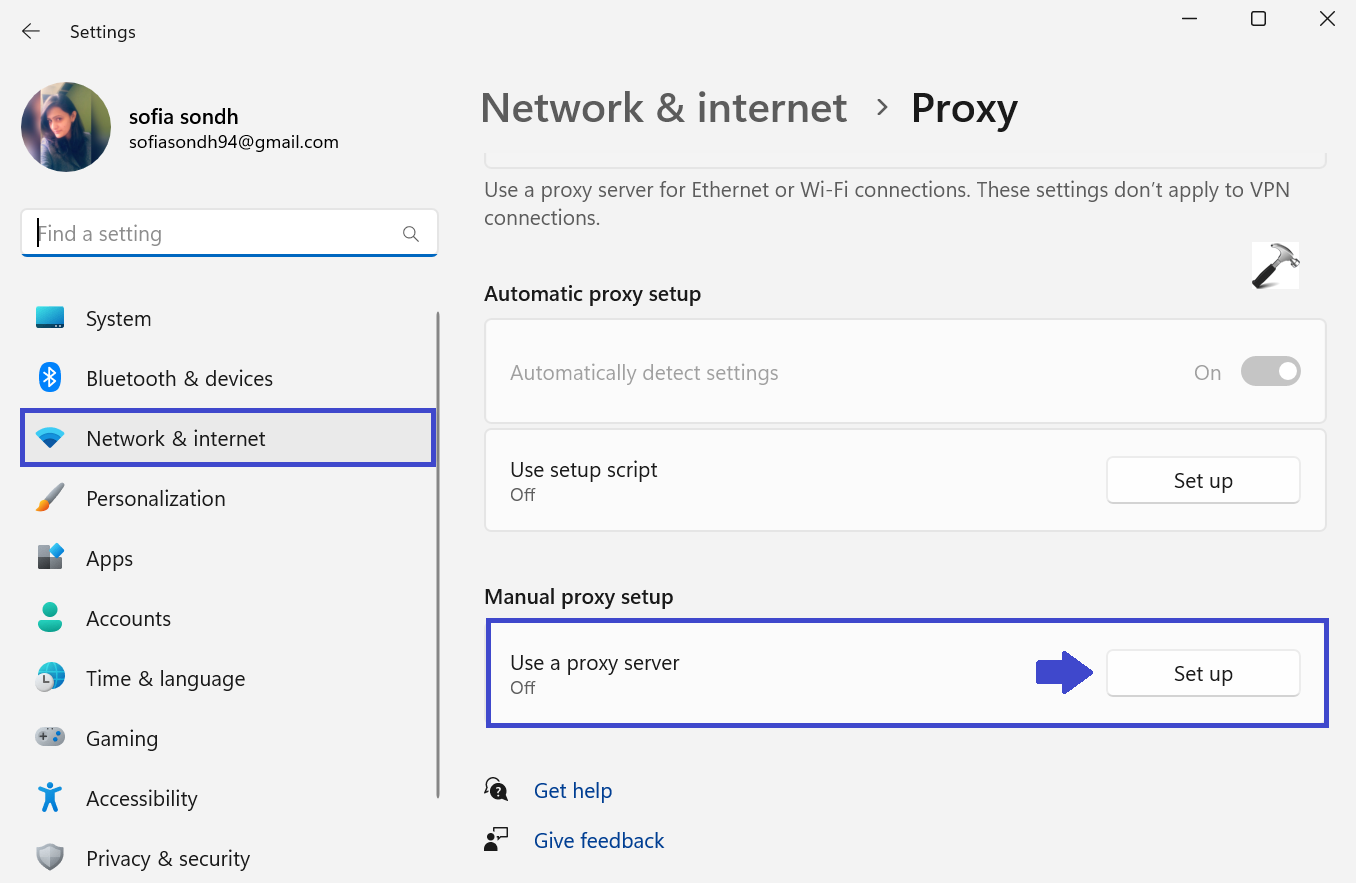
3. Turn off the “Use a Proxy Server”.
4. Click Save and restart your PC. Now, again try your VPN.
Method 7: Disable Windows Firewall
Windows Firewall protects PC and Local Network from malware attacks. Temporarily disable the Windows Firewall to resolve the issue. Follow the steps to disable the Windows Firewall:
1. Open “Windows Defender Firewall” using Search menu.
2. In the left panel, click on “Turn Windows defender Firewall On or Off”.

3. Now, check the “Turn off Windows Defender Firewall” box.

4. Click OK.
5. Close the Windows Defender Firewall Window and restart your PC to apply the settings.
Now, try the VPN. If not working, then try the next solution.
Method 8: Change Windows Firewall Settings
Windows Firewall is used to protect your PC from unauthorized network traffic, reducing the risk of problems from viruses, spyware, and other malicious software. Sometimes your firewall may block your VPN from connecting successfully.
Follow the below steps to configure the firewall to add VPN to authorized list of apps that are allowed to connect through it:
1. Open “Firewall & network protection” from Search menu.
2. Now, click on “Allow an app through the firewall”.

3. Click on “Change Settings”.
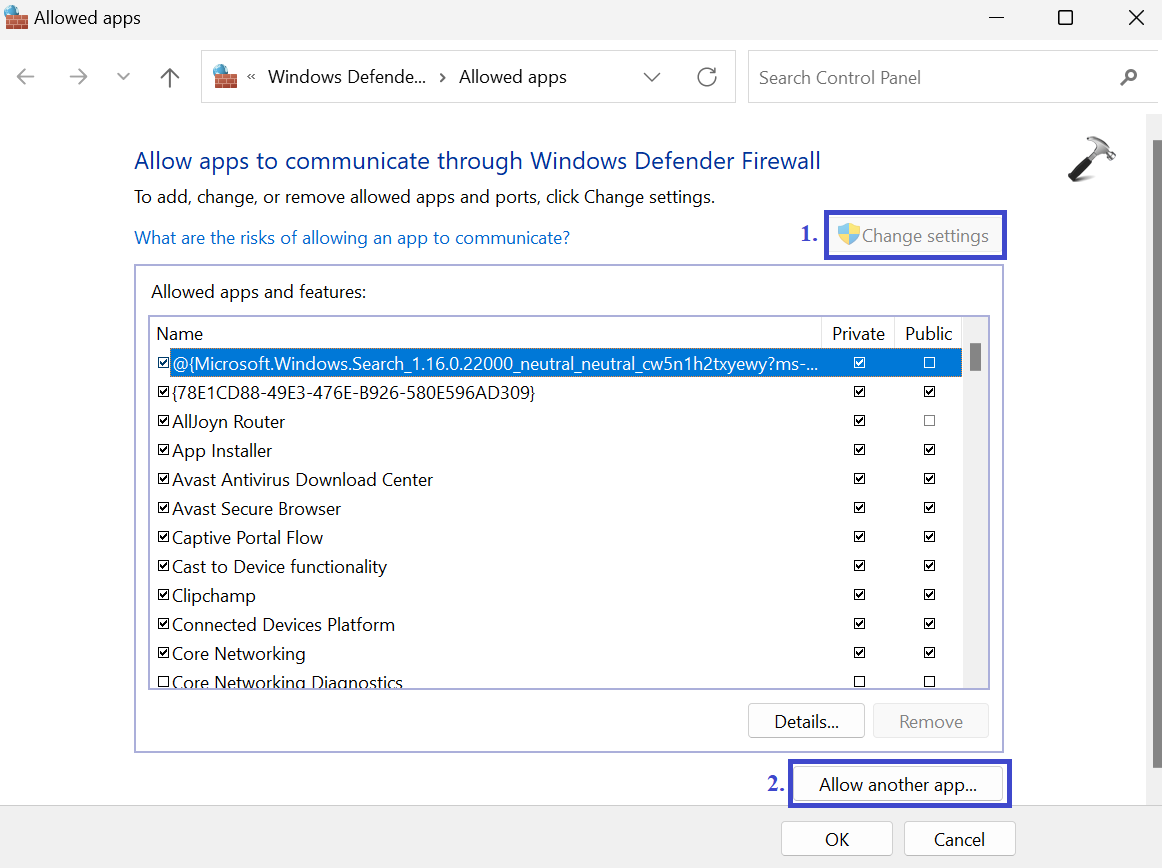
4. Now, click on “Allow another app..”.
5. Click Browse.

6. Navigate to the location of your VPN app and click Open.
7. Now, click on “Add” to allow VPN through the Windows Firewall.
8. Close the Window and restart your PC to apply the settings you made. Try VPN.
Method 9: Configure UDP (User Datagram Protocol) Encapsulation
Your PC might not able to make an L2TP/IPSec connection to the VPN Server. reconfiguring UDP encapsulation in the Registry Editor can solve this problem. Follow the below steps to configure UDP Encapsulation:
1. Press the Windows Key + R. Type regedit.exe and click OK.
2. Navigate the following path:
Computer\HKEY_LOCAL_MACHINE\SYSTEM\CurrentControlSet\Services\PolicyAgent
3. Right-click on “PolicyAgent” and select New => DWORD(32-bit) value.
Type “AssumeUDPEncapsulationContextOnSendRule” and press Enter.
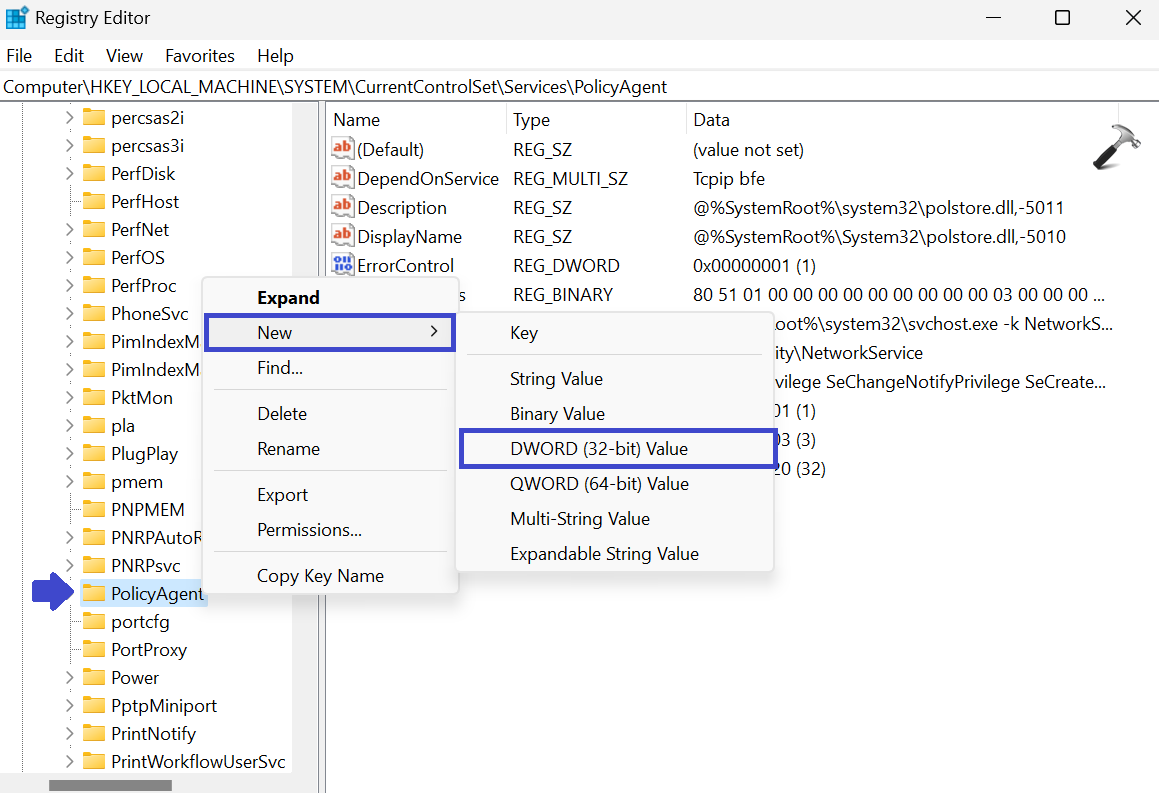
Registry key is created.
4. Now, double-click on “AssumeUDPEncapsulationContextOnSendRule“.
5. Here, set the value to 2 and click OK.

6. Close the Registry Editor and restart your PC to apply the settings. Try your VPN again.
All the above solutions will help you to resolve the issue.
That’s It!

![Fix VPN error 812 on Windows 11/10 [6 practical fixes]](https://www.kapilarya.com/assets/VPN-6-768x684.jpg)