Imagine a scenario. You started to build a project and started compiling some code on your development software. Whenever you try to compile your code, you receive a warning from Windows Security on your Windows 11/10. This warning mentions Your IT administrator requires a security scan of this item. However, there is no item mentioned for this scan. How you can fix this issue? We will see in this article.
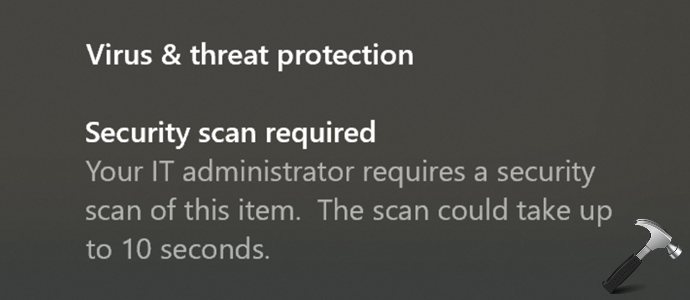
In some cases, if your system is not part of network, you may instead receive Your administrator requires a security scan of this item. The solution for this issue is to add Windows Defender/Security exclusions to all the processes and directories you are using for your development environment. While this gets rather complicated to do on your own and differs depending on your development environment of choice, but in case if you’re using Visual Studio, you can quickly add these exclusions with below fix.
Page Contents
Fix: Your IT administrator requires a security scan of this item
FIX 1 – Add exclusion(s) for your development software processes and directories
- Open the Start Menu.
- Type in Windows Security and select it.
- Click on Virus and threat protection found in the left column.
- Under Virus & threat protection settings, click Manage settings.
- Scroll down to Exclusions.
- Click on Add or remove exclusions then select Add an exclusion.
- Select ‘folder’ as type, then browse to your VSCode file folder you created (e.g., ‘Downloads/VSCode’) and select it.
- Restart VSCode and the problem should be resolved.
- Repeat step 6-8 for another exclusion(s), if you want to add.
FIX 2 – Check Event Log
If you’re not performing any development task, still if you face this issue, it’s time to identify the program/process that triggered the notification.
Follow these steps:
- Open Event Viewer using
eventvwr.execommand - In Event Viewer, go to Applications and Services logs > Microsoft > Windows > Windows Defender > Operational.
- Check with the timestamp, and you should be able to locate the process or program that triggered the notification.
- You can then manage that identified program and fix this issue. You can also add the program to exclusion following similar steps in FIX 1.
Hope this helps!