Are you a Windows user looking for a way to create a bootable USB for your Mac so you can reinstall macOS for troubleshooting or system repair? You’re in the right place! This comprehensive guide will walk you through the simple yet essential steps to create a macOS bootable USB on a Windows 11/10 computer. Whether you’re preparing for a fresh macOS install, needing to run a recovery, or just exploring new tech skills, this tutorial has got you covered. Let’s demystify the process and get your macOS journey started with ease!
Page Contents
Requirements
- A Windows computer running Windows 11/10/7.
- A bootable macOS DMG file, which you can download from Apple or third-party websites.
- A USB flash drive with at least 32 GB of storage capacity. USB 3.0 or 3.1 device is more recommended for fast speed.
- UUByte DMG Editor software.
What is macOS DMG file?
A bootable macOS DMG (Disk Image) file is a digital replica of a physical disk, specifically designed for macOS systems. This file format is used to store compressed software installers, including the macOS operating system itself. When made bootable, this DMG file can be used to install or run macOS directly from an external drive, such as a USB flash drive. This is particularly useful for installing or repairing macOS on a Mac computer, or for running macOS on a non-Mac system through virtualization software.
To create a bootable USB for macOS on a Windows computer, obtaining a valid .dmg file is a very important step. If the file was not complete or damaged, the bootable USB creation process would fail for sure.
To download a bootable dmg file for old macOS versions (Sierra and earlier), you can download the dmg file directly from Apple (https://support.apple.com/en-us/102662).
For modern macOS version such as Sonoma or Ventura, you can search and download various macOS dmg file from uubyte.com.
Instructions: Create a macOS Bootable USB on Windows 10/11 PC
UUByte DMG Editor is a versatile software tool designed for Windows users. It stands out for its user-friendly interface and powerful functionalities, including creating, editing, and extracting DMG files. More importantly, it enables Windows users to create a bootable USB drive from a macOS DMG file, which is particularly useful for installing macOS on Apple hardware or running it on a virtual machine.
Steps to Create a macOS Bootable USB on Windows 11 Using UUByte DMG Editor:
Step 1: Download and install UUByte DMG Editor on your Windows 10/11 PC. Ensure you have a valid macOS DMG file and a USB drive with sufficient storage.
https://www.uubyte.com/online-help/dmg-editor.html
Step 2: Launch UUByte DMG Editor and select the ‘Burn’ option from the main interface.
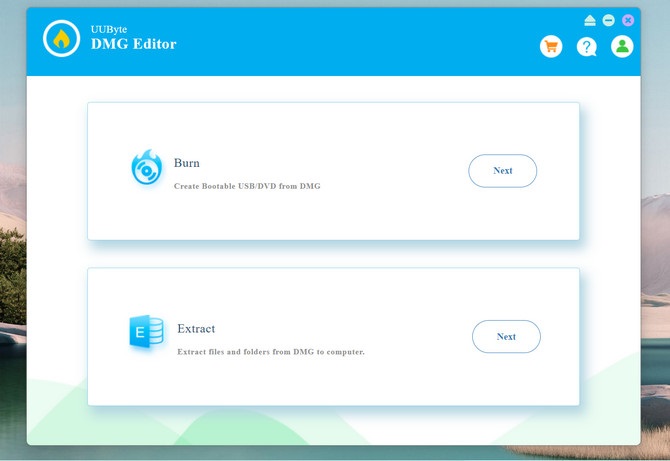
Step 3: Insert your USB drive into the PC. Then, click the ‘Browse’ button in UUByte to locate and select your macOS DMG file.

Step 4: Choose the USB drive as the destination for the bootable USB. Make sure you have backed up any important data on the USB, as this process will erase its contents.

Step 5: Click the ‘Burn’ button to start the process. The software will convert the DMG file to a bootable format and transfer it onto the USB drive.
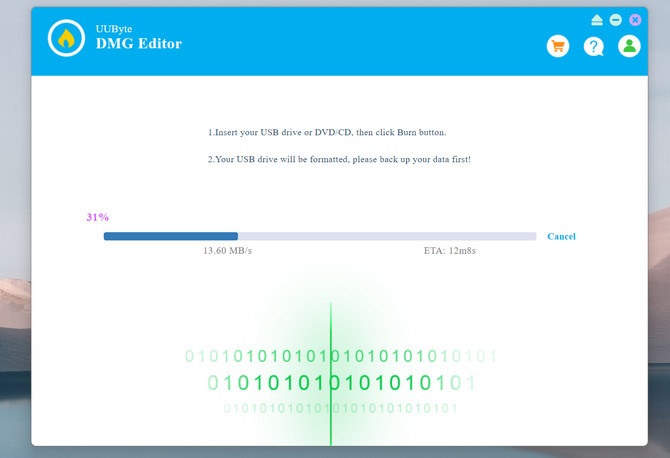
Step 6: Once the process is complete, you’ll have a macOS bootable USB drive ready. You can use this drive to install macOS on a compatible Mac device or run it on a virtual machine.

Bonus: Boot Your Mac from USB and Start Installing macOS
After creating a bootable USB, the next step is to boot the Mac from it and reinstall macOS from scratch. The steps are not the same for Intel and Apple Silicon Macs. This guide will provide clear instructions on how to boot Mac from a USB drive and begin the macOS installation process.
For Intel-based Macs, insert the USB drive into your Mac and restart it. Immediately after the startup chime, hold down the Option key until the Startup Manager appears. Here, you’ll see a list of bootable devices. Now, select your USB drive labeled with the macOS installer. The Mac will then boot from the USB, and you can follow the on-screen instructions to start the macOS installation.

Booting an Apple Silicon Mac from a USB drive differs slightly. First, ensure your bootable USB drive is inserted. Then, turn off your Mac if it’s on. To enter the startup options screen, press and hold the power button until you see the gear icon and “Options.” Select the gear icon, and your Mac will display the available startup disks, including your USB drive. Choose the USB drive, and your Mac will boot from it and continue with the macOS installation.
FAQs about Creating macOS Bootable USB on Windows PC
1. Can I create a macOS bootable USB on a Windows PC without any third-party software?
It is possible if you had a macOS virtual machine on your Windows PC. Typically, this task requires third-party software to properly format the USB drive and transfer the macOS installer files.
2. Do I need a specific version of macOS DMG file to create a bootable USB?
Yes, you should use a DMG file of the macOS version you intend to install. Make sure the DMG file is compatible with the Mac hardware you plan to use.
3. How much storage capacity is needed for the USB drive used for a macOS bootable USB?
It’s recommended to use a USB drive with at least 32 GB of storage to ensure enough space for the macOS installer and additional files required during the installation process.
4. Can I use the same macOS bootable USB on different Mac models?
Generally, a macOS bootable USB can be used on different Mac models, as long as the macOS version is compatible with those models. However, it’s always best to check the specific system requirements for each macOS version.
5. Will creating a macOS bootable USB on Windows erase the data on the USB drive?
Yes, the process of creating a macOS bootable USB typically involves formatting the USB drive, which will erase all existing data on it. It’s important to back up any important data on the USB drive before starting the process.