
There are several reasons you may have issues with your keyboard. This can be due to hardware failure or software issues. When your keyboard stops working, you cannot input information, communicate, or run commands. In this article, we will provide 10 ways to fix keyboard not working in Windows 11.

Page Contents
Fix: Keyboard not working in Windows 11
If your keyboard is not working properly, then try and troubleshoot the problems. Here we have some fixes for keyboard issues:
Fix 1. Repair Bluetooth Keyboard
For wireless keyboards, make sure that Bluetooth is enabled. You can repair the keyboard connection by manually disconnecting and re-connecting with your device.
To do so, follow the below steps:
1. Open Settings App and go to Bluetooth & devices.
2. Make it Enabled.

3. Click on Add device. Select the “Bluetooth” and follow the on-screen instructions.

Fix 2. Reconnect Wired Keyboard
You should check the connection if you have an external keyboard connected to your PC. Unplug the keyboard and then plug it back, make sure it’s connected properly.
If that doesn’t work, the issue could be with the USB port, so try another USB port. Sometimes adapters can also create problems, so if you are using a USB-C to USB-A adapter (for instance), you can try another adapter to solve the issue.
Fix 3. Try Secondary Keyboard
In many situations, keyboard itself can be the problem. In that situation, you should try another keyboard to solve the issue.
If secondary keyboard works, the problem was with the primary keyboard itself. After connecting secondary keyboard, it doesn’t work then the problem is on system side.
Fix 4. Troubleshoot using Manufacture Software
If your keyboard has additional keys or controls, custom drivers or software might be needed for the device to work correctly. For example, keyboards from companies like Logitech are supplied with specialized software. Manufacturer software like this will often come with a troubleshooting component to help you fix problems.
For example, if you’re missing drivers, you should be able to update them using the manufacturer app. The same applies to connection issues, with step-by-step instructions to resolve them. The availability of these features will vary, depending on your manufacturer, so make sure to check the manufacturer’s website for more information.
When you’re ready, verify that your keyboard software is up-to-date, check any settings are correct, and, if available, run any available troubleshooting tools
Fix 5. Turn Off Filter Keys
By mistake, you have enabled Filter Keys settings. If it’s enabled the keyboard will not work. To disable the Filter Keys settings, follow the steps:
1. Open Settings App and go to Accessibility.
2. Click on Keyboard.
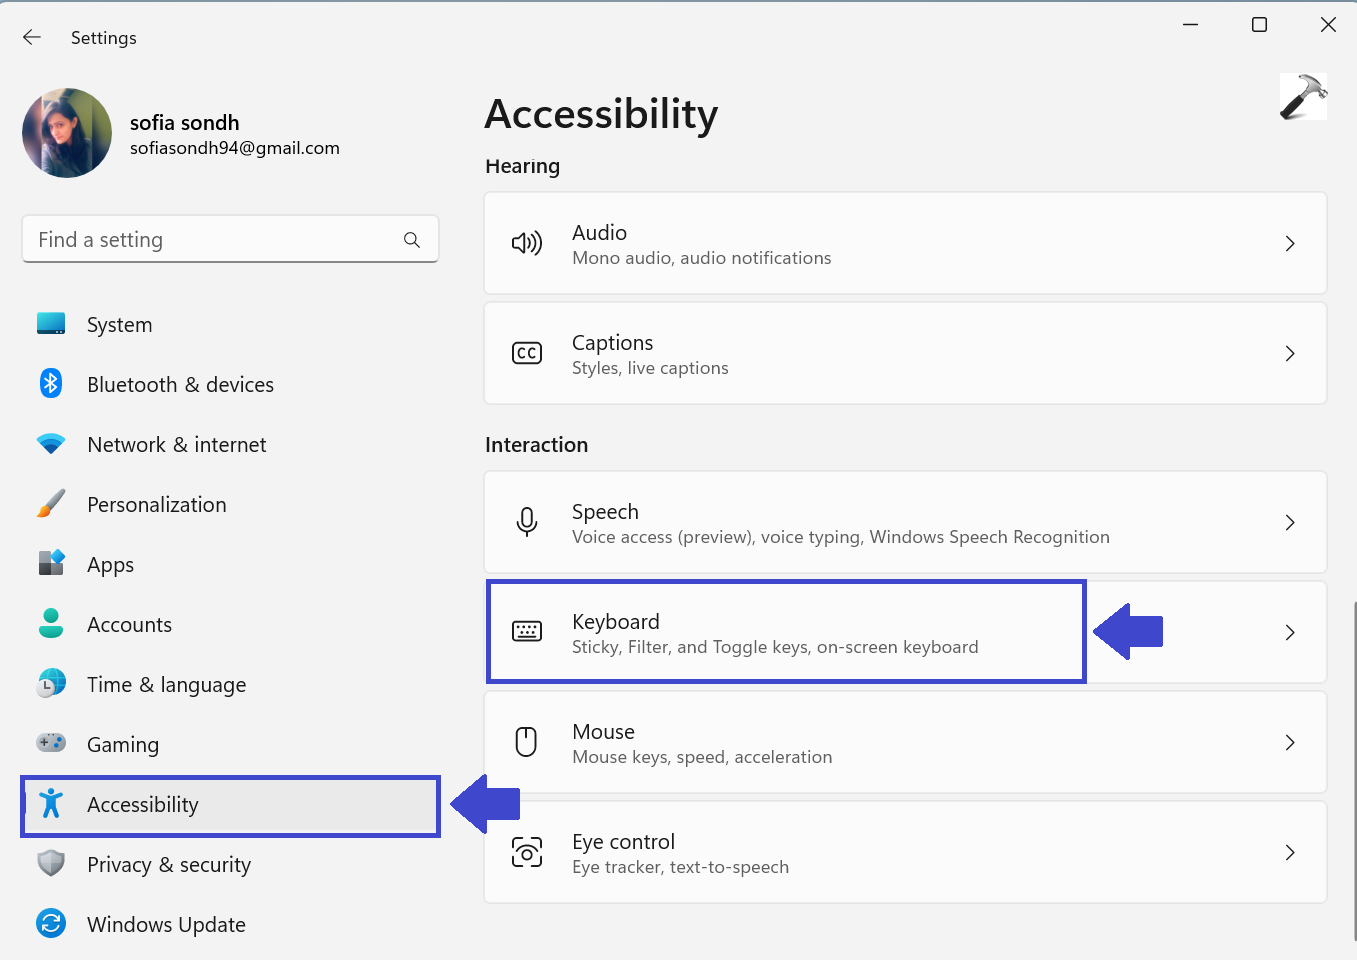
3. After clicking keyboard, “Sticky, Filter, and Toggle keys” list will appear.
4. Click on “Filter Keys” to enable the Filter Keys settings.
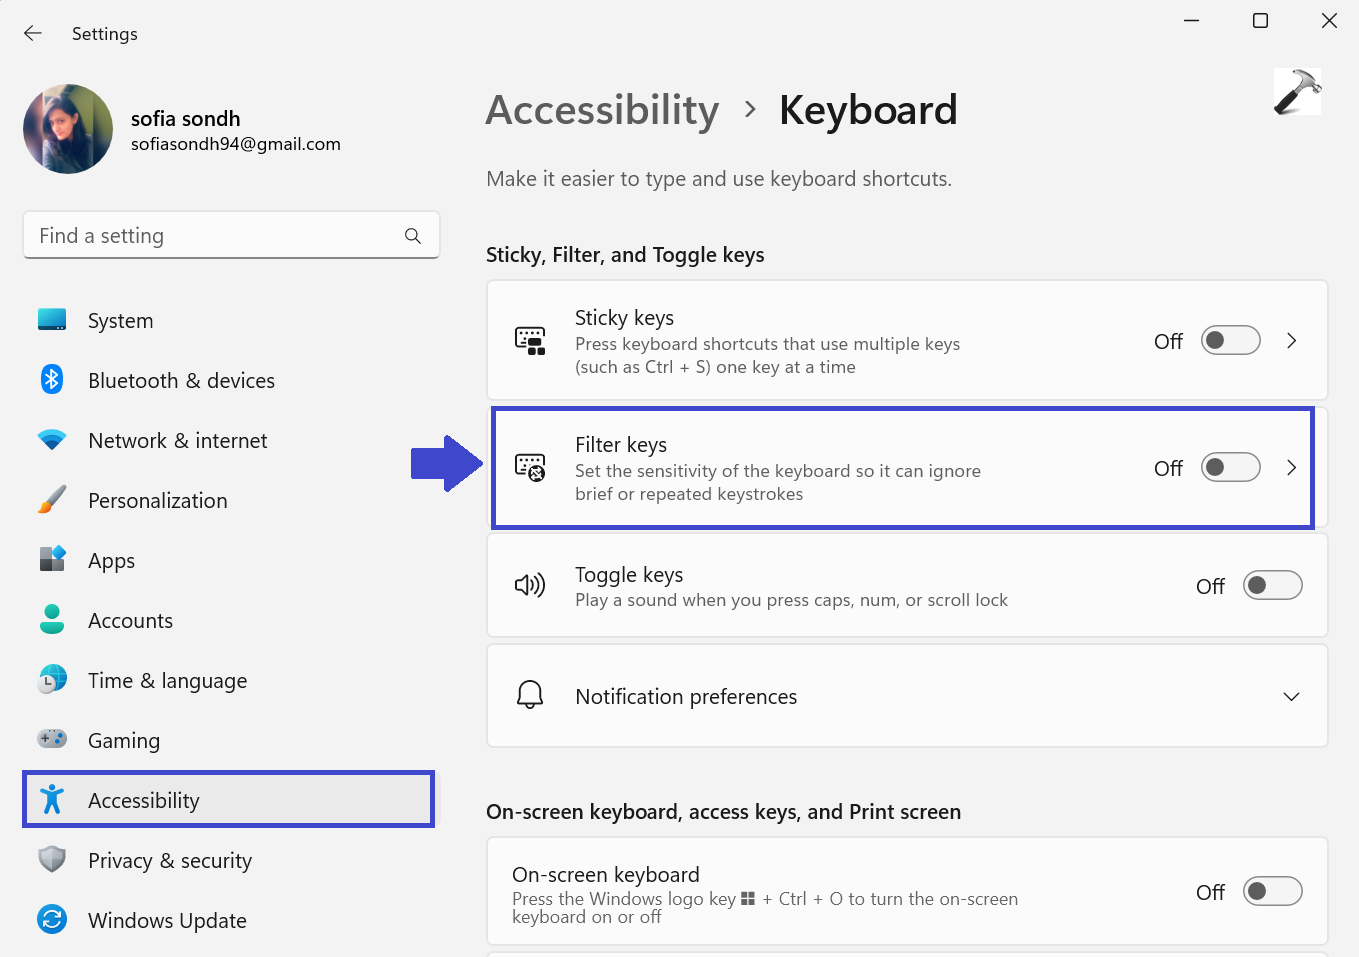
5. Close the Settings App and restart your PC.
Now, your keyboard will start working. But still it’s not working then try another method.
Fix 6. Manage Keyboard Drivers
You should check the device’s drivers. Some advanced keyboards require third-party manufacturer drivers to work correctly and basic keyboards can suffer from missing drivers.
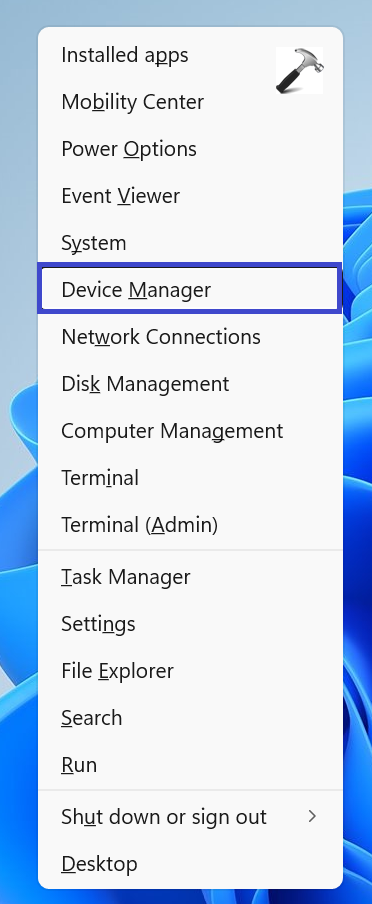
1. Press the Windows Key + X to open WinX menu. Select Device Manager from the list.
2. Right-click on Keyboard you want to check.
3. Select Update driver to check for updates.
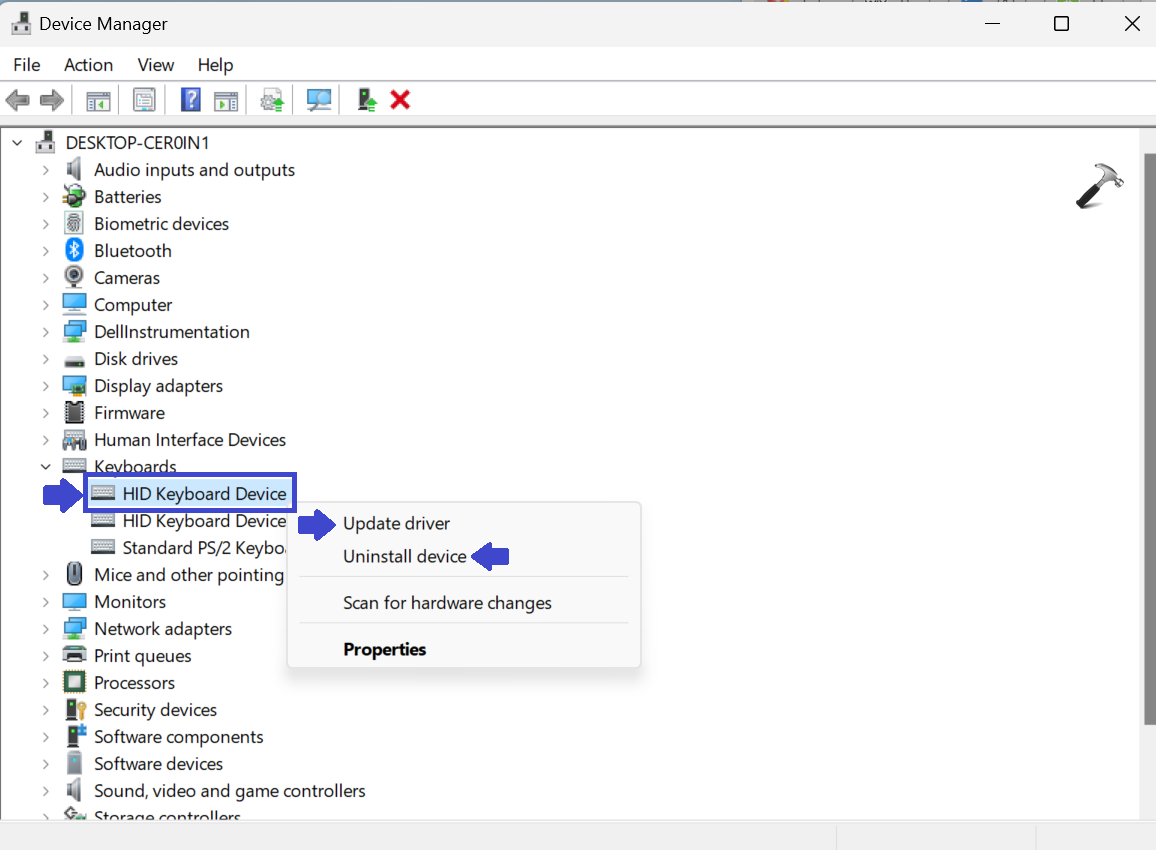
4. You can also re-install your keyboard.
Fix 7. Disable Fast Startup
The Fast Startup feature offered in Windows can help reduce your PC’s boot time. But it can also cause problems in getting power to peripheral devices like your keyboard.
To disable, follow the steps:
1. Open Start menu and open Control Panel.
2. Select “System and Security” and click “Power Options”.

3. Now, click on “Choose what the power button does” link.

4. Click on the “Change settings that are currently unavailable” link.

5. In Shutdown settings, uncheck “Turn on fast startup” option. Click on Save changes.
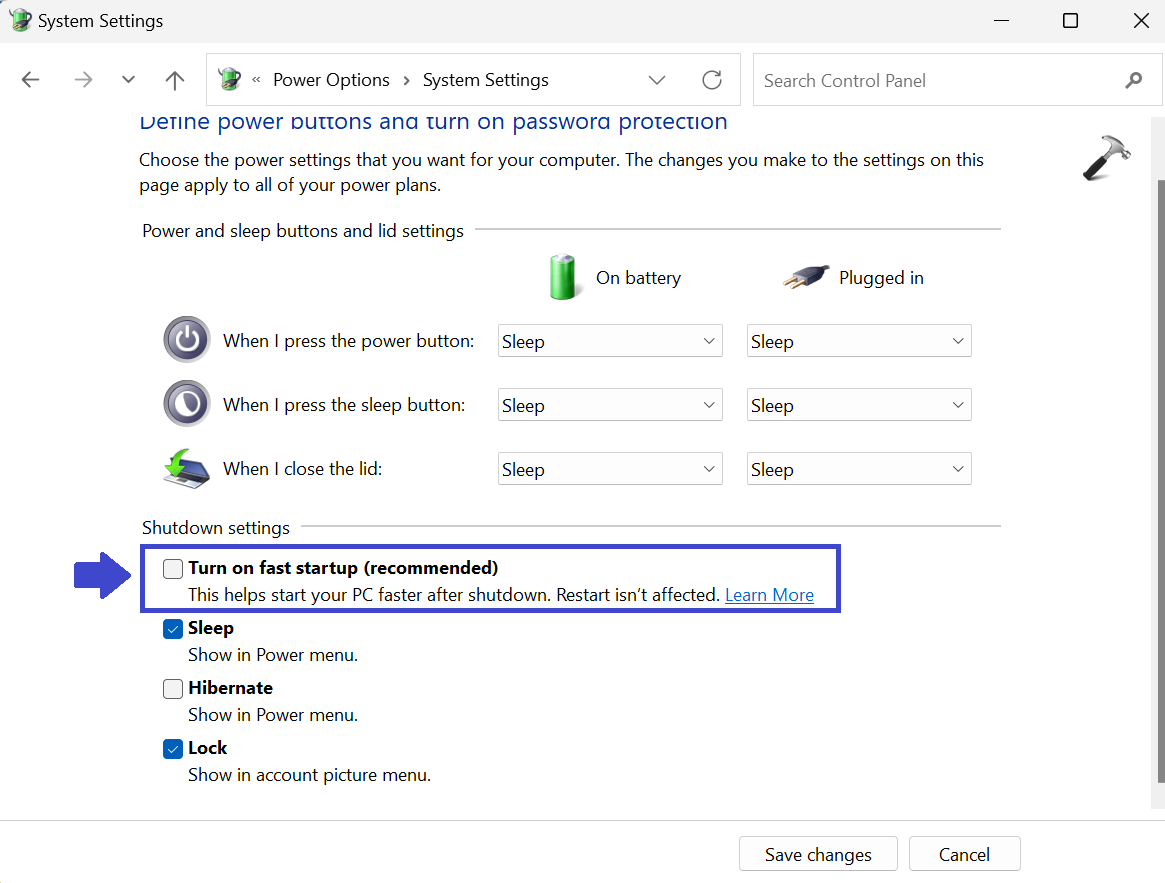
6. Close the Window and restart your PC to apply the settings.
Fix 8. Run Keyboard Troubleshooter
1. Open Settings Apps and go to System.
2. Click on Troubleshoot.
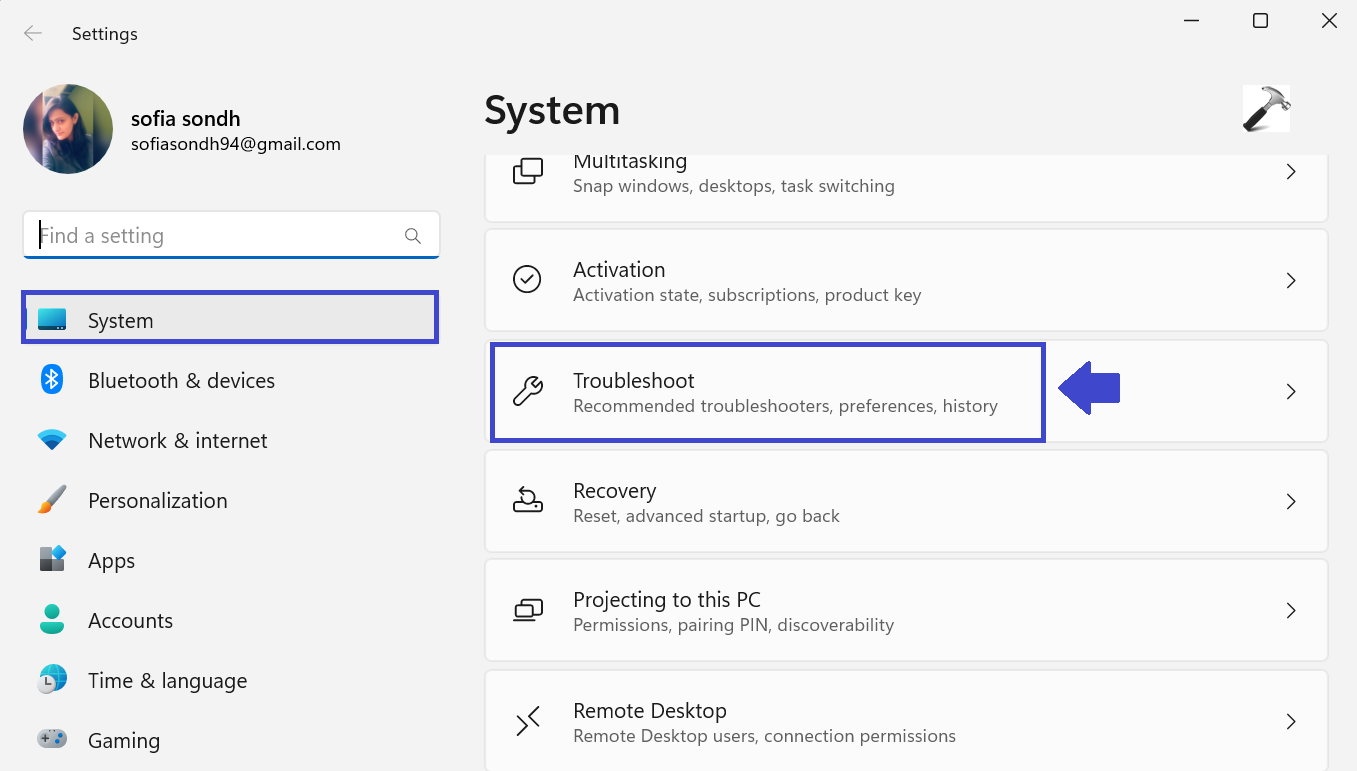
3. Go to Other troubleshooters.
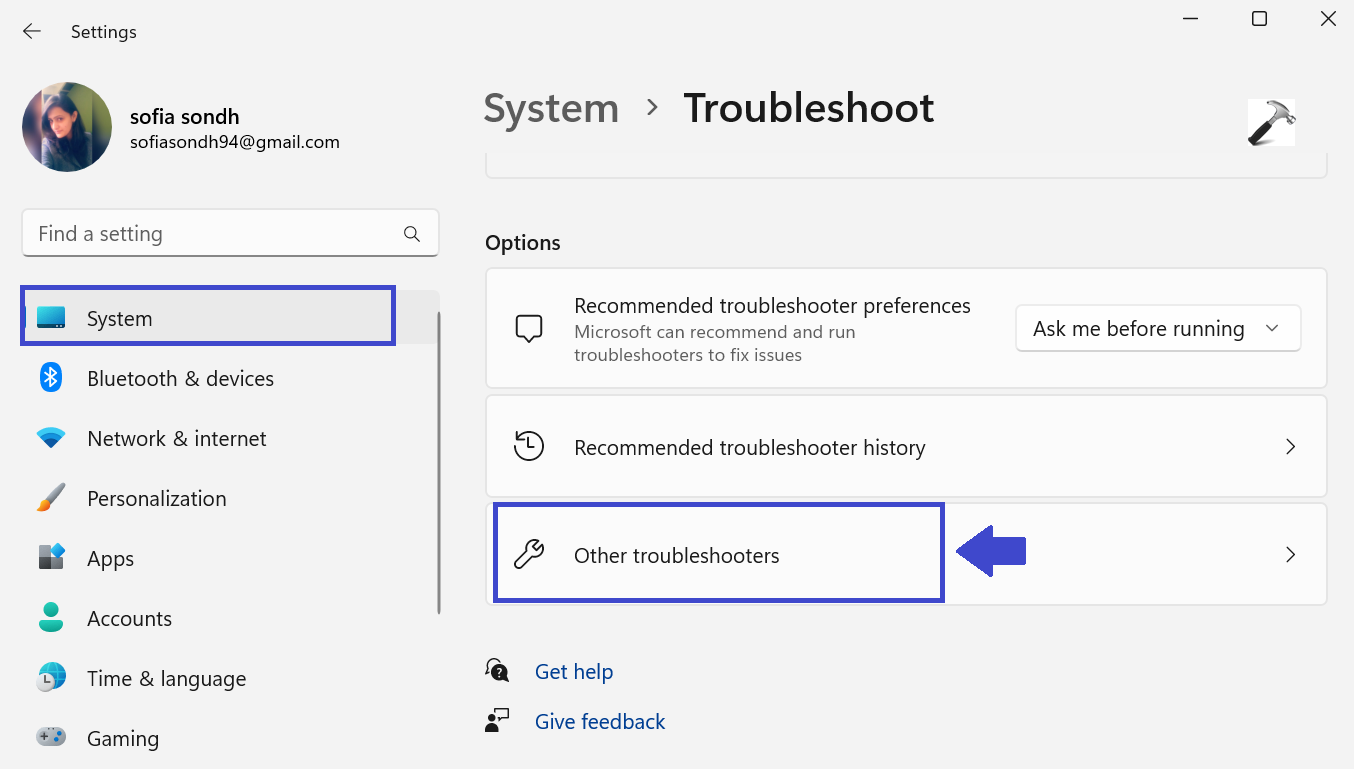
4. On keyboard, click on “Run“.

5. The troubleshooting wizard begins and can identify and fix issues with the keyboard.
Fix 9. Run SFC (System File Checker) Scan
The issue can be with Windows System Files. System File Checker (SFC) is a Windows utility that checks your local drive for corrupted system files. It restores Windows files with working ones from the directory cache to ensure the PC is working correctly.
1. Press the Windows Key + X to open WinX menu.
2. Select Windows Terminal (Admin).

3. Copy and paste the below command:
sfc /scannow

4. Wait until the scan is complete.
Fix 10. Run DISM (Deployment Image Service and Management) Scan
If SFC Scan doesn’t work, then try DISM Scan. It will replace corrupt files downloaded from Microsoft servers.
1. Press the Windows Key + X to open WinX menu. Select Windows Terminal (Admin).
2. Copy and paste the below command:
DISM /Online /Cleanup-Image /RestoreHealth

3. Wait until the scan is complete.
That’s It!
Video guide
Checkout the video guide for further help on this issue:
Also check: Keyboard Not Working In Windows 10/8/7.


Thanks for the steps to resolve keyboard issues. At this time I ask not tobe on an email list. Unless it is for tips no more than 1 a month. Please :)