
While updates are crucial for security and stability, sometimes an update might cause compatibility issues, bugs, or even break your system. If you don’t want to install a specific update, there are two ways to show or hide updates in Windows 11 on demand. We’ll explore both methods in detail in this guide.
Page Contents
Show or Hide Updates on Windows 11
Hide Updates using PowerShell
You can hide or show Windows updates using PowerShell on demand. Here’s how you can do this:
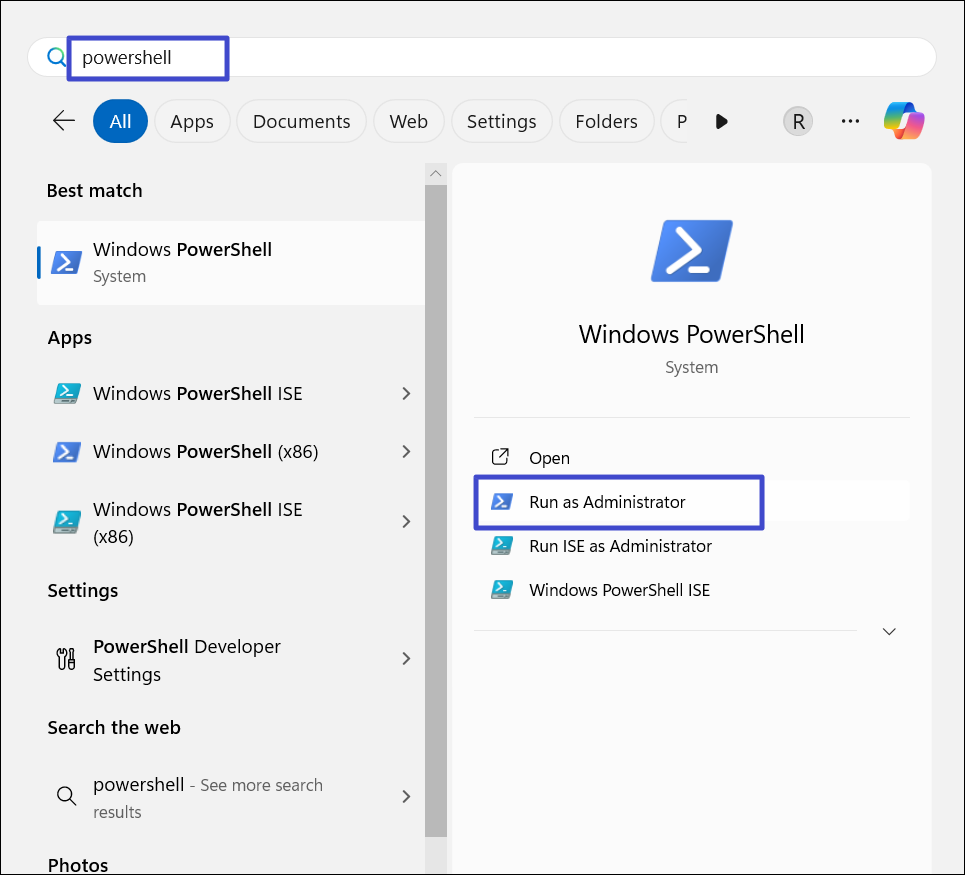
1. First, you need to open Windows PowerShell with administrative privileges. To do that, press Start, and type “PowerShell“. Then, on the right pane, select “Run as administrator“.
2. Type the following command in the PowerShell window, and hit Enter:
Install-Module PSWindowsUpdate
3. If you are prompted to install additional packages like NuGet provider, type “Y” to accept and install.

4. When you’re asked whether you want to install modules from an untrusted repository, type “A” and press Enter.

5. Then, type the following command to check for Windows updates:
Set-ExecutionPolicy RemoteSigned
6. Run the below command to check for any available updates:
Get-WindowsUpdate
7. Next, type the following command to hide an update:
Hide-WindowsUpdate -KBArticleID KBNUMBER
In the above command, replace the KBNUMBER with the KB number of the update you want to hide or block, for example:
Hide-WindowsUpdate -KBArticleID KB2267602
8. Then, type “A” or “Y” to confirm.

9. Alternatively, you can use the following command to hide updates when the KB number is not available:
Hide-WindowsUpdate -Title "UPDATE-TITLE"
In the above command, replace UPDATE-TITLE with the update name. Even a partial title will work, as long as the text you enter is included in the update title.
For instance:
Hide-WindowsUpdate -Title "Realtek Semiconductor Corp"
Once the update is hidden, it will appear with H under the Status column. The script will block the selected update from downloading and installing on your system.
Show or Unhide Updates using PowerShell
1. Open Windows PowerShell as administrator.
2. If the PSWindowsUpdate module hasn’t been installed before, run the below command:
Install-Module PSWindowsUpdate
3. Next run the following commands one after the other:
Set-ExecutionPolicy RemoteSigned
Get-WindowsUpdate
4. After that run the following command to unhide or unblock an update, replacing KBNUMBER with the update number:
Show-WindowsUpdate -KBArticleID KBNUMBER
For Example:
Show-WindowsUpdate -KBArticleID KB2267602
5. Then, type “A” to confirm the action.

6. If the KB number isn’t available, you can use the below command instead. Replace the UPDATE-TITLE with a partial or full name of the update to block it:
Show-WindowsUpdate -Title "UPDATE-TITLE"
7. Once it’s done, the update will be available to download and install on your system.
Hide Updates using Troubleshooter
1. First, download the Show or Hide Updates troubleshooter package (wushowhide.diagcab file) from the Microsoft page.
2. Double-click the downloaded wushowhide.diagcab file to open the tool.
3. Click “Next” on the Show or hide updates wizard to continue.

4. On the next screen, click “Hide updates“.

5. Then, select the updates you want to hide or block and click “Next“.
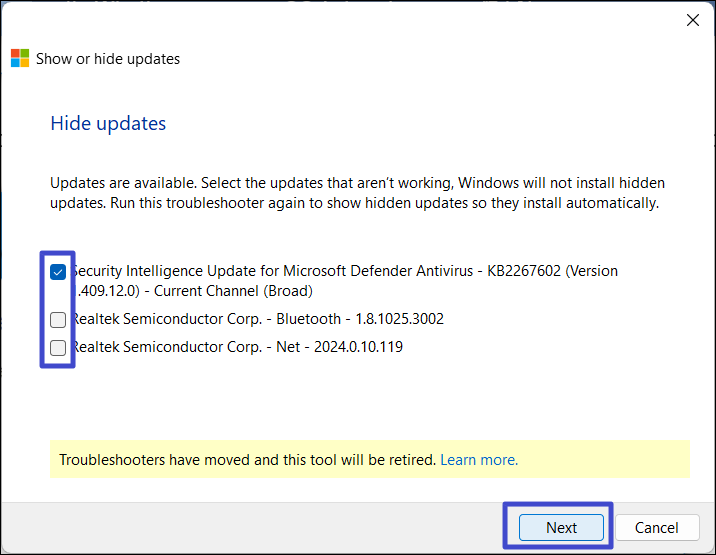
6. Click “Close” to complete. The troubleshooter will hide the selected updates on your computer.

Show Updates using Troubleshooter
1. Download and launch the Show or Hide Updates troubleshooter from Microsoft.
2. In the troubleshooter, click “Next“.
3. Next, select the “Show hidden updates” option.

4. Then, select the hidden update you wish to show and click “Next“.
5. Now, the update will be available to download in the Windows Update.
That’s it.


![[Latest Windows 11 Update] What’s new in KB5089549?](https://www.kapilarya.com/assets/Windows11-Update-768x651.png)