Microsoft has continuously enhanced features of Microsoft Defender app. The company is aiming to make it more secure and robust in features. Hence, they have continuously added new features to the app. In this article, we will learn how to turn on Periodic Scanning feature in Microsoft Defender.
The Periodic Scanning feature can only be enabled when you have another third-party antivirus installed on your system. It is a special type of threat detection and remediation tool. Using this feature, Microsoft Defender works with another antivirus present on your system and periodically scans your system to find security threats. The power of two security providers creates more chances of make your system safer.
Usually, when you have third-party antivirus installed and if it is working correctly, then Microsoft Defender will disable itself. Also, you will be notified of the current security protection provider in the Defender app itself. You can use Periodic Scanning feature only when Defender is turned off and other antivirus is working perfectly. If another antivirus is turned off, uninstalled, out of date or expired, then Microsoft Defender will enable itself.
The feature shares parallel behaviour the Automatic Maintenance feature uses. It runs when your system is idle so that you have minimum impact on performance, PC efficiency and power. If you like, you can also schedule those periodic scans.
Now let’s see how to turn on Periodic Scanning in Microsoft Defender.
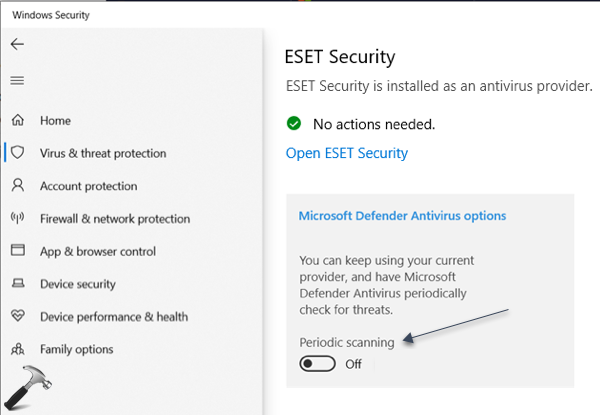
Turn On Periodic Scanning In Microsoft Defender
- Open Microsoft Defender app.
- In the dashboard, click on Virus and Threat Protection.
- Next, scroll down and click on Microsoft Defender Antivirus options link.
- Finally, turn On the Periodic Scanning option.
In case if you see the Microsoft Defender antivirus options link missing, then you might not have third-party antivirus installed. Or you might still have Microsoft Defender enabled, so simply turn it off and then you configure the feature.
That’s it!