Microsoft Defender is the built-in antivirus comes with Windows 10. It can help you to protect against malware, viruses and other security threats. These threats are harmful for your system and should be dealt carefully. Microsoft Defender can provide the competitive security and helps you to make your system safe and secure. In this article, we will learn how to allow or prevent scan network files with Microsoft Defender.
By default, Microsoft Defender will not scan network files. However, if you wish that Microsoft Defender should scan network files as well, you need to configure a relevant setting for that. You can configure the setting using either of the methods mentioned below.
Page Contents
Allow/Prevent Scan Network Files With Microsoft Defender
Method 1 – Using Windows PowerShell
Open administrative Windows PowerShell.
In the administrative Windows PowerShell, type following command to allow scan of network files with Microsoft Defender:
Set-MpPreference -DisableScanningNetworkFiles 0

If you wish to prevent scan of network files, try this command instead:
Set-MpPreference -DisableScanningNetworkFiles 1
Once the command has been executed successfully, close Windows PowerShell. The settings should be in effect now.
Method 2 – Using Registry
- Press
 + R and type
 regeditin Run dialog box to open Registry Editor. Click OK. - Go to registry location
HKEY_LOCAL_MACHINE\SOFTWARE\Policies\Microsoft\Windows Defender\Scan. - In the right pane, create the registry DWORD (REG_DWORD) named
DisableScanningNetworkFilesand set it to 0.
 + R and type
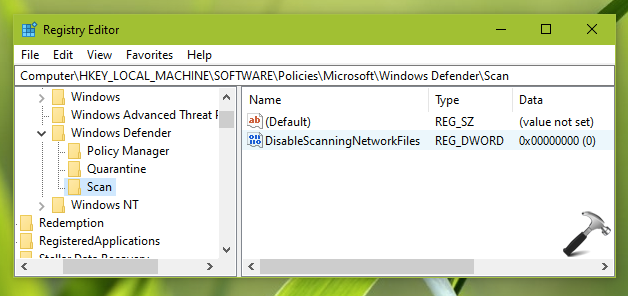
To prevent scan of network files with Microsoft Defender, you set the registry DWORD to 1 instead.
Close Registry Editor and restart your system to make changes effective.
Computer Configuration > Administrative Templates > Windows Components > Microsoft Defender Antivirus > Scan.That’s it!