
We have preferred Registry Editor as the ultimate customization tool for Windows many times in the past. Today, as the succession of this we’re are here to share you yet another registry customization trick for Desktop context menu in Windows 7 & 8. In this article, we are giving you the way to add power plan options to right click context menu. Have a look:

Manually, you can access power plan settings (for a laptop or tablet) using the battery icon provided in taskbar notification area. But after following the method provided in this article, you’ll be able to change power plan settings fro right click Desktop context menu as shown in image above.
So, here is how to make this possible (you must be admin of your Windows to perform below steps):
Page Contents
Change Battery Power Plan From Desktop Context Menu
1. Press  + R and put regedit.exe in Run dialog box to open Registry Editor (if you’re not familiar with Registry Editor, then click here). Click OK.
2. Navigate to this location:
HKEY_CLASSES_ROOT\DesktopBackground\Shell
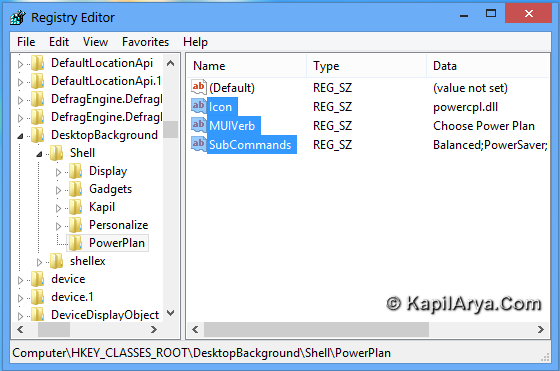
3. In the left pane of this location, create a new sub-key using Right click -> New -> Key. Name it as PowerPlan. Now in the right pane of this newly created sub-key, create three strings using Right click -> New -> String Value with following data:
Icon – powercpl.dll
SubCommands – Balanced;PowerSaver;HighPerformance
MUIVerb – Choose Power Plan

4. Moving on, navigate to the following location:
HKEY_LOCAL_MACHINE\SOFTWARE\Microsoft\Windows\CurrentVersion\Explorer\CommandStore\shell
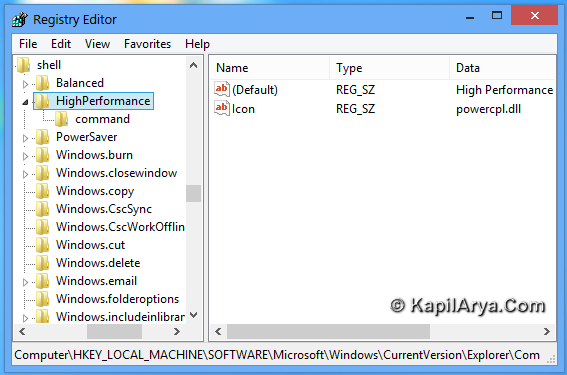
5. In the left pane of this location, create three new sub-keys named Balanced, PowerSaver, HighPerformance. No go to the left pane of sub-key High Performance. Edit the Default string with Value data equals to High Performance. Now create a new string, named Icon with Value data equals to powercpl.dll. Similarly for sub-key Balanced & PowerSaver, modify their Default strings with Value data equals to Balanced & PowerSaver respectively. Also create string Icon with powercpl.dll value for both sub-keys.
6. Next to this, create a sub-key named Command for the sub-keys created in step 5.
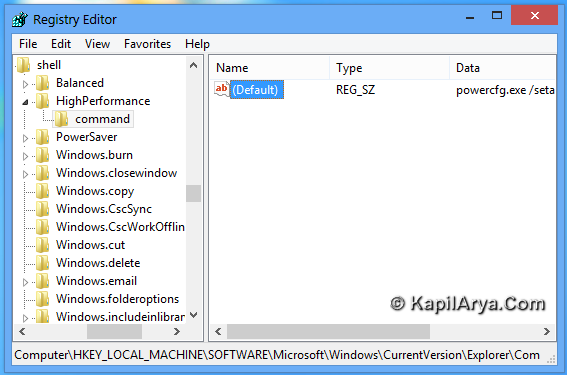
7. Finally, modify the Default string of commands created so far for the sub-keys. Here are the modifications:
For Command of High Performance (HKEY_LOCAL_MACHINE\SOFTWARE\Microsoft\Windows\CurrentVersion\Explorer\CommandStore\shell\HighPerformance\command) put powercfg.exe /setactive 8c5e7fda-e8bf-4a96-9a85-a6e23a8c635c
For Command of Balanced (HKEY_LOCAL_MACHINE\SOFTWARE\Microsoft\Windows\Current\Version\Explorer\CommandStore\shell\Balanced\command) put powercfg.exe /setactive 381b4222-f694-41f0-9685-ff5bb260df2e
For Command of PowerSaver (HKEY_LOCAL_MACHINE\SOFTWARE\Microsoft\Windows\CurrentVersion\Explorer\CommandStore\shell\PowerSaver\command) put powercfg.exe /setactive a1841308-3541-4fab-bc81-f71556f20b4a
Download Direct Registries
To simply the job, we’ve created the direct registry files for you. Just download the file using below link. When downloaded, right click on it, select Merge and you’re done. Here are the links:
Hope you find it useful!


Really helpful!!
Added the options on my windows 7. Thank you :)
Hmm. the registry modification made my system messy. so i downloaded the automation. God bless you for nice tips!!