As the Internet is growing very fastly, new technologies are being developed to make it more secure. Previously, when you are about to visit a website, your browser sent an unencrypted DNS request to the website server. If an attacker is snooping to your data packets, he can get the information, which website you’re about to visit. So the man-in-the-middle can easily inject fake DNS records and you may be landed to phishing website. From here, its really easy for an attacker to capture your login and get into your account. Even if you’re accessing a HTTPS site, if the website server is not signing DNS communications, it is possible for attacker to listen to your data packets.
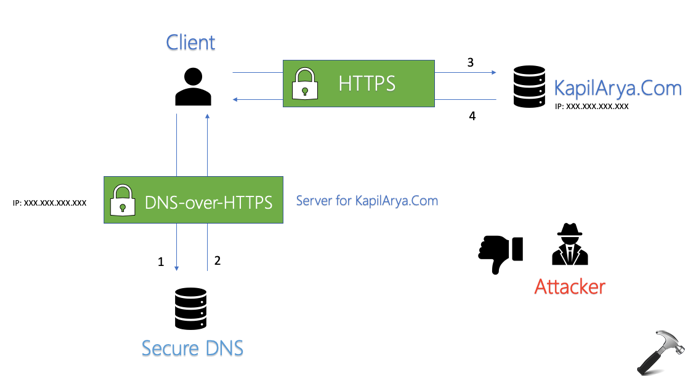
To avoid this, the DNS queries needs to be sent in secure form. Also, the websites needs to have DNSSEC enabled. Because with that, the server can digitally sign the replied DNS queries. In that way, the browser can verify that replied DNS queries are coming back from authoritative server. But a very less number of websites on web have DNSSEC enabled. So to resolve this, we can use DNS over HTTPS which is also called secure DNS. With it, the browser will first communicate to DNS service provider, which then communicate to website server. In this way, all the communications over DNS are simply secure. In Google Chrome version 83 or later, secure DNS is enabled by default. Read more in this post at Chrome blog.
In this article, we’ll see how you can configure secure DNS settings in Google Chrome.
Configure secure DNS in Google Chrome
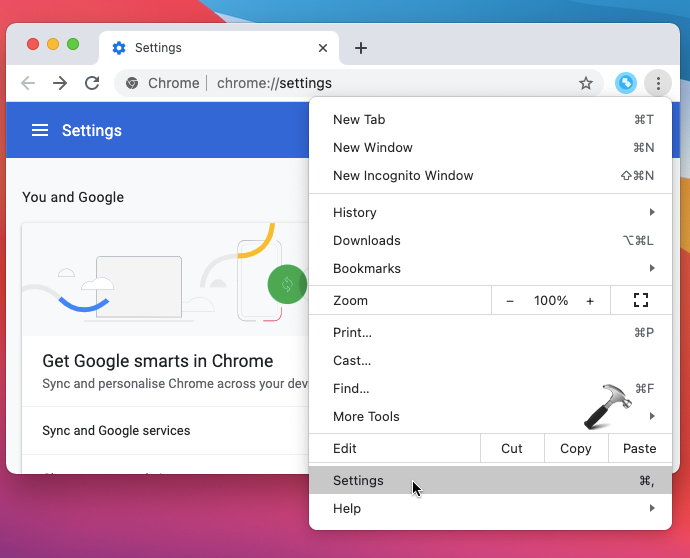
1. Open Google Chrome on your system, be it Windows, Mac or Linux. Click on three vertical dots in top right corner and select Settings in pop-up menu.
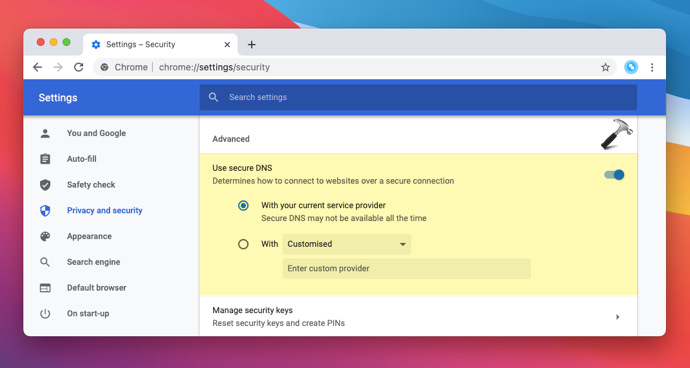
2. In Settings, go to Privacy and security. In the corresponding right pane, scroll and locate Use secure DNS option under Advanced. As we mentioned earlier, this option must be enabled by default. The setting is set to Use secure DNS from your current service provider.
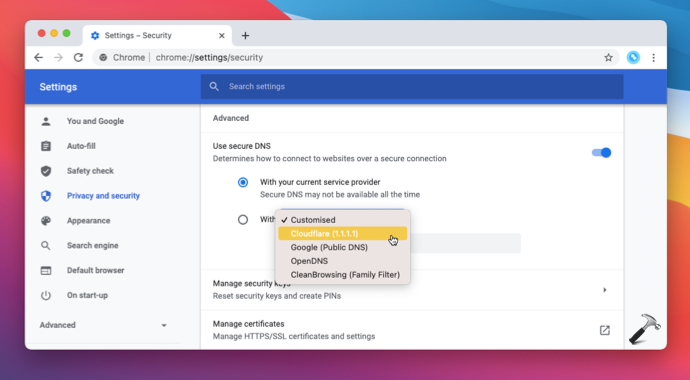
3. To select another DNS provider, select With <DNS provider> and choose the available from listed DNS providers. The popular DNS provides are listed here such as Cloudflare, Google, OpenDNS. If you want to use any third-party DNS provider, select Customised and type in the DNS address of the provider.
Once you’re done with configuring the settings, restart the browser and Chrome will now use your configured DNS provider.
That’s it!
Related: Enable DNS Over HTTPS In Microsoft Edge.