As the world is moving towards secure web, most of websites are now HTTPS. When you are visiting a HTTPS site, the DNS query is sent in plain text. The DNS query is basically the request sent by your browser using web, to lookup IP of website you want to visit.
Since the DNS query is sent unencrypted, the Man-In-The-Middle snooping to packets may know that which site you’re about to visit. So it is easy for the middle man to change the answers for your DNS queries. With this, they may be able to redirect you to fake login pages, where they can capture your login information along with other Personally Identifiable Information (PII).
To prevent this from happening, websites needs to have DNSSEC enabled. However, less than 10% of websites on the planet have DNSSEC enabled. Hence, to resolve this, DNS over HTTPS (DoH) was introduced. The DoH protocol is used for remote DNS resolution via HTTPS protocol. Leading browsers are now providing users the ability to manage DoH. In this article, we’ll see how to enable DoH for new Chromium based Microsoft Edge.
Page Contents
Enable DNS Over HTTPS In Microsoft Edge
Method 1 – Using Edge Settings
1. Open Microsoft Edge. Click on triple dots to open fly-out menu and select Settings.
2. In the Settings screen, click on hamburger icon and click Privacy, search, and services.
Note: You can directly type edge://settings/privacy in URL bar to skip steps 1-2.
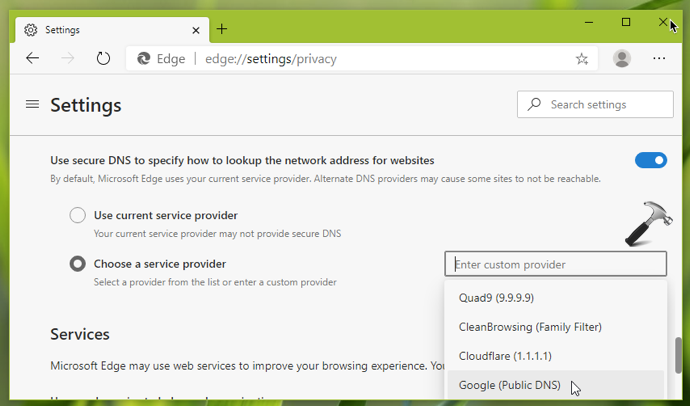
3. Now scroll down and under Security heading, locate and enable Use secure DNS to specify how to lookup the network address for websites option.

4. Then select Choose a service provider option, if you want to use any other provider than current provider (default: Google Public DNS).
Your settings should be applied, if not, restart the browser.
Method 2 – Using Edge Flags
1. Type edge://flags in the Edge URL bar and press Enter key.
2. In next screen, search for Secure DNS lookups and locate the same in results.
Note: You can directly type edge://flags/#dns-over-https in URL bar to skip steps 1-2.
3. Now for Secure DNS lookups, click on Default drop-down and select Enabled.

Restart Microsoft Edge and your selected settings should be applied.
That’s it!


Leave a Reply