
In modern computing, the ability to connect multiple devices on a network facilitates seamless file sharing, printer access, and collaborative tasks. However, encountering this issue of being unable to see other computers on your Windows 11 network can disrupt workflows and slow down device interactions. In this article, we will explore the common reasons behind this issue and provide step-by-step solutions to fix can’t see other computers on network in Windows 11.
This problem can result from various factors, including
- Network Discovery Settings: The Network Discovery feature allows devices to locate and communicate with one another on the network. If this feature is disabled, your computer won’t identify other devices.
- Firewall and Security Software: A third-party firewall or security software may block network communications, inhibiting your Windows 11 PC from recognizing other networked devices.
- Network Profile Settings: Windows 11 categorizes networks as Public, Private, or Domain. Incorrect network profile settings can limit network access and visibility.
- Network Configuration Issues: Router problems, incorrect IP configurations, or hardware issues can also lead to this problem.
Page Contents
Fix: Can’t see other computers on network in Windows 11
Below, you’ll find the top solutions that you can apply to fix the issue of ‘Fix: Can’t see other computers on network in Windows 11:
Fix 1: Reset the network
Resetting the network will reset all of your network adapters and settings to their defaults. Network discovery is a feature that allows Windows computers to see each other on the network. If network discovery is disabled, you will not be able to see other computers on the network.
Follow the below steps to reset the network:
1. Open the Settings app and go to “Network & Internet“.
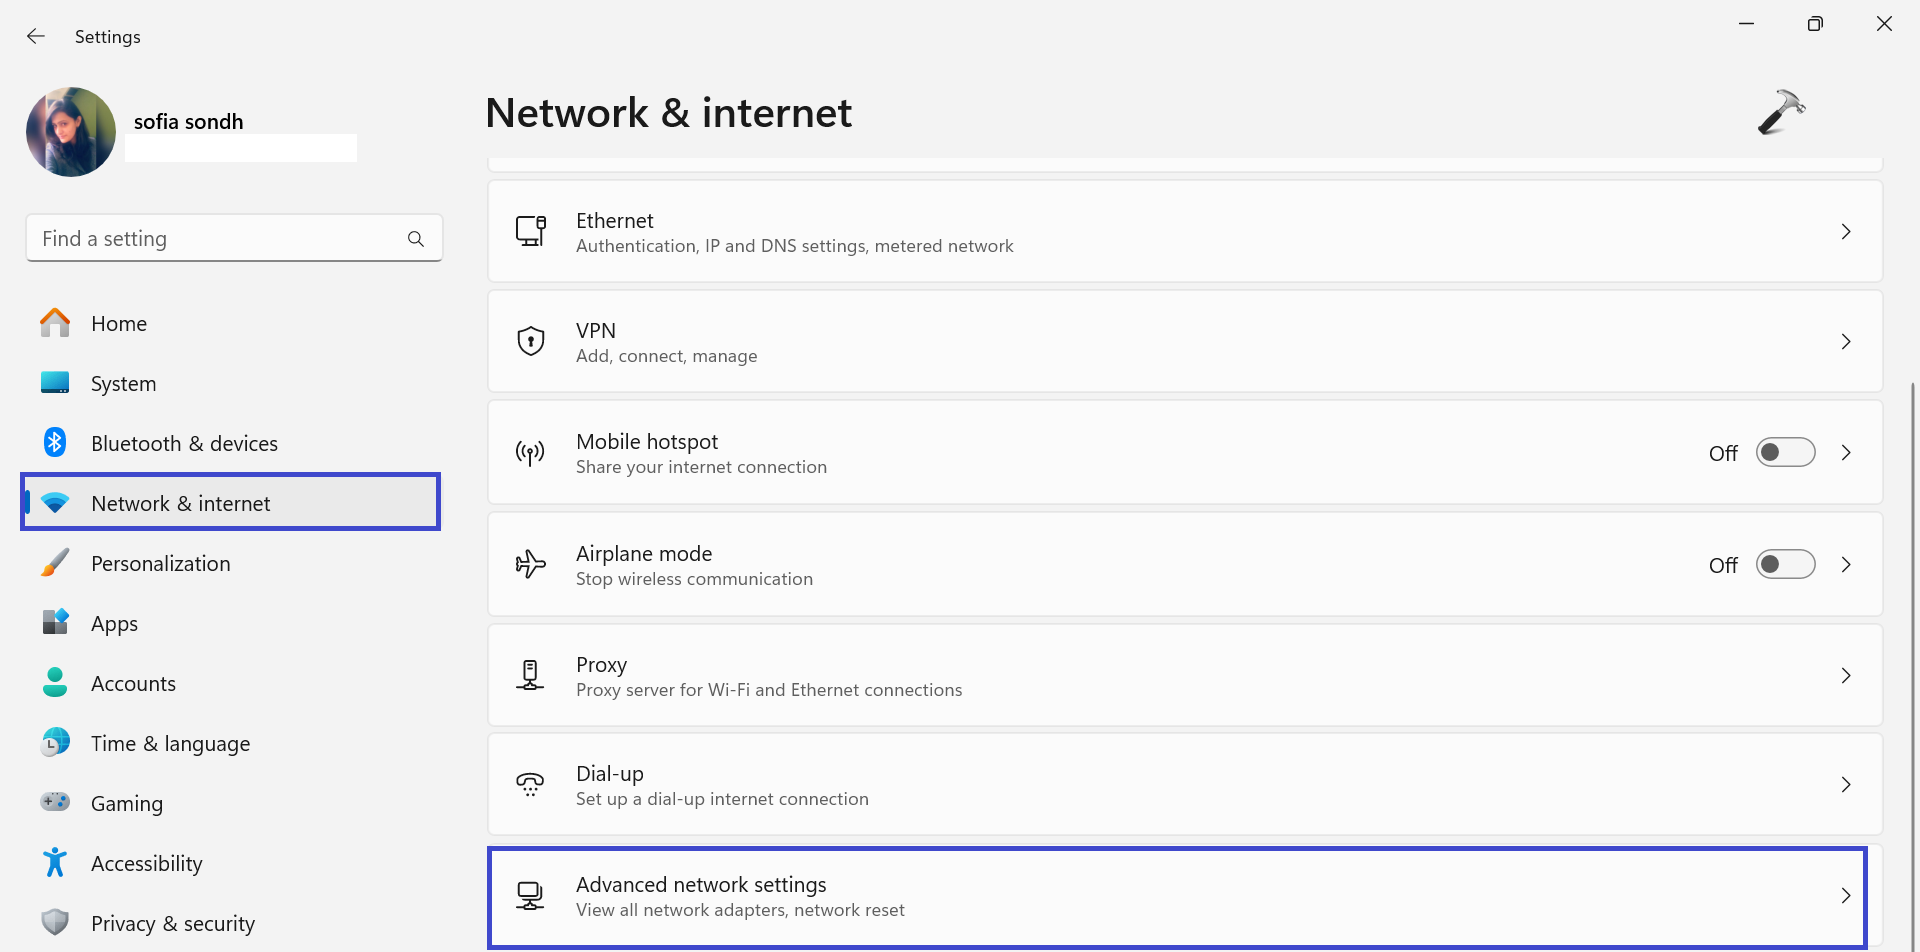
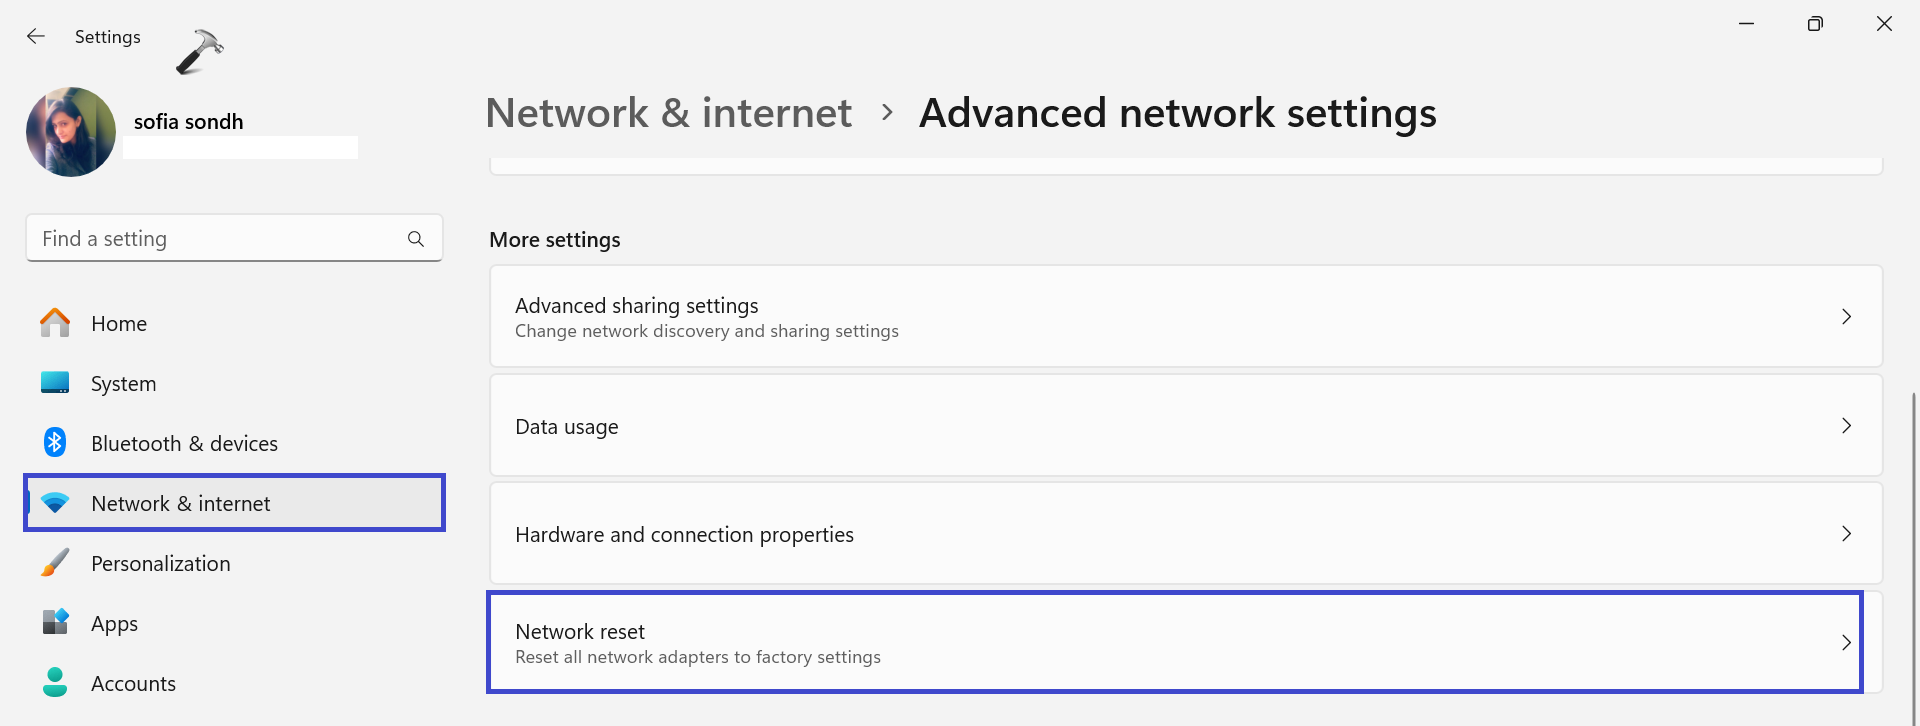
2. Select “Advanced Network settings“.
3. Now, click on “Network Reset“.
4. Select the “Reset Now” option.

5. Restart the PC and check whether the issue is resolved or not.
6. Now, go to the File Explorer and go to your Network.
7. A prompt box will appear. Click “Enable” to enable the Network Discovery.
Fix 2: Disable Internet Protocol Version 6
If you are unable to see other computers on the network, disabling IPv6 may resolve the issue. Follow the below steps to disable the IPv6:
1. Press the Windows key + R. Type “ncpa.cpl” and click OK.
2. Now, right-click on your Network Adapter and select “Properties“.

3. Here, disable the “Internet Protocol Version 6 (TCP/IPv6)” option.

4. Click OK.
Now, restart the PC to apply the changes and check whether the issue is solved or not.
Fix 3: Disable VPN Connection
A VPN (virtual private network) encrypts your internet traffic and routes it through a remote server. This can help to protect your privacy and security online. However, VPNs can also interfere with network discovery and file sharing.
Follow the below steps to disable the VPN connection:
1. Open the Settings app and go to “Network & Internet“.

2. Look for the VPN connection, if you have any running VPN connection.
3. Click on it and click on “remove“.
4. A dialog box will appear. select “Accept“.
Restart your PC to apply the changes and check whether you are able to see other computers on the network or not.
Fix 4: Re-install the Network driver
If you’re unable to see other computers on your network in Windows 11, one thing you can try is reinstalling your network drivers.
Follow the below steps to do so:
1. Press the Windows key + X. Select “Device Manager“.
2. Expand the “Network adapters“, right-click on the adapter, and click “Uninstall driver“.

3. A prompt box will appear. Click OK to uninstall the driver.

You have to repeat these steps for all the network drivers.
4. Now, open the Command prompt and run as administrator.
5. Copy and paste the below commands. Press Enter after each command.
ipconfig /flushdns
ipconfig /registerdnsipconfig /release
ipconfig /renew
netsh int ip reset
netsh winsock reset
6. After executing all the commands one by one, restart the PC.
Fix 5: Restart the services
To fix the issue of not being able to see other computers on the network in Windows 11, you can try restarting the Function Discovery Provider Host Service. Here’s how:
1. Press the Windows key + R. Type “Services.msc” and click OK.
2. Locate “Function Discovery Provider Host Service“.

3. Right-click on it and select “Properties“.
4. Under the startup type, set to “Automatic” and click “Start” in order to make the service run.

5. Now, go to the recovery tab.
6. Next to “First failure“, scroll down and select the”Restart the service” option.

7. Repeat this for a second and Subsequent failures.
8. Click OK followed by Apply.
Fix 6: Enable Guest Account on your PC
Insecure guest authentication is a type of authentication that does not use encryption. This can be a security risk, but it may be necessary for some legacy networks.
By setting the AllowInsecureGuestAuth value to 1, you can enable the guest account and allow Windows to see other computers on the network.
Follow the below steps to do so:
1. Press the Windows key + R. Type “regedit.exe” to open the registry and click OK.
2. Navigate to the following path:
HKEY_LOCAL_MACHINE\SYSTEM\CurrentControlSet\Services\LanmanWorkstation\Parameters
3. Now, right-click on the “AllowInsecureGuestAuth” option.
4. If you don’t have the registry key, then you can create it.
To create the key, right-click on “Parameters” and select New => DWORD (32-bit) Value.

5. After creating the key, right-click on the “AllowInsecureGuestAuth” and click “Modify“.
Set the value to 1 and then click OK.

6. Close all the Registry windows and restart the PC to apply the changes.
Fix 7: Fix this issue using the Control Panel
The Turn on automatic setup of network connected devices (Plug and Play) option allows Windows to automatically detect and configure network devices. However, this option can also interfere with network discovery and file sharing.
Follow the below steps to change the sharing options for different network profiles:
1. Open the Control panel and click on the “View network status and tasks” option under the “Network and Internet” section.

2. Now, click on “Change Advanced sharing settings“.

3. Here, uncheck the box of the “Set up network connected devices automatically” option.

4. Click “Save changes“.
Fix 8: Reconfiguring Starting Services
By setting the Computer Browser service’s startup type to Automatic and starting the service, you can ensure that the service is always running and that it will be automatically started if it fails.
To fix the issue of not being able to see other computers on the network in Windows 11 by reconfiguring the Computer Browser service, follow these steps:
1. Press the Windows key + R. Type “Services.msc” and press Enter.
2. Under the Service Management section, click on “Computer Browser”.
3. Now, select “Automatic” under the “Startup type” option.
4. Click on “Start“.
5. Click OK followed by Apply.
Fix 9: Change router and DNS settings
Obtaining the DNS server address automatically will allow Windows to use the DNS servers that are provided by your router. This can help to resolve DNS issues that can prevent you from seeing other computers on the network.
Disabling client isolation will allow computers on the network to see each other. Client isolation is a security feature that prevents computers on the network from communicating with each other. However, this feature can also prevent you from seeing other computers on the network.
1. Open the Control panel and click on the “Network and Sharing Center” option.

2. Now, click on “Change adapter settings“.

3. Select your network and right-click on it. Select “Properties“.
4. Now, click on “Internet Protocol Version 4 (TCP/IPv4)” and select “Properties“.

5. Check the option “Obtain DNS server address automatically“.

You need to make sure that you have to check the option “Obtain DNS server address automatically” for both IP addresses (IPv4 and IPv6).
Till now we have enabled the automatic detection for DNS. Now, we have to change the router settings. Follow the below steps to do so:
1. Open the Command prompt and run as administrator.
2. Type the below command and press Enter:
ipconfig/all
3. Now. copy the Router Gateway IP address. Paste the IP address in the command prompt and press Enter. This will open the Router Login page.

4. Enter the username and password which is written on the back of your router.
5. Now, log into the router page of your network.
6. Click on “Client Isolation, AP Isolation” or “Wi-Fi Isolation” settings and disable it.
That’s It!


![The mapped network drive could not be created [Detailed fix]](https://www.kapilarya.com/assets/Network-Drive-768x511.jpg)

![Stop sharing a folder in Windows 11 [Guide]](https://www.kapilarya.com/assets/Network-768x522.png)
I just wanted to send a sincere thank you for your post. I spent over 3 hours trying to connect 2 windows 11 laptops with no success until finally reaching your suggestions. Fix #5 worked for me.
^^ Glad it helped 😎
No luck here. All had been working but changed about a moth ago. When I started troubleshooting, PC1 could see PC2 but NOT access (0x80070035 error) but PC2 could see and access shared files on PC1. In the process of trying these 10 steps, I discovered PC2 Windows auto-updates were off. When I turned updates on, PC2 updated to Win 11 24H2 (PC1 was already at 24H2). After this, neither PCs could access (0x80070035) although both PCs could see each other. Both PCs are less than 6 months old, on ethernet, Win 11 Pro. The 10 steps did not help my case. From my point of view, things went bad when Win 11 updated to 24H2.Any ideas? Thank you.
Update… My neighbor who is a lot more of a “techy” than I, came over and resolved the issue. Unfortunately he was in a rush and didn’t have time to explain. So I am good! As for what YOU have listed above, I was really impressed with the detail and screenshots you provided. It was a BIG help going while going through the steps. Thank you so much for taking the time to post.