
Windows 11 offers an exciting feature called File Sharing. This feature lets you share files between the Windows devices on the same network. It turns the entire sharing process error-free and smooth. If File Sharing is not working in Windows 11, then there is nothing to worry.
Here, we are going to discuss how to resolve this issue in a hassle-free manner. There are many ways to fix this error. Let’s discuss them in detail below!
Page Contents
Fix: File Sharing Is Not Working in Windows 11
Method 1: Fix the Problem by Enabling File and Printer Sharing Feature
1. Open Run by pressing the Windows+R. Once there, type control.exe /name Microsoft.NetworkAndSharingCenter and hit OK.

2. After that, click on Change advanced sharing settings present on the left pane.

3. In the Private window, enable the Turn on file and printer sharing option.
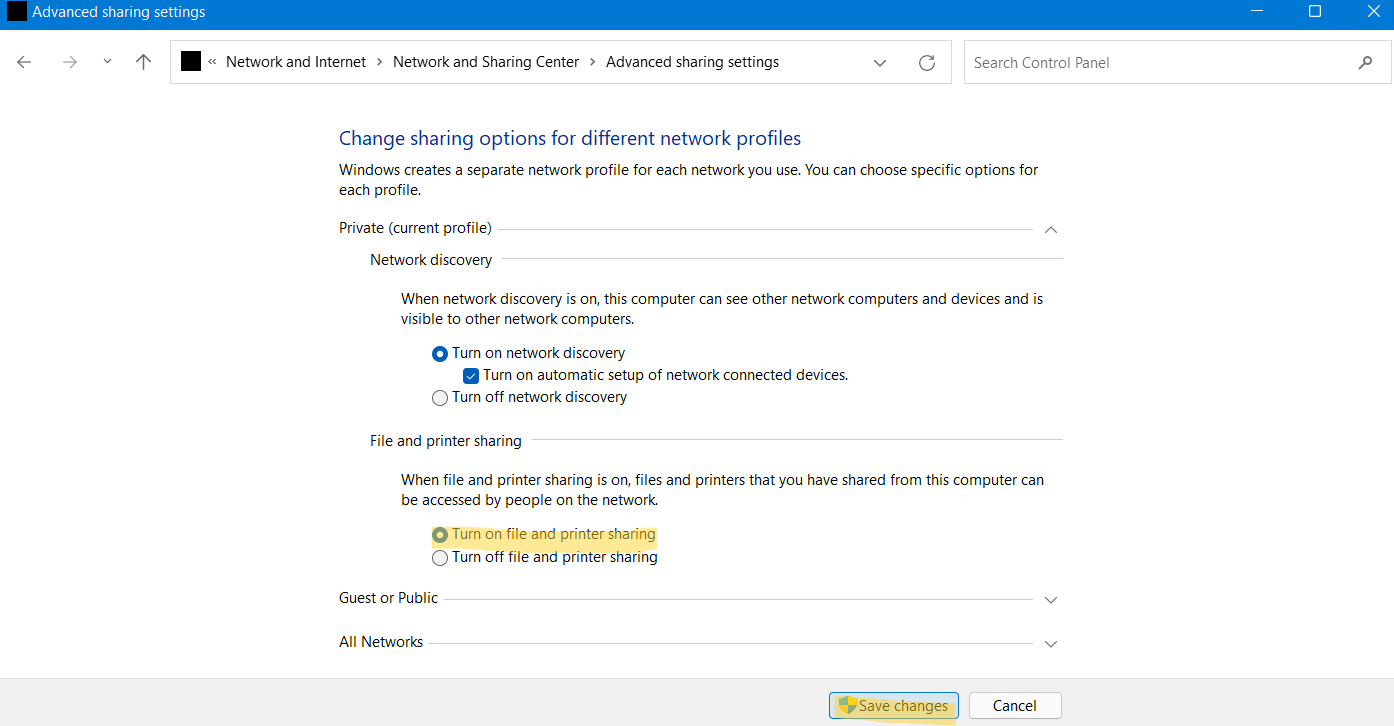
4. Once done, click on Save changes. Restart your system after closing the current window.
Method 2: Resolve the Issue Using Registry Editor
 Registry Disclaimer: It is recommended to create a System Restore point first, if you’re not familiar with registry editing.
1. Firstly, type regedit in the Run dialog box to open Registry Editor.

2. Now, navigate to the following location:
HKEY_LOCAL_MACHINE\SYSTEM\CurrentControlSet\Services\LanmanWorkstation\Parameters
3. From there, click on AllowInSecureGuestAuth and change its value data to 1. If you could not find this REG_DWORD, then create one by right-clicking on the empty space. After that, select New and DWORD (32-bit) Value.

4. Once modified the value data, close Registry Editor and restart your system.
Method 3: Fix the Issue by Automating the FDRP Service
1. Open Run by pressing the Windows+R hotkey.
2. Now, type services.msc and hit Press.

3. After that, look for the service called Function Discover Resource Publication.

4. To access the feature, double-click on it. Then, set Automatic as the Startup type from the drop-down menu.

5. Next, click on Start and then, on Apply. Once done, hit OK.
6. Restart your system to apply the changes. Now, you will be able to share your files.
Method 4: Resolve the Problem by Turning On the Advanced Sharing Feature
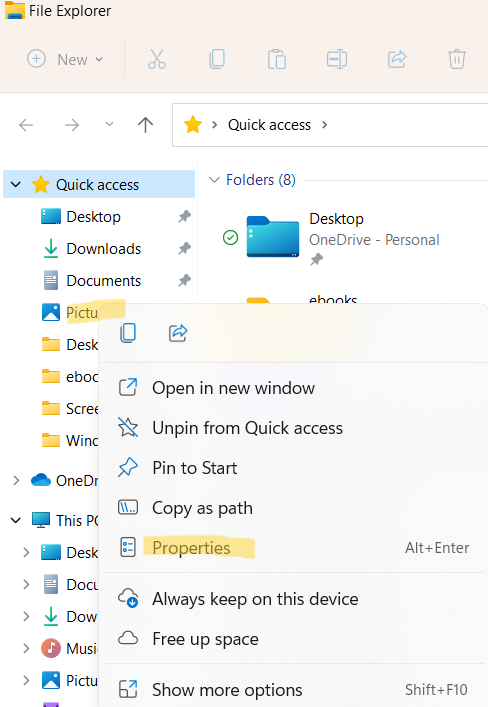
1. Open File Explorer and right-click on the folder that you like to share.
2. After that, choose Properties from the menu.
3. Under the Sharing tab, select Advanced Sharing….

4. Now, mark the Share this folder box. Lastly, click on Apply and then, press OK.

Method 5: Fix the Issue by Disabling the IPv6 Protocol
1. Open Network Connections by typing ncpa.cpl in the Run dialog box.

2. Now, right-click on Wi-Fi or the network adapter you use. From the drop-down menu, choose Properties.

3. Next, uncheck the box present next to Internet Protocol Version 6 (TCP/IPv6).

4. Lastly, click OK for saving the changes. Restart your system after closing the window.
So, these are a few methods to fix file sharing is not working issue on Windows 11.


![The mapped network drive could not be created [Detailed fix]](https://www.kapilarya.com/assets/Network-Drive-768x511.jpg)

![Stop sharing a folder in Windows 11 [Guide]](https://www.kapilarya.com/assets/Network-768x522.png)