If your graphics card is not detected in the Device Manager on your Windows 11 device, you’re not alone. This can happen at random due to various hardware or software issues like outdated drivers, faulty GPU, outdated BIOS, or Windows update problems.
Don’t worry, this guide will walk you through some quick fixes to get your graphics card recognized again!
Page Contents
Fix: Graphics Card Not Detected in Windows 11
Method 1: Check If the Graphics Card is Hidden
Before we move to other methods, first check if the graphics card is hidden as this is the case for some newly installed graphics cards.
1. Press Windows + R. Then, type “devmgmt.msc” in the Run box and press Enter.

2. Click the “View” menu and select “Show hidden devices“.

3. Next, click “Action” and “Scan for hardware changes”.

3. Then, check if the graphics card is still not detected under the Display adapters section.
Method 2: Update BIOS Firmware
1. Press Windows + R, type “msinfo32″ in the Run box, and press “Enter”.

2. Check the BIOS version and when it was updated at the “BIOS Version/Date” line.

3. Then, go to your manufacturer’s website and check the Support (or Download) page for any BIOS updates.
4. If there is any update available, download the recent version.
5. Copy the downloaded file into a USB drive with the FAT32 file system.
6. Plug the USB drive into the system and reboot it.
7. Open the BIOS settings by pressing the key (e.g. F2, Del, Esc) specific to your manufacturer.
8. Once you’re in the BIOS settings, locate the “Update BIOS” option.
9. Then, select the BIOS update file from the USB drive and update the version. Restart your PC once it’s complete.
If updating the BIOS doesn’t fix the GPU not detected issue you can try resetting the BIOS settings to their default state.
Method 3: Reinstall the Graphics Driver
1. Open Windows Settings by pressing Windows + I.
2. Go to the “Apps” section and click on “Installed apps” on the right.

3. From the list of apps, locate the driver for the Graphics card that is not detected.
4. Then, click the three dots and select “Uninstall“.

5. After uninstalling the driver, reboot your system.
6. Go to your computer manufacturer’s site (AMD drivers – https://www.amd.com/en/support and NVIDIA drivers at https://www.nvidia.com/en-in/geforce/drivers), and find and download the latest GPU driver from the Support/Driver page.
7. Install the driver and restart your computer.
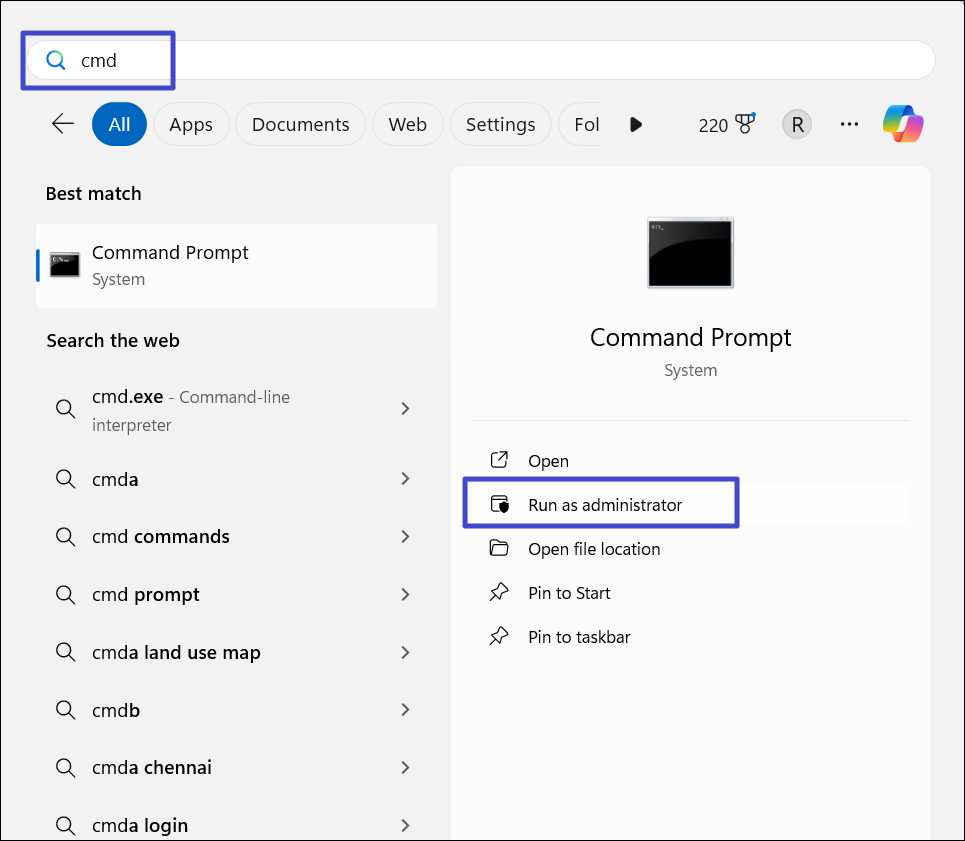
Method 4: Re-enable the Graphics Card using the Command Prompt
1. Press Windows and type “cmd” in the Start menu. Select “Run as administrator”.
2. In the Command Prompt window, type the following command and hit Enter:
bcdedit /set pciexpress forcedisable

3. After executing the command, restart your PC to see if the GPU missing on Windows 11.