Are you experiencing high CPU usage on your Windows 11 computer due to the ‘Service Host’ process? This issue can be frustrating and impact your system’s performance. In this guide, we’ll explore the causes of this problem and provide effective solutions to fix Service host high CPU usage in Windows 11.
Page Contents
What Causes the Issue?
Service Host, or ‘svchost.exe,’ is an important system process responsible for hosting and managing various Windows services. It’s not unusual for Service Host to consume some CPU resources, as it runs multiple services simultaneously. However, when it starts consuming an excessive amount of CPU power, it can lead to sluggish system performance and reduced responsiveness.
Several factors can contribute to this issue, including:
- Background Services: Windows relies on many background services to perform various tasks, and some of them may run under the Service Host process. If any of these services malfunction or misbehave, it can cause high CPU usage.
- Malware or Virus Infections: Malicious software can disguise itself as a Service Host, leading to increased CPU usage. Scanning for malware and removing any threats is essential in such cases.
- Outdated Drivers: Incompatible or outdated device drivers can cause conflicts with Windows services, including Service Host, leading to high CPU utilization.
- Windows Updates: Occasionally, certain Windows updates may not install correctly, resulting in Service Host-related issues.
- Corrupted System Files: System file corruption can disrupt the proper functioning of Service Host, causing it to consume more CPU resources than necessary.
Fix: Service host high CPU usage in Windows 11
Here, we present the most effective solutions to resolve the problem.
Fix 1: Run System File Checker
The System File Checker will inspect and repair any corrupted or missing system files, which can often contribute to the Service Host causing high CPU usage.
Here’s how to do it:
1. Open the Command prompt and run as administrator.
2. Copy and paste the below command:
sfc /scannow
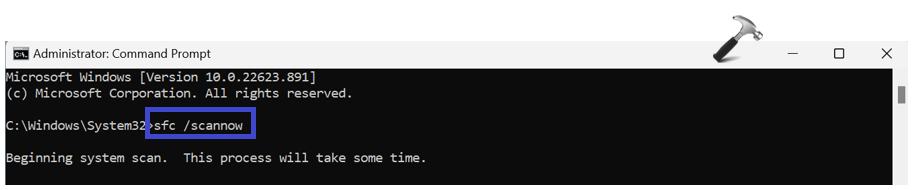
Press Enter.
3. After executing the command, close the Window and restart the PC.
Fix 2: Disable Service Host Local System Task
This action will terminate the ‘Service Host: Local System’ task, which may temporarily relieve the high CPU usage issue caused by this particular service.
1. Open Task Manager. Find “Service Host: Local System”.
2. Now, click on “Service Host: Local System” and click “End Task“.
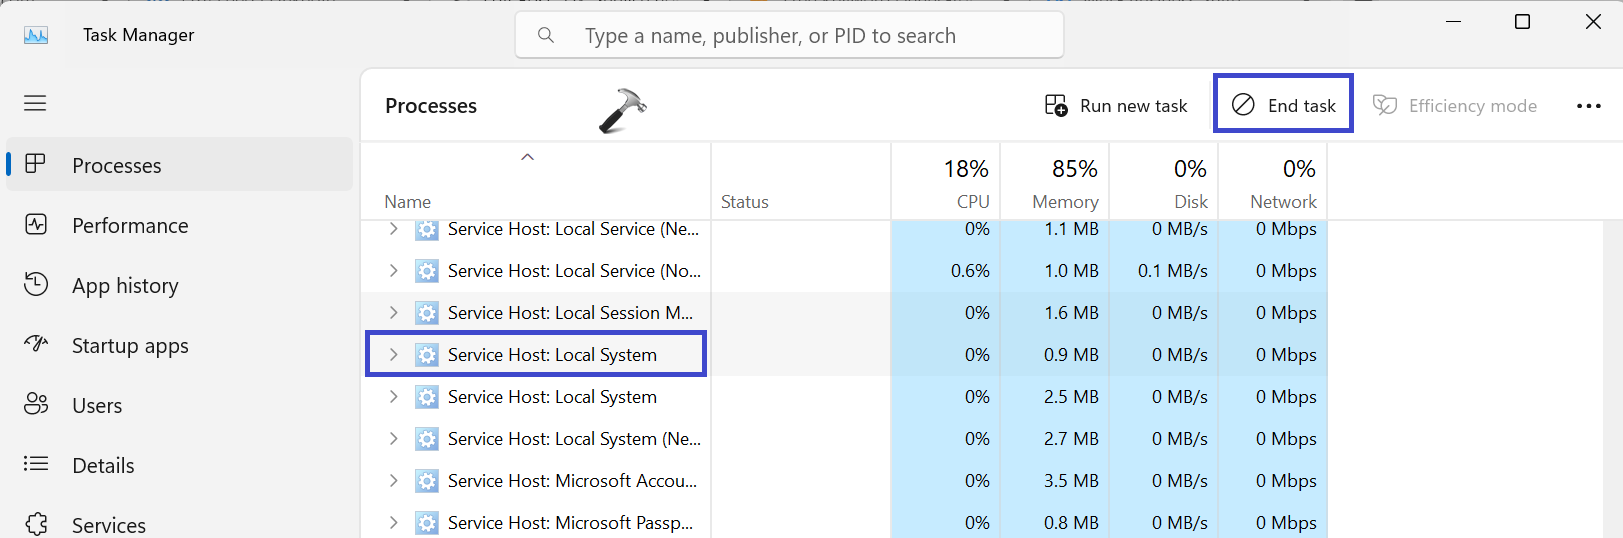
3. A dialog box will appear. This is a warning message to confirm whether you want to end the task.
4. Check the “Abandon unsaved data and shut down” box. After that, click “Shut down“.

Fix 3: Change Registry Value
To address the ‘Service Host High CPU Usage’ issue in Windows, you need to modify the registry value. Follow the below steps to change the value:
1. Press the Windows key + R. Type “regedit.exe” and click OK.
2. Navigate to the following path:
Computer\HKEY_LOCAL_MACHINE\SYSTEM\ControlSet001\Services\Ndu
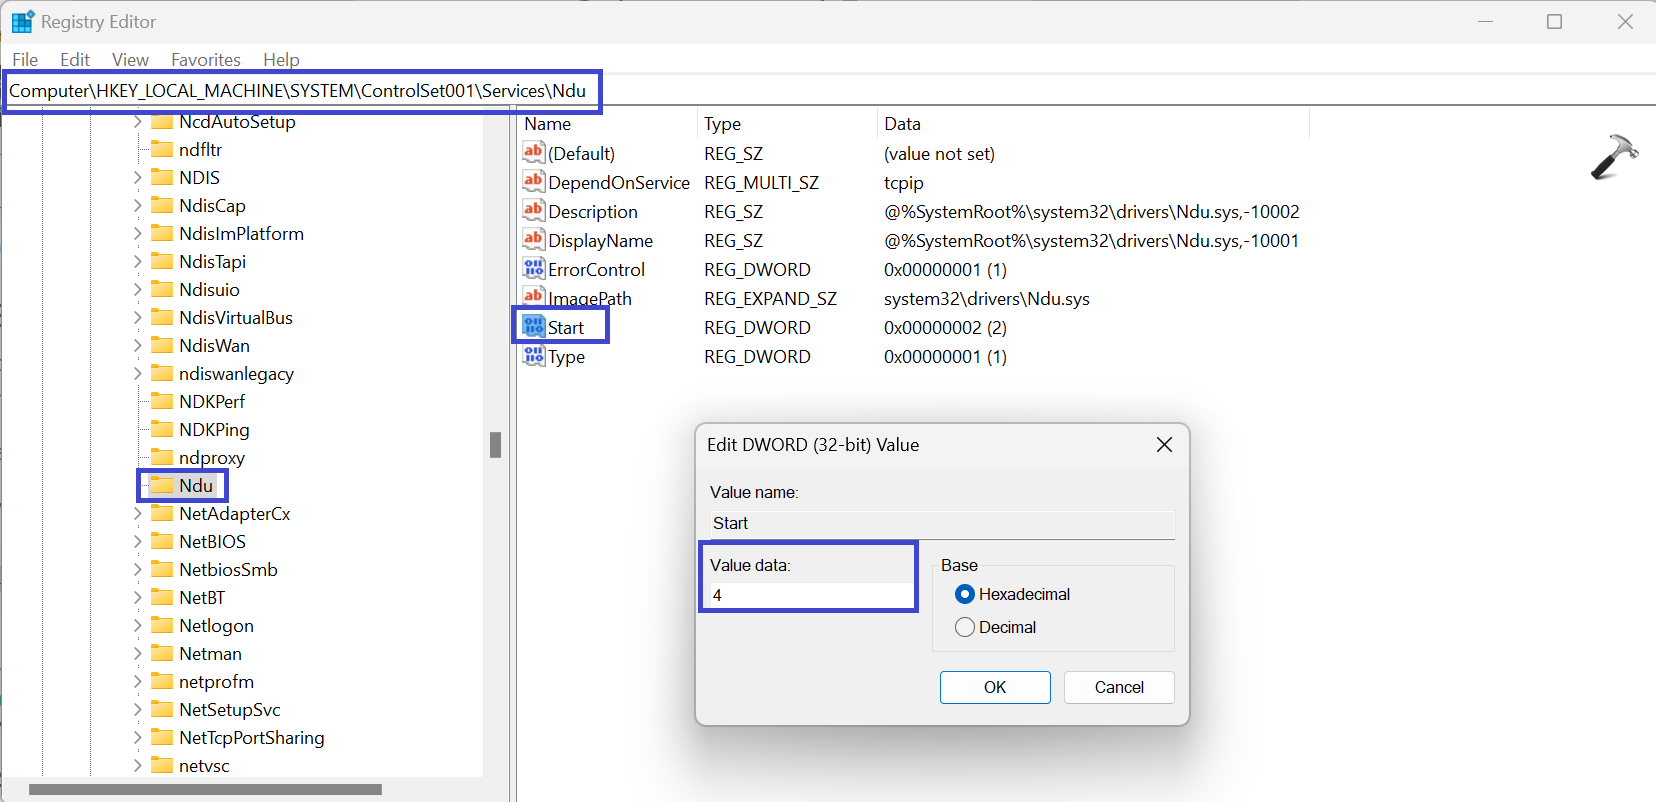
3. In the right panel, double-click on the “Start” registry key and set the value to 4.
4. Click OK.
Fix 4: Disable Background Intelligent Transfer Service
The Background Intelligent Transfer Service (BITS) is a Windows service that facilitates asynchronous and prioritized transfer of files between a client and a server. BITS is primarily used to manage the download and upload of files for various Windows components and applications, such as Windows Update, Windows Defender, and other software that requires background transfers.
Follow these steps to disable the background intelligent transfer service:
1. Press the Windows key + R. Type “msconfig” and click OK.
2. Under the Services tab, uncheck the “Background Intelligent Transfer Service” box.
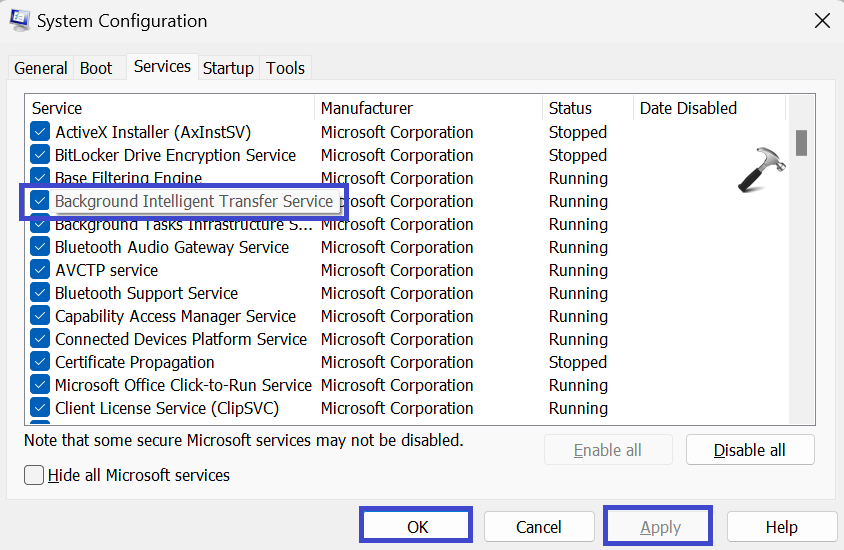
3. Click OK followed by Apply.
Fix 5: Disable Superfetch
Superfetch is a Windows service designed to improve system performance by preloading frequently used applications into RAM (Random Access Memory). This preloading, or caching, is intended to reduce application launch times and enhance overall system responsiveness.
If you are experiencing performance problems and suspect that Superfetch might be the culprit, you can disable it by following these steps:
1. Press the Windows key + R. Type “services.msc” and click OK.
2. Now, double-click on “Superfetch“.
3. A dialog box will appear. Under the startup type, select “Disable” and then click “Stop”.
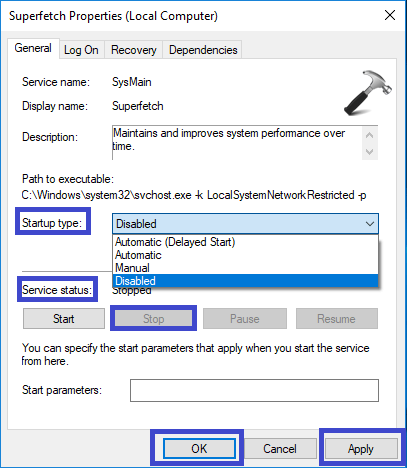
4. Click OK followed by Apply.
Fix 6: Perform Clean Boot
A clean boot can help troubleshoot and pinpoint the cause of the ‘Service Host High CPU Usage’ issue by starting Windows with only essential services and startup applications.
Follow the below steps to perform a clean boot:
1. Press the Windows key + R. Type “msconfig” and click OK.
2. Under the Services tab, uncheck the “Hide all Microsoft services” box.
3. After that, click on “Disable all“.
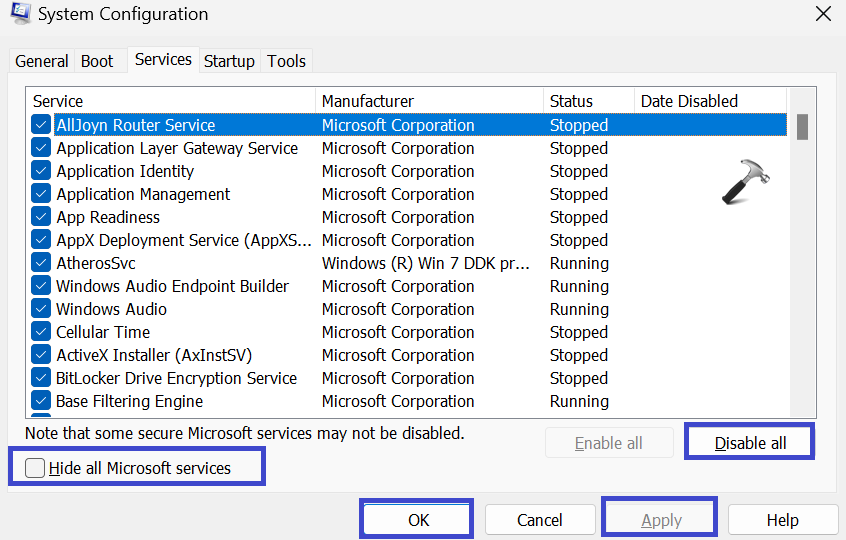
4. Click OK followed by Apply.
5. Go to Startup tab, click on “Open Task Manager“.
6. A Task Manager dialog box will appear. Go to Startup Apps, select the enabled applications and click the “Disable” button.
Fix 7: Upgrade CPU
If none of the previous solutions have resolved your issue, consider upgrading your CPU. The CPU, also known as the Central Processing Unit, plays a vital role in your computer’s performance.
If the ‘Service Host Local System High Disk’ problem persists, an outdated CPU could be the culprit.
To address this issue, you can attempt a CPU upgrade.
It’s important to note that CPU upgrades carry some inherent risks. Incompatibility issues may arise, leading to boot failures. In such cases, you may need to reinstall Windows. To safeguard your data, it’s advisable to back up your files before embarking on a CPU upgrade
That’s It!