
In Windows OS, there may be many background processes running. You won’t care about them until they make some negative impact on your system. This article talks about one such service, which may cause high CPU usage on your Windows 10 machine.
Earlier, many users has reported that wsappx process when run on their system, it makes high usage of CPU and sometimes system hangs or freezes due to this. When you terminate the wsappx process, CPU usage becomes normal immediately.

If you’re also facing same issue due to wsappx process, here’s how you can fix it.
Page Contents
FIX: WSAPPX Causing High CPU Usage In Windows 10
FIX 1 – Via Settings App
Well, wsappx process is associated with AppX Deployment Service (AppXSVC). As per Microsoft, this service provides infrastructure support for deploying Store applications. This service is started on demand and if disabled Store applications will not be deployed to the system, and may not function properly.
The service is usually utilized in Microsoft Store apps. If you disable these apps to run in background, you may be able to resolve this issue. Follow this guide to disable the apps from running in background:
How to disable background apps in Windows 10

If you still have the issue, refer FIX 2 to disable wsappx process.
FIX 2 – Via Registry Editor
Registry Disclaimer: The further steps will involve registry manipulation. Making mistakes while manipulating registry could affect your system adversely. So be careful while editing registry entries and create a System Restore point first.
1. Press  + R and put regedit in Run dialog box to open Registry Editor (if you’re not familiar with Registry Editor, then click here). Click OK.

2. In left pane of Registry Editor window, navigate to following registry key:
HKEY_LOCAL_MACHINE\SYSTEM\CurrentControlSet\Services\AppXSvc
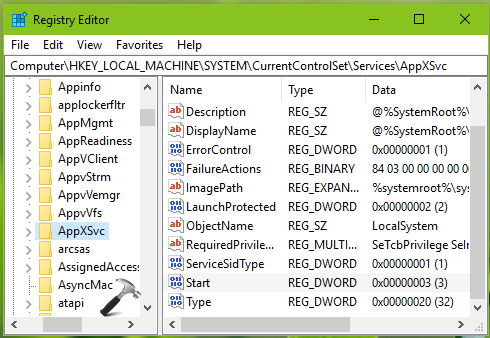
3. Now in the right pane of Explorer registry key, you might see Start named registry DWORD (REG_DWORD) which may be set to 3. Double click on this registry DWORD to modify its Value data:

4. Finally, set the Value data to 4 and click OK. Close Registry Editor and reboot to make changes effective.
After restarting your system, you’ll notice that issue has been resolved.
Hope this helps!


Thank you, My CPU usage was running hot 40 to 60 for 5 days after doing the latest Quality UPdate (KB5064838). I followed the instructions and it went back to normal.
^^ Glad to help Diane 😎