If you’ve to manage multiple printers attached with your Windows operating system, this article is for you. In this post, we’ll see how you can change installed printer’s name from default to friendly one. This will help you to manage the printers in a more simplified and better way.
To rename printers, you can adopt either of the below mentioned methods. Note that you’ll need administrative privileges to rename a printer. So without wasting the time anymore, here’s the how-to part:
Page Contents
How To Change Printer Name In Windows 10/8.1/8/7
We recommend you to create System Restore point first.
Method 1 – Using Windows PowerShell In Windows 10
1. Right click Start Button or press  + X keys and select Windows PowerShell (Admin).
2. In administrative Windows PowerShell window, type/paste Get-Printer and press Enter key.
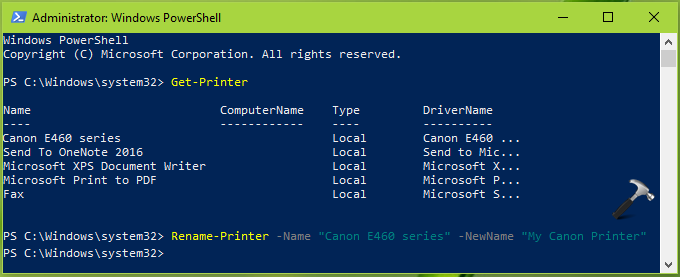
3. As a result a list will of all installed printers on the machine will be displayed. Under Name, take a note of the printer’s exact name which you want rename.
4. Finally type following command substituting your printer’s exact name plus new name and press Enter key:
Rename-Printer -Name "<Printer's exact name>" -NewName "<Printer's new name>"
5. Close Windows PowerShell and check, your printer should have new name associated now.
You can explore Rename-Printer cmdlet in this Microsoft documentation.
Method 2 – Using Settings App In Windows 10
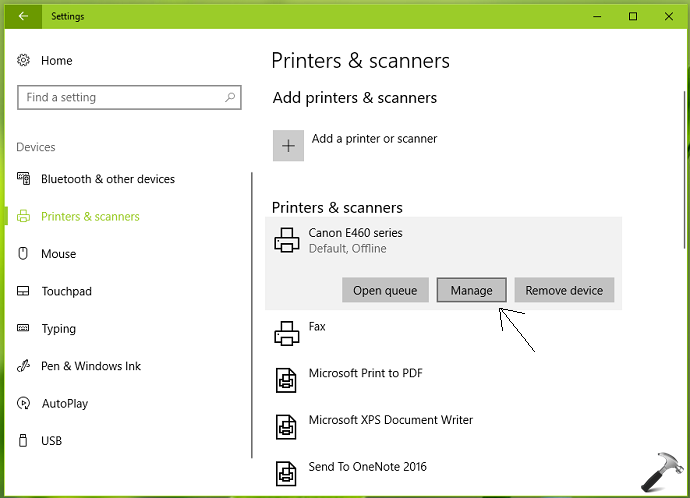
1. Right click Start Button or press + X keys and select Settings.
2. In the Settings app, navigate to Devices > Printers & scanners.
3. Now in right pane of Printers & scanners, click on your printer and then click Manage.
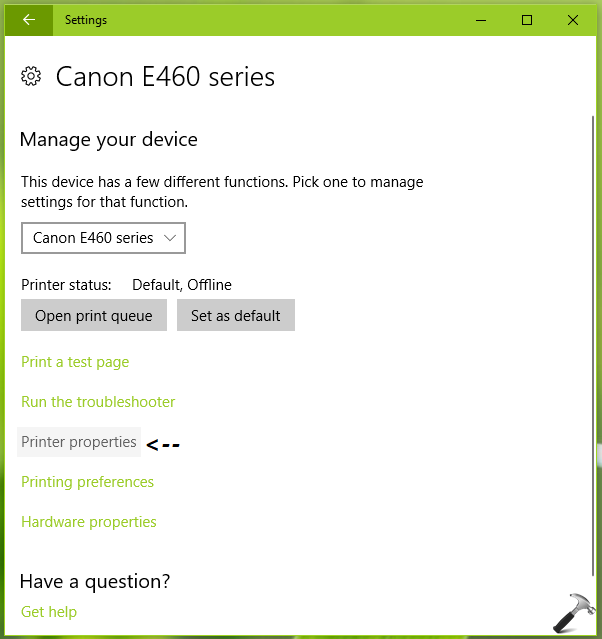
4. Moving on, in next screen, click on Printer properties link.
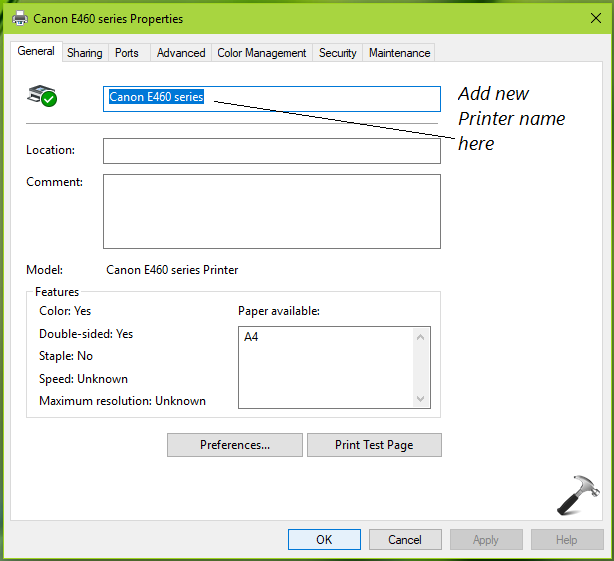
5. Finally, in printer property sheet, on General tab, replace the printer’s existing name with new name you want (refer below shown screenshot). Click OK. This would rename your printer with name you want.
Method 3 – Via Registry Editor In Windows 8.1/8/7
The registry method is not applicable to Windows 10. But if you’ve Windows 8.1/8/7, you can try it on those operating systems.
1. Open Registry Editor.
2. Go to HKEY_LOCAL_MACHINE\SOFTWARE\Microsoft\Windows NT\CurrentVersion\Print\Printers registry key.
3. Under Printers, locate the sub-key for the printer you want to rename. Once you locate the registry sub-key to printer, in the right pane, look for Name registry string (REG_SZ).
4. Double click on the registry string and type its Value data as the printer name you want. Click OK.
5. If the printer is shared one, you need to similarly change Share Name registry string’s Value data with new printer name.
6. Close Registry Editor and reboot.
So in this way you can rename printer in Windows.
That’s it!