When you connect a removable media to your Windows 10, you should be asked what you want to do with that media. The feature behind this is called AutoPlay. However, if you’re no longer offered the notification and then pop-up to decide what to do with plugged media, this article is for you.
Usually, after plugging a removable media, you get a notification like this:

When you hit above notification, following fly-out menu comes with AutoPlay options:

However, if you’re not getting either of above then it must be possible that AutoPlay settings on your system is turned off. Here is how you can configure AutoPlay settings in your Windows 10.
Page Contents
How To Configure AutoPlay Settings In Windows 10
Method 1 – Using Settings App
1. Right click Start Button or press  + X keys and select Settings.
2. In the Settings app, navigate to Devices > AutoPlay.
3. In right pane of AutoPlay, set the Use AutoPlay for all media and devices option to On to enable AutoPlay.

4. Then you can individually select default settings for the media you plug in. For example, you can set Removable drive and Memory card settings to one of the following option:
- Take no action.
- Open folder to view files (File Explorer).
- Ask me every time.
- Configure storage settings (Settings).
5. Additionally, if you connect your phone in the past, you can also select AutoPlay settings for it.
Once you configured all settings, they will be immediately saved and applied.
Method 2 – Using Control Panel
1. Open Control Panel.
2. Go to All Control Panel Items > AutoPlay.
3. Under AutoPlay, check Use AutoPlay for all media and devices option to activate AutoPlay settings.
4. Now for Removable drive, you can select a convenient action.
5. Then check Choose what to do with each type of media and then you can individually set an action for Pictures, Videos, Music and Mixed content.
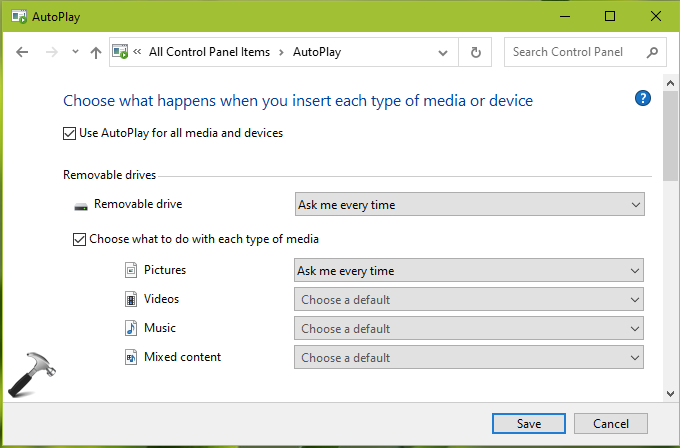
6. Finally, click Save button to preserve configured settings.
That’s it!
Related: Configure Media Autoplay Settings In Microsoft Edge.