
As we all know, Windows 8 introduced the Lock Screen feature last year, and now this feature has got improved in newly released update i.e. Windows 8.1. In Windows 8.1, you can enable a slide show for Lock Screen. For this to be worked out, you can make its setup very easily from the PC Settings screen. Here is how you can manually configure Windows 8.1 Lock Screen to display slide show:
From the above image and article title, I am going to show you the registry way to configure the slide show. Registry way, obviously overrides the manual way and is non-configurable by normal users, who can disturb the settings you’ve made. So, here is the method involving registry modification:
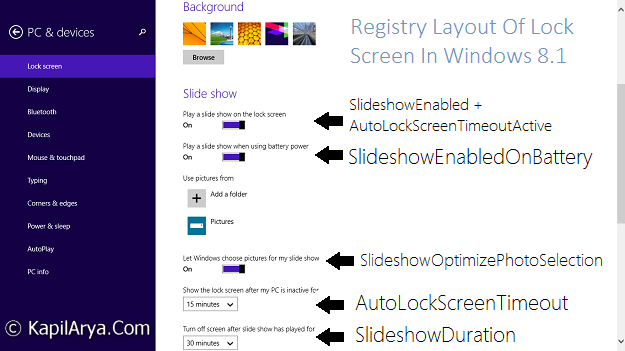
How To Configure Lock Screen Slide Show In Windows 8.1
Registry Disclaimer: The further steps will involve registry manipulation. Making mistakes while manipulating registry could affect your system adversely. So be careful while editing registry entries and create a System Restore point first.
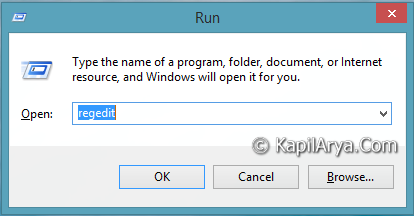
1. Press  + R and put regedit in Run dialog box to open Registry Editor (if you’re not familiar with Registry Editor, then click here). Click OK.
2. Navigate here:
HKEY_CURRENT_USER\Software\Microsoft\Windows\CurrentVersion\Lock Screen
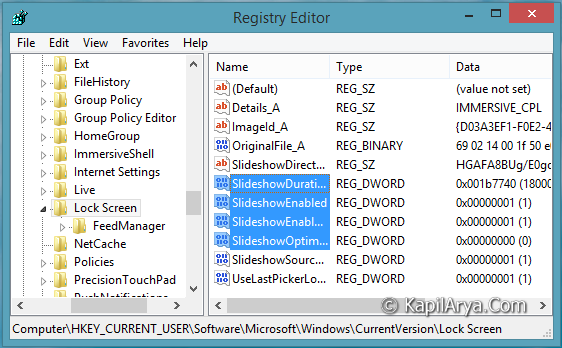
3. In the above mentioned location, for the right pane, your window should have above shown highlighted DWORD entries (refer screenshot). The Value data for these DWORDs handles the configuration for slide show of Lock Screen.
4. Double click on the DWORDs and edit their corresponding Value data as per you desire the slide show to display:
DWORD : SlideshowEnabled – Play a slide show on the Lock Screen
Value data : 0 = Off | 1 = On
DWORD : SlideshowEnabledOnBattery – Play a slide show when using battery power
Value data : 0 = Off | 1 = On
DWORD : SlideshowOptimizePhotoSelection – Let Windows choose pictures for my slide show
Value data : 0 = Off | 1 = On
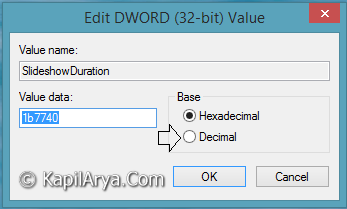
DWORD : SlideshowDuration – Turn off screen after slide show has played for
Value data (Decimal) : 1800000 = 30 minutes | 3600000 = 1 hour | 10800000 = 3 hours | 0 = Don’t turn off
After inputting your preferred Value data, click OK.
5. Now, locate this key:
HKEY_CURRENT_USER\Control Panel\Desktop
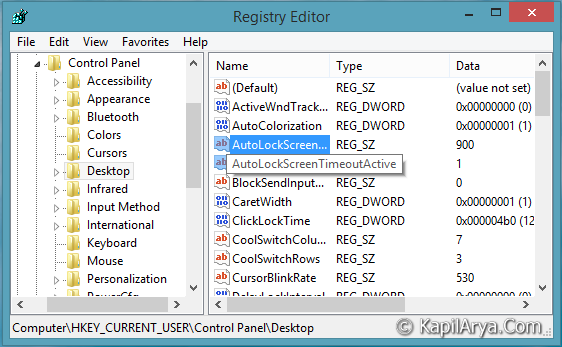
6. In the right pane of this location, double click the highlighted strings and put corresponding Value data according to your requirement:
String : AutoLockScreenTimeoutActive – Play a slide show on the Lock Screen
Value data : 0 = Off | 1 = On
String : AutoLockScreenTimeout – Play a slide show on the Lock Screen
Value data : 60 = 1 minute | 120 = 2 minutes | 300 = 5 minutes | 900 = 15 minutes | 1800 = 30 minutes | 3600 = 1 hour
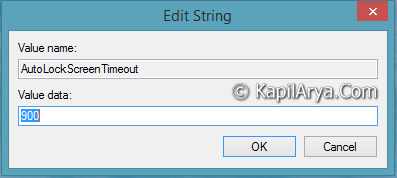
After pasting the required value, click OK.
Please note that SlideshowEnabled (DWORD) and AutoLockScreenTimeoutActive (String), both must have Value data equals to 1 in order to display slide show. In this way, slide show for Lock Screen is configured using registry.
That’s it! Also see how to configure desktop slideshow in Windows.


The only disadvantage of registry is dat u can’t select the folder thru it to get slide show :(
Sir:
I have done a reload of Win 8.0 upgraded to 8.1 to clean up the registry fluff after several years.
Before this, the slideshow on lock screen worked. It did after the reload but stopped several days later.
I tried your setup above, and did add the two keys on the control screen. It is still not working.
All my drivers are working fine and updated.
Do you have any ideas? When I setup the system, my screen goes to lockscreen. It stays there for exactly 1 minute and then blanks out by two screens.
Please help. Are your registry examples from Win 8.1 or are they from a pre-view version.
Thanks, in advance.
Levi
^^ Please ensure that the Value data mentioned in step 6 are correct :)
Thanks for the suggestion.
In the meantime, I tried something else.
I use System Mechanic to keep the PC clean on an ongoing basis. I remembered that I had cleaned the registry several times since I reloaded Win 8.1. I restored the registry fixes and now the slide show works.
I have reset the system, run System Mechanic again and no registry issues are found, even though I restored some ?? Go figure!
Anyway, thanks for your quick reply. The same problem occurred on my laptop, so I will restore some registry cleanups there in pieces to try to figure out what broke the system.
Lots of moving parts and problems do not always manifest themselves clearly.
Have a great day!
Levi
^^ Glad to hear that you sorted it! You could also have given a try to restore the Group Policy objects, since there are some policies for Lock Screen as well :)
http://www.kapilarya.com/how-to-reset-local-group-policy-editor-in-windows-8
Nice tip on the reg settings.
However, WHERE can we change the location it takes pictures from?
For example, I have a custom set of wallpaper in the Windows/Web directory I would like to use for the slideshow on the LockScreen . . .
^^ You can select the images folder from PC Settings -> Personalize -> Lock Screen.
Well, you can scrap my comments above. Things worked awhile after I restored registry items but then it stopped working again.
It also stopped working on my laptop where I have not been trying these feats. I wonder if it has something to do with the payload that is put on a computer after having used that same log-in on another Microsoft log-in computer. Both computers use the same log-in Microsoft account.
I am not sure where to go from here except to wait for a Microsoft patch which might solve the problem.
Do you have any advice?
Thanks,
Levi
Yeah, I agree that sometimes Lock Screen not plays the slide show. In my case, I removed the image selection; switched to default settings then reconfigured the slide show. It works well now :)
” You can select the images folder from PC Settings -> Personalize -> Lock Screen”
Not in Windows 8.1 Pro, you can’t. You are only allowed to choose certain specific limited folders. You cannot, for example, choose C-drive, then choose Windows.
What you can do, though, is place your wallpaper/pics collection in the Public-Pictures folder and work from there.
Yet my question remains: Where in the Registry can you set the Slideshow location? Is that even possible?
Kapil, what do you mean by default settings.
^^ By default settings, I mean that Playing slide show is off, there is no folder selection of images from which slide show can be played.
@ CarlS, I am using Windows 8.1 Pro 64-bit, and I have the options to select folder. You can choose any folders having images in it from the Modern UI file browser, click This PC when it asks to choose folder. Atm, I have no idea where it is located in registry, but I am still digging :)
@ Kapil Arya:, using Win 8.1 Pro WMC 64bit (and an identically-configured 32bit system), when I browse to This PC, I do get several folders, including other internal drives, attached USB, and network drives. However, when I choose This PC to navigate to C:WindowsWebWallpapermy wallpaper collection(s), it will not allow access. The only directory it provides is “Users”.
During your further development of this issue and research into the registry, please see if you can identify the reg tweaks necessary to overcome this restriction. Once identified, that would allow a user to choose any location for screenshow.
Hello again.
I have been off looking at other trails to try to find the rabbit.
A guy named Sergio posted a patch on 11/22/13 that solved my problem for now.
Slide show on lock screen has a dependency on Windows Search Service working properly.
Navigate to HKEY_LOCAL_MACHINESOFTWAREMicrosoftWindows SearchFileChangeClientConfigs and rename it with a BAK (or something) close RegEdit and restart computer.
A new key will be created without the BAK and it includes two lines. One with “ScopeToMonitor” with the address for Camera Roll and Skydrive.
I had deleted the Camera Roll dir in my Pictures sometime ago because it was empty. It turns out it has to be there but it can be empty as long as you select another picture directory in the screen show setup which has acceptable photos.
So I created the directory “Camera Roll”, selected it in the setup along with other picture directories. The system is working fine now.
CarlS, this might be the place in registry to put the locations you are trying to change, I didn’t try that. Just need to restart the PC after you have changed the registry.
Good Luck!
^^ Yeah, I posted that solution few months ago:
https://www.kapilarya.com/fix-windows-search-service-failed-to-start-in-windows-8-1
But I can’t give surety that ScopeToMonitor is the handler for selecting slide show images. Well, thanks for the letting me know, I’ll try it on my system and respond you :)
The “Camera Roll” directory that has to be there is also referenced in ComputerHKEY_CURRENT_USERSoftwareMicrosoftWindowsCurrentVersionExplorerUser Shell Folders .
My issue with having both of my systems not working on slideshow on the lock screen was that I deleted the “Camera Roll” directory on my main PC and backed up my files to the laptop which made the problem move there too. Initially, I thought this was because of the same windows logon username and that the problem transferred to the laptop because of that.
I think Microsoft made an error in requiring the “Camera Roll” directory to be present when it may be empty most times anyway. It would have been better to just use the “Pictures” directory as the landing position.
^^ Here is how configured the slide show and it plays every time :)
Notice that Camera Roll option is off in my case. Using Shell Folders from the Registry not have any ID linked to that of Lock Screen slide show :(
Hey,
Two questions
1) Is there a way to reduce delay between pictures?
2) Is there also a way to have a normal slideshow, instead of windows zooming into my pictures, or loading 6 at a time which occasionally happens?
I’m trying to achieve a stop-motion effect with like a 0.5 or 1 second delay between a series of pictures I took. ( I am aware this will cause a battery drain, and use up resources, but need to do it anyway).
Thank you very much
^^ AFAIK, it’s not possible to change the slide duration, only you can configure duration for whole of slide show. Answer to second question is also no, because this is by design and we can’t tweak the in-built effects :)
Hello, not sure if this customization has been posted above, but is there a way to set a custom time limit until the screen turns off after the slideshow? Notice how the default values are 30 minutes, 1 hour & 3 hours? Is there a way to set it for 5 minutes (300 seconds)? I tried putting that in the registry, yet the screen turns off in a few seconds. I tried other custom numbers with the same result. Can you please email me *email removed for privacy* for a way to do that please? Thanks
Hi, I want the monitor to turn off after 5 minutes of the slideshow on the lock screen. How do I do that?
^^ Set SlideshowDuration DWORD for 5 minutes :)
Sorry about my double post above, if you read that first post I have right above the one liner post that I have, I’ve tried putting in 300 for the value, yet the screen turns off within a few seconds. Can you try it out on your computer real quick and see if it works? Thanks
WOW! I finally figured out the crazy mathematical computation that is used for those numbers. First I thought it was “seconds” that were being used. I was wrong. So I thought they were “milliseconds” (for how I learned them to be called) which would be 1/100 of a second. Apparently that didn’t work either. So I noticed that there’s an additional 0 in the computation which means that it should be 1/1000. I looked up the meaning of a millisecond and that’s 1/1000. I thought 1/100 was a millisecond. Apparently not. 1/100 is a centisecond.
ANYWHO, I figured it all out:
1000 milliseconds X 60 seconds X 5 minutes = 300000
I have to input that number for 5 minutes. Thanks for all the help.
^^ Glad you sorted it 😀