Reserved Storage is designed to enhance system stability and ensure smooth updates. Reserved Storage allocates a portion of your computer’s storage exclusively for system use, helping to prevent low disk space issues and facilitating seamless system updates. In this guide, we’ll walk you through the steps on how to enable/disable Reserved Storage in Windows 11, allowing you to optimize your Windows 11 experience.
Page Contents
Reasons to Enable Reserved Storage
- Enhanced System Stability: Reserved Storage sets aside a portion of your device’s storage exclusively for system updates and maintenance. This helps ensure that essential system files always have sufficient space, contributing to a more stable and reliable operating system.
- Seamless Updates: With Reserved Storage enabled, Windows 11 can download and install updates more smoothly. The allocated space acts as a buffer, preventing common issues associated with low disk space during the update process.
- Optimized Performance: By providing a dedicated space for system operations, Reserved Storage contributes to optimized performance. It helps in the efficient execution of background tasks, reducing the likelihood of performance degradation over time.
Reasons to Disable Reserved Storage
- Conserving Storage Space: Some users may prefer to maximize their available storage for personal files and applications, especially on devices with limited disk space. Disabling Reserved Storage allows you to reclaim this dedicated space for your use.
- Customization and Control: Disabling Reserved Storage gives users greater control over their system resources. If you are familiar with managing your storage manually and want to allocate space based on your specific needs, turning off Reserved Storage allows for a more customized approach.
- Compatibility with Storage-intensive Applications: Certain applications or workflows may require significant amounts of free storage. Disabling Reserved Storage can be beneficial in scenarios where every bit of available space is crucial, ensuring compatibility with storage-intensive tasks.
Check the Reserved Storage Status in Windows 11
Firstly, it’s important to determine whether Reserved Storage is currently enabled or disabled on your Windows 11 system.
You can verify its status through the following methods:
Method 1: Using Command Prompt/Windows PowerShell
1. Open the Command Prompt and run as administrator.
2. Copy and paste the below command:
DISM /Online /Get-ReservedStorageState
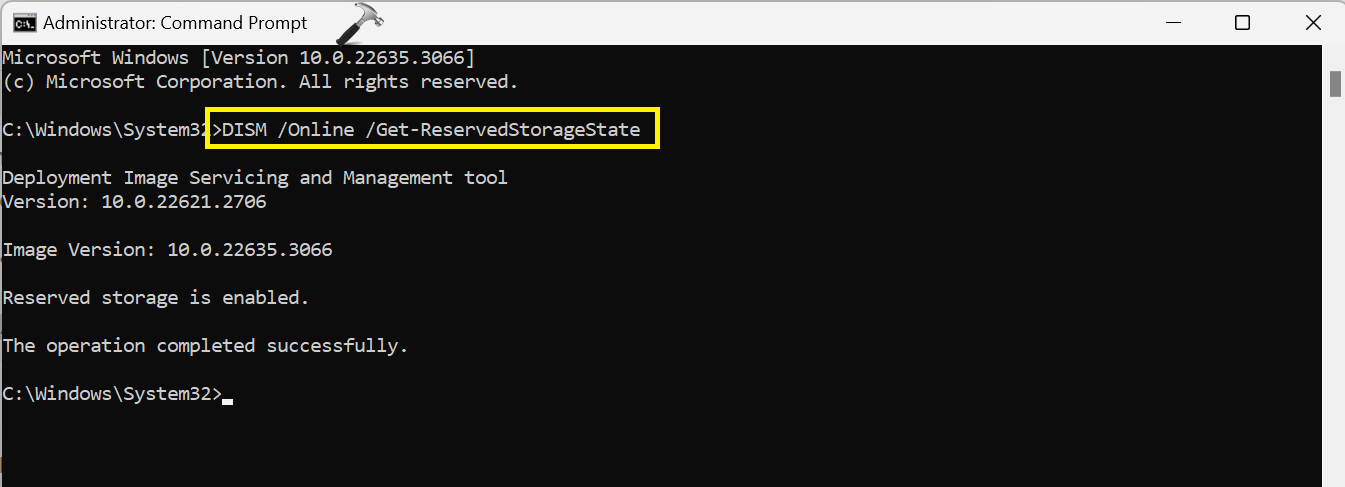
Press Enter.
For Windows PowerShell, copy and paste the below command:
Get-WindowsReservedStorageState

Press Enter.
Method 2: Using Settings App
1. Open the Settings app and navigate to “System => Optional features“.
2. If it is enabled, you will see a reserved storage option.
If it is disabled, you will not be able to see the reserved storage option.
How to Enable/Disable Reserved Storage in Windows 11
Below are the methods to enable or disable reserved storage:
Method 1: Using REG File
1. Press the Windows key + R. Type “regedit.exe” and click OK.
2. Navigate to the following path:
[HKEY_LOCAL_MACHINE\SOFTWARE\Microsoft\Windows\CurrentVersion\ReserveManager]

3. There should be three registry keys:
- MiscPolicyInfo
- PassedPolicy
- ShippedWithReserves
If you don’t have any of these policies, then you can create one. Right-click on “ReserveManager” and click “New => DWORDv(32-bit) Value“.

Type “MiscPolicyInfo” and click OK.
Follow the above steps to create the other two registry keys (PassedPolicy and ShippedWithReserves).
4. Now, double-click on the “MiscPolicyInfo” key. A prompt box will appear.

Set the value to 1 to enable it.
Set the value to 2 to disable it.
5. Double-click on the “PassedPolicy” key.

Set the value to 1 to enable it.
Set the value to 0 to disable it.
6. At last, double-click on the “ShippedWithReserves” key.

Set the value to 1 to enable it.
Set the value to 1 to disable it.
7. Close all the registry windows and restart the PC to save the changes.
Method 2: Using Command Prompt
1. Open the Command prompt and run as administrator,
2. Copy and paste the below command to enable reserved storage:
DISM /Online /Set-ReservedStorageState /State:Enabled

Press Enter.
Copy and paste the below command to disable reserved storage:
DISM /Online /Set-ReservedStorageState /State:Disabled

Press Enter.
3. Close all the windows and restart the PC.
Method 3: Using Windows PowerShell
1. Open the Windows PowerShell and run as administrator.
2. Copy and paste the below command to enable it:
Set-WindowsReservedStorageState -State Enabled

Press Enter.
Copy and paste the below command to disable it:
Set-WindowsReservedStorageState -State Disabled

Press Enter.
3. Close the windows and restart the PC.
That’s It!