
If you’re managing a system with multiple users and you need to disable user account without deleting it, this article is for you. Windows provides you the facility to disable an user account so that it can no longer be signed in or switched to.
Unlike deleting user account completely, disabling the user account preserves the user account data, which should be readily accessible when user account is enabled again.
Here is how you can enable or disable users account on your Windows 10.
Page Contents
How To Enable/Disable User Account In Windows 10
Method 1 – Via LUSRMGR Snap-in
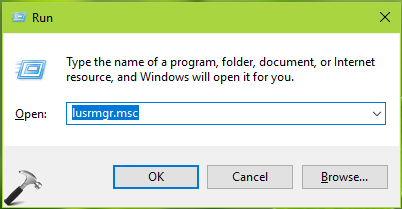
1. Press  + R and type lusrmgr.msc in Run dialog box to open Local Users and Groups snap-in. Click OK.
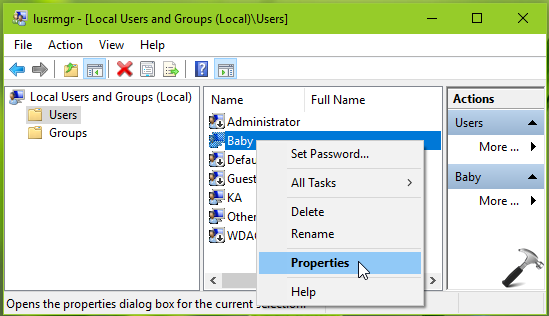
2. In the lusrmgr window, double click on Users. Now right click on the user account you want to disable and click Properties.
3. On the property sheet, check the Account is disabled option. Click Apply followed by OK.
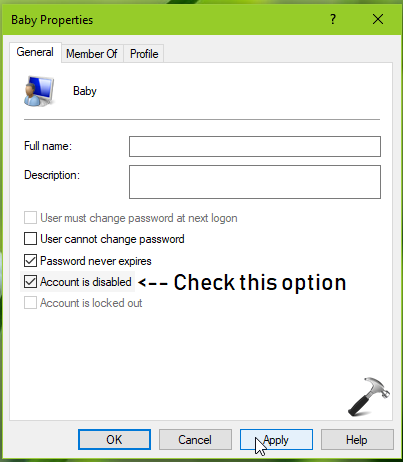
This should disable the user account now. The account will no longer be visible at login screen, which is proof the active is deactivated.
Method 2 – Via Command Prompt
You can also use Command Prompt to disable user account.
Please follow these steps:
1. Right click Start Button or press + X keys and select Command Prompt (Admin) to open Command Prompt as administrator.
2. In administrative Command Prompt window, type net user and press Enter key.
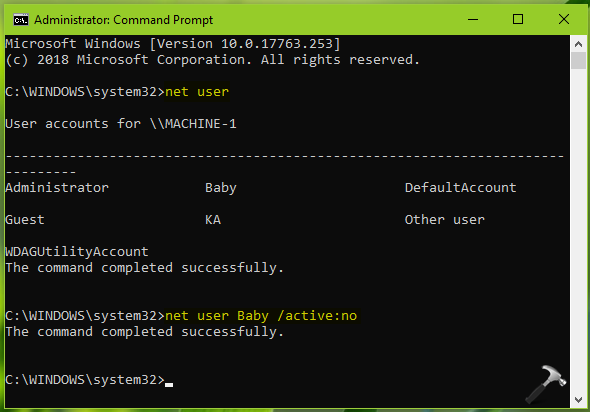
3. Then type following command and press Enter key:
net user <ACCOUNT NAME> /active:no
*Make sure you replace <ACCOUNT NAME> with actual user account name to disable.
The command completed successfully message in return confirms that selected user account is disabled now.
———
To activate the disable user account later, simply uncheck Account is disabled option or execute net user <ACCOUNT NAME> /active:yes command in Command Prompt, where <ACCOUNT NAME> must be substituted with actual user account to activate.
———
That’s it!


Dear Kapil ji,
I am looking for a user account as Administrator with full rights. I am using Windows 10 Home Single Language version of windows bundled with Asus X543U Laptop. While opening lusrmgr.msc, i am unable to find the details of user accounts.
Getting an error as “This snapin may not be used with the edition of Windows 10. To manage user accounts for this computer , use the User Accounts tool in the Control Panel.” unable to getting new user options further.
Please help how can i get Administrator named user account with administrator rights.
Warm Regards,
Suraj Singh
^^ You can use the current administrator account to create another administrator account. If you can change existing account to administrator account using this guide: https://www.kapilarya.com/how-to-change-user-account-type-in-windows-10. If there is no admin account on your system, refer this fix: https://www.kapilarya.com/fix-lost-administrative-rights-in-windows-10.
Lost one account from login screen after Windows Update Assistant (the account that downloaded & ran that app). Another suggestion, running command line ‘net user “missing user name” /active:yes’ lost the other non-admin user login! Several suggestions making changes in lusrmgr.msc did not work or were not applicable (un-disable account) until I finally used lusrmgr.msc to assign the missing users to a local group (Users or Administrators). That should be the first thing to check, that missing logins, when still existing in C:\Users, should be checked if assigned to a local group.