
If Windows Update is constantly eating your data bandwidth, this article may help you to solve this. We all know that updates are automatic in Windows 10 and they keeps downloading in background. However, if you like, you can turn off automatic updates.
But if you prefer to stay updated without ruining your data plan, Microsoft has something for you. By enabling delivery optimization, Windows will automatically adjust the bandwidth while downloading updates. This ensures your data is used efficiently. Delivery optimization can help you to restrict or limit Windows Update bandwidth as mentioned below.
Page Contents
How To Limit Windows Update Bandwidth In Windows 10
WAY 1 – Using Settings App
1. Right click Start Button or press  + X keys and select Settings.
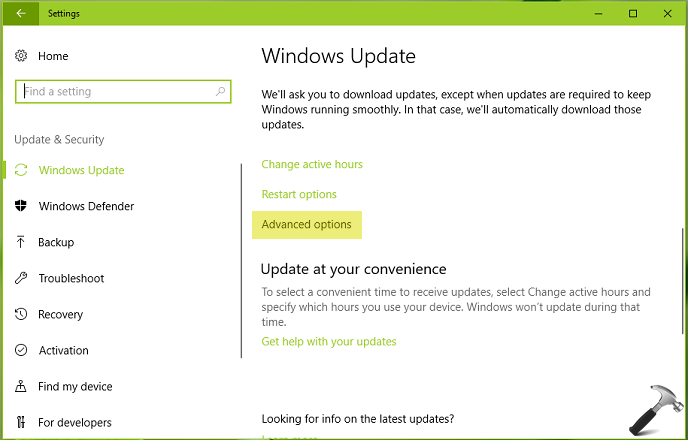
2. In the Settings app, navigate to Update & Security > Windows Update.
3. In the right pane of Windows Update, click Advanced options.
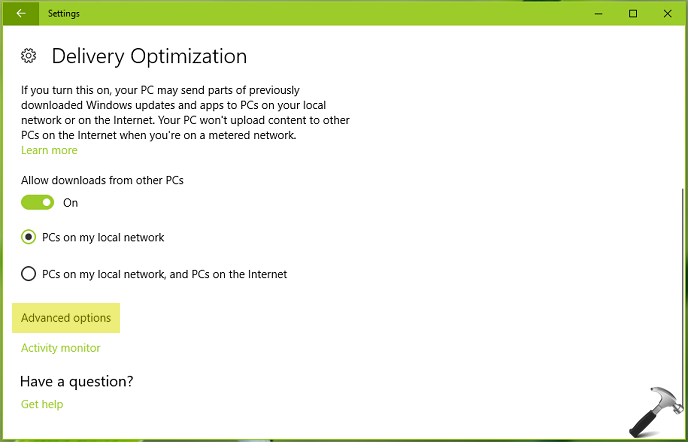
4. Next, click on Delivery Optimization.

5. Moving on, click on Advanced options under Delivery Optimization.
6. Now on the next screen, under Download settings heading, you’ve to enable Limit how much bandwidth is used for downloading updates in the background option and then choose a percentage on the slider to restrict the bandwidth.
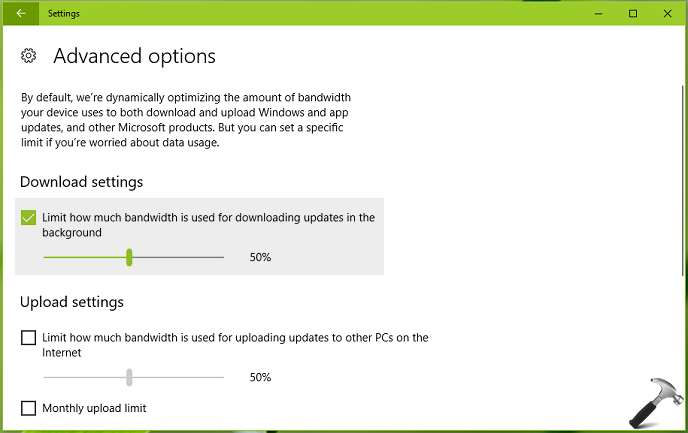
FYI, above mentioned steps are illustrated on V1709. The wording and placement of corresponding options may change in later versions.
You can also limit Windows Update bandwidth via registry as mentioned below.
WAY 2 – Via Registry
Registry Disclaimer: The further steps will involve registry manipulation. Making mistakes while manipulating registry could affect your system adversely. So be careful while editing registry entries and create a System Restore point first.
1. Press + R and put regedit in Run dialog box to open Registry Editor (if you’re not familiar with Registry Editor, then click here). Click OK.

2. In left pane of Registry Editor window, navigate to following registry key:
HKEY_LOCAL_MACHINE\SOFTWARE\Microsoft\Windows\CurrentVersion\DeliveryOptimization\Settings
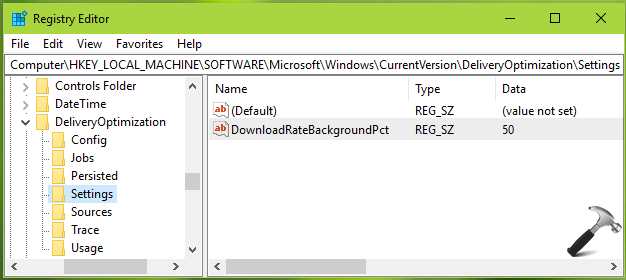
3. In the right pane of Settings registry key, right click and select New > String Value. Name the newly created registry string (REG_SZ) as DownloadRateBackgroundPct. Double click to modify the string’s Value data:

4. Finally, type the percentage of bandwidth you want to limit for Windows Update and click OK. A value between 5 and 100 is acceptable here. You can now close Registry Editor.
In this way, you’ve restricted the Windows Update bandwidth for your Windows 10.
That’s it!


![[Latest Windows 11 Update] What’s new in KB5089549?](https://www.kapilarya.com/assets/Windows11-Update-768x651.png)