
If you are the only user on the system and want to sign-in automatically to your Windows 11, this article is for you. By default, when you start your Windows 11, you will see the login screen just after the boot screen. The login screen allows you to select a user account, in case if there are multiple users on the system. After selecting the user account, you should be able to use the sign-in option such as password, PIN or fingerprint/face to complete login. On a physically secured machine, if you’ve only your account and you don’t want to sign-in each time you start the system, you can enable auto-login. In this article, we will see how you can sign in automatically to Windows 11.
Here is the screenshot for login screen in Windows 11:

To enable auto-login for Windows 11, you can follow steps mentioned below.
Page Contents
Sign-in automatically to Windows 11 without password
Method 1: Using Registry
 Registry Disclaimer: The further steps will involve registry manipulation. Making mistakes while manipulating registry could affect your system adversely. So be careful while editing registry entries and create a System Restore point first.
1. Run regedit command to open Registry Editor.
2. In left pane of Registry Editor window, navigate to following registry key:
HKEY_LOCAL_MACHINE\SOFTWARE\Microsoft\Windows NT\CurrentVersion\Winlogon
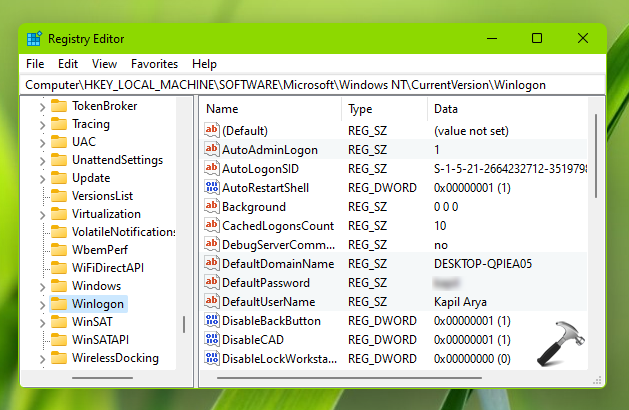
3. In the right pane of Winlogon registry key, you’ll find the registry strings (REG_SZ) named DefaultUserName and DefaultPassword. Modify these strings by doing a double-click and set their Value data with your user account name and password, respectively. If you’re on Microsoft account, use the user account name Value data as Microsoft account/<your email ID>.
Note: Make sure you use correct username and password in above entries.4. Then at the same registry location, set AutoAdminLogon registry string to 1. Also, make sure DefaultDomainName registry string is set to the name of your system or domain name, and modify it only if required.
5. Close the Registry Editor and reboot. After restarting the system, you should be automatically login to your account.
Method 2: Using User Accounts window
You can follow this video guide with demonstration, if you’re not comfortable editing registry as described in Method 1.
That’s it!
Read next: How to switch to local account in Windows 11.


I am trying to enable autologin on my Windows 11 laptop I made a password and then a pin alright then logged out and back in but then nowhere in additional setting does it show an option that shows “For improved security only allow Windows Hello sign in for Microsoft accounts on this device (recommended)” under additional settings with a switch to turn on or off.
Under “Additional settings” it jumps right to “If you’ve been away when should Windows require you to sign in again?” question it just skips that option altogether. What am I doing wrong? HELP !
^^ If you’re on local account, try switching to Microsoft account, see if it helps: https://www.kapilarya.com/switch-to-microsoft-account-from-local-account-in-windows-11.
Thank you for posting this.
Microsoft have removed the “User must enter a password to logon” tickbox in the netplwiz window in Windows 11.
The regedit option still works for now Windows 11 Home 64-bit 23H2 (Build 10.0.22631.3155) with an MS a/c. Hopefully MS won’t remove that too going forward.
It’s a shame really how much control MS are taking away from users in Windows. If you convert to a local account, you get constant nags to sign with an MS a/c.
^^ Thanks for confirming, it works!
FYI, I was able to use the registry method with a local account, but the relevant registry values under HKEY_LOCAL_MACHINE\SOFTWARE\Microsoft\Windows NT\CurrentVersion\Winlogon didn’t exist. Seriously, every single value you instructed us to edit just wasn’t there. Adding them all by hand, as strings, still works though.