
Windows Installer service is the one which is basic need of your system while installing new software. All the software created for Windows utilize this service while they’re mapped. So if this service is not responding or not available at the moment you’re installing new programs, you can’t go ahead.
Generally, in such cases users are supposed to receive this error message:
Page Contents
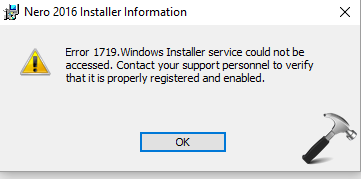
Error 1719. Windows Installer Service could not be accessed. Contact your support personnel to verify that it is properly registered and enabled.
After getting this error message, the first thing that would come to my mind is to run System File Checker scan. Here is how you’ll do that:
Steps to repair your machine using System File Checker scan
If SFC /SCANNOW doesn’t helps you and you still face the issue, go ahead with the specific fixes for this problem. They may individually or collectively help you to overcome this issue.
FIX : Error 1719. Windows Installer Service Could Not Be Accessed In Windows 10/8.1/8/7
FIX 1 – Make Sure Windows Installer Service Is Running
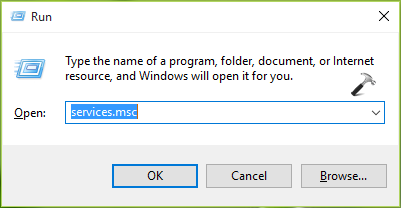
1. Press  + R and type services.msc in the Run dialog box, hit Enter key to open Services snap-in.
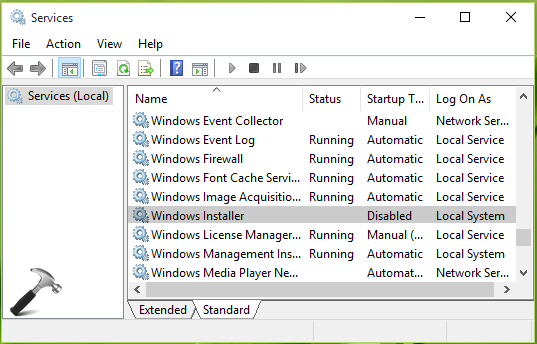
2. In the Services window, scroll down and look for Windows Installer service. As you’re facing this issue, might be possible that service is Disabled. Double click on the service to open its property sheet.
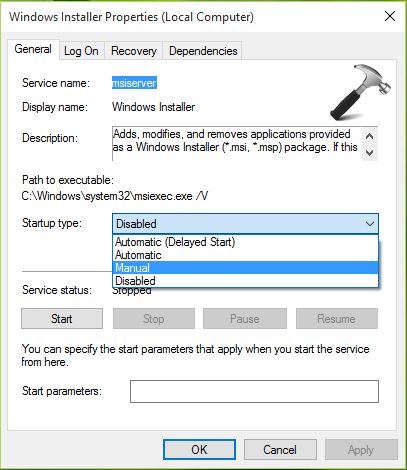
3. In service property sheet, change the Startup type of service from Disabled to Manual or Automatic. Hit the Start button then. Click Apply followed by OK.
Close Services snap-in and check the status of issue. If it is resolved, you’re done, else check FIX 2.
FIX 2 – Re-register Windows Installer Service
Sometimes steps mentioned in FIX 1 are not sufficient and you may need to re-register Windows Installer service as well. These two simple steps will share how to do it:
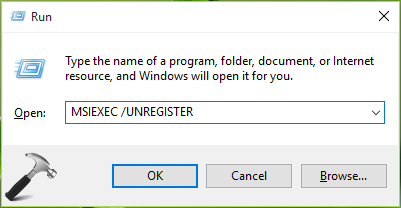
1. Press + R and type MSIEXEC /UNREGISTER in the Run dialog box, hit Enter key or click OK. It’s okay if you don’t see any progress window even after doing it correctly.
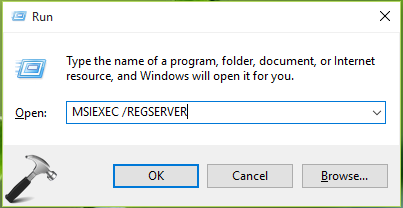
2. Again, press + R and type MSIEXEC /REGSERVER in the Run dialog box and click OK. This has completed re-registration of Windows Installer service and should fix the issue as well.
In case if you still have the problem, follow FIX 3.
FIX 3 – Using Registry Editor
Registry Disclaimer: The further steps will involve registry manipulation. Making mistakes while manipulating registry could affect your system adversely. So be careful while editing registry entries and create a System Restore point first.
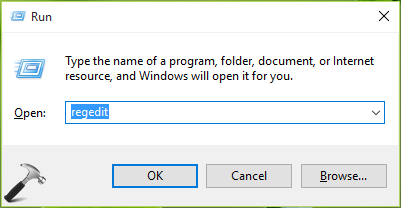
1. Press + R and put regedit in Run dialog box to open Registry Editor (if you’re not familiar with Registry Editor, then click here). Click OK.
2. In the left pane of Registry Editor, navigate to following registry key:
HKEY_LOCAL_MACHINE\SYSTEM\CurrentControlSet\Services\msiserver
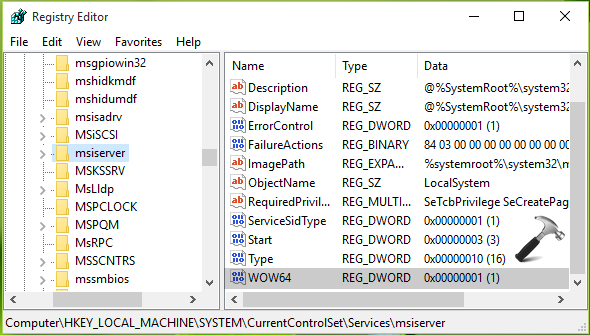
3. In the right pane of msiserver key, locate the registry DWORD (REG_DWORD) named WOW64. Its value might be set to 1 in you case which is root cause of this problem. So double click on it to modify its value.
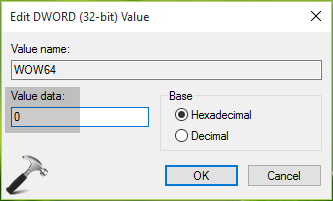
4. Finally, set the Value data to 0 and make sure that Hexadecimal Base is selected here. Click OK. Close Registry Editor and reboot. After restarting the machine, problem will no longer occur.
That’s it! Go here to reset Windows Installer service, in case if nothing works.


Per instructions on {FIX} Error 1719
3. In the right pane of msiserver key, locate the registry DWORD (REG_DWORD) named WOW64. Its value might be set to 1 in you case which is root cause of this problem. So double click on it to modify its value.
I do not find entry DWORD (REG_DWORD) named WOW64
^^ Try creating the DWORD manually and see if it helps you.
Kapil, forgive me but I do not have a lot of experience poking around in the registry. I have the same problem as Roger in that the WOW64 entry is not located in the msiserver key. I got to the stage of trying to create the DWORD manually but how do I enter the data number correctly? The last digit before the brackets is ‘0’ not ‘1’. Many thanks.
^^ When you create the WOW64 DWORD manually, it would already get a 0 value assigned, that’s it!
Hello kapil , I have by mistakenly changed my image file path of the msi server registry key . The error message that is now getting displayed is ( windows cannot start the windows installer service on local computer, Error 2 : The sysyem cannot find the file path specified) when i tried to install a new software. Please help me out .
^^ Kindly restore the original ImagePath string value: %SystemRoot%\System32\msiexec.exe /V. Hope this helps 😊
Is there a space after .exe ? And do i need to reboot my PC?
^^ Yup!
Hello kapil, i have a problem every time i open my application it shows that ” due to changes in the configuration file format the following config file cannot be read” how do i resolve this issue please help!
^^ Try running System File Checker scan: https://www.kapilarya.com/how-to-use-system-file-checker-to-repair-windows-10
None of this works.