
It is well evident that Hyper-V is the virtualization technology helps us to run more than one operating system on single machine. We’ve already seen, how to enable this feature in Windows 8 or later and bring it to Control Panel, in the following article:
How to bring Hyper-V manager inside Control Panel in Windows
Enabling Hyper-V becomes necessity for the users when they want to test new operating system builds without messing original installation. As we have seen, you can enable Hyper-V feature from Turn Windows Features on or off window, however you can enable it from Command Prompt or Windows PowerShell as well. If you can’t activate Hyper-V from Windows Features box, here is the command you can try at administrative Command Prompt or Windows PowerShell:
dism /online /enable-feature /featurename:microsoft-hyper-v-all /All /LimitAccess /Source:<SXS Folder location>
Where <SXS Folder location> is the location of sxs folder inside sources folder in setup of Windows 8 or later.
The older machines may not have ability to enable Hyper-V, as the hardware is not supported. Hence one reason that why you can’t enable this feature is hardware was found non-legitimate. You can use this command to check, whether your system supports this feature or not:
Dism /online /Get-FeatureInfo /FeatureName:microsoft-hyper-v-all
Recently, I came around the error 0x800F0906 while enabling Hyper-V on my Windows 10 running system. You might also receive error code 0x800F081F in this case. Here is why the system can’t enable this feature:
Page Contents
Error: 0x800F0906
The source files could not be downloaded.
Use the “source” option to specify the location of files that are required to restore the feature.

I was well aware that the system supported Hyper-V feature. But what I was trying to do, is not following the exact procedure, due to which source files couldn’t be achieved. Here is what you need to do actually:
FIX : Error 0x800F0906 While Enabling Hyper-V In Windows 10
1. Locate the Windows ISO file which you’ve used to install your operating system. Right click over it and select Mount.
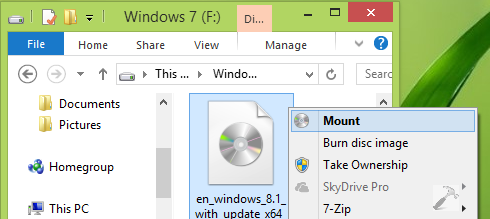
2. Next, decompress the same ISO file and locate Sources -> sxs folder. Copy this sxs folder to any other drive which isn’t system root drive, for ex. F: drive.

3. Now open administrative Command Prompt or Windows PowerShell, type following command and hit Enter key:
dism /online /enable-feature /featurename:microsoft-hyper-v-all /All /LimitAccess /Source:<SXS Folder location>
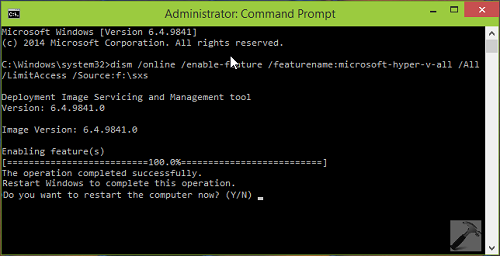
4. You would be prompted to restart the system, type Y and hit Enter key. After rebooting the system, you’ll find that the Hyper-V feature is ready to use.
Hope this helps!
Related: DISM Error 0x800F0906 In Windows.


This worked like a charm. Ty. :)
still getting 0x800f0831 after mounting iso and copying sxs file :(((