In this modern world, staying connected is essential, but encountering with Wi-Fi issues on your Windows 11 device can be frustrating. One common problem that users often face is the mysteriously missing Wi-Fi networks from the available list. If you’ve been in this situation, you’re not alone. Many Windows 11 users have experienced the same issue, scratching their heads in search of a solution. In this guide, we’ll explore the reasons why your Wi-Fi network might not be showing up on Windows 11 and provide you with a step-by-step approach to fix WiFi network not showing up on Windows 11.
Page Contents
Fix: WiFi network not showing up on Windows 11
There can be several reasons for the issue of “WiFi network not showing up on Windows 11.” Some common causes include:
- Driver Issues: Outdated or corrupted network drivers can prevent your Windows 11 device from detecting available WiFi networks. If the driver responsible for your WiFi adapter is malfunctioning, it may not be able to scan for networks properly.
- Network Adapter Problems: Sometimes, the network adapter itself may have hardware issues or be disabled, causing it to not detect WiFi networks.
- WiFi Signal Interference: Physical obstacles, electronic devices, or interference from neighboring networks can weaken or disrupt WiFi signals, making networks invisible to your device.
- Network Profile Issues: Your Windows 11 device may have saved incorrect or outdated network profiles. This can result in your device not connecting to networks that have changed their settings.
- Misconfigured WiFi Settings: Sometimes, changes to your WiFi adapter settings or Windows settings can lead to network detection issues.
- Operating System Updates: Windows 11 regularly receives updates that can include bug fixes and improvements. An outdated operating system may lead to compatibility issues with WiFi network detection.
To fix WiFi network not showing up on Windows 11 problem, we’ve compiled a list of the top 8 methods you can implement for a solution.
Method 1: Check for Windows Update
Updating your Windows can resolve problems such as Windows 11 not recognizing Wi-Fi networks, by fixing bugs and updating essential drivers. So, if you’ve been postponing the installation of the most recent updates on your Windows device, it’s time to take action.
Below are the steps on how to do it:
1: Open the Settings App by pressing Windows key + I.
2: Go to “Windows Update” and click on “Check for updates“.

If there are any available updates for Windows 11, please make sure to install them.
Method 2: Check whether the Wi-Fi Adapter is Enabled or not
To locate Wi-Fi networks, it’s essential to ensure that your Windows 11 device’s Wi-Fi adapter is active.
Here’s a step-by-step guide on how to perform this check.
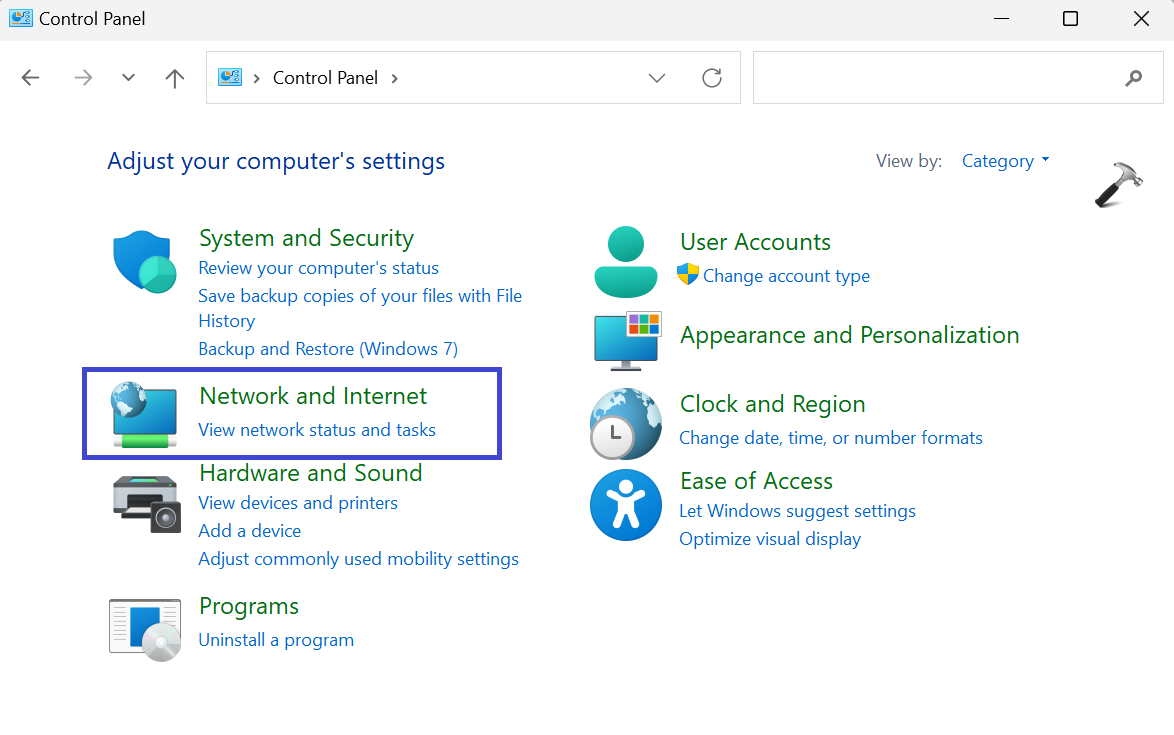
1: Open the Control panel.
2: Here, click on “Network and Internet“.
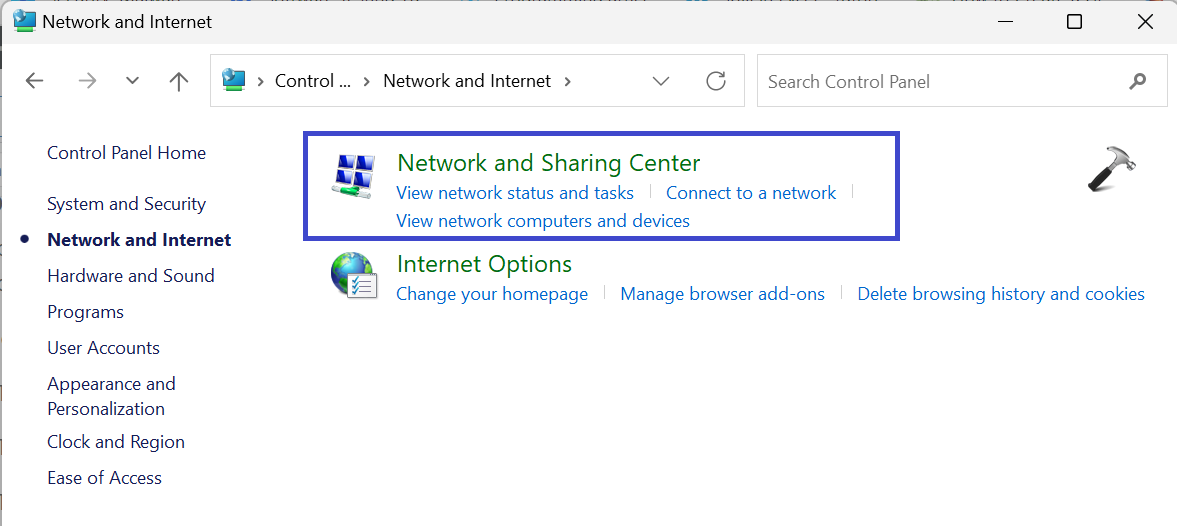
3: Then, click on “Network and Sharing Center“.
4: From the left side panel, click on “Change adapter settings“.

5: Now, right-click on your Wi-Fi adapter and click “Enable” if it is not.

Method 3: Reset TCP/IP and Flush DNS Cache
TCP/IP enables your device’s drivers to establish communication with other devices over the internet. Nevertheless, when misconfigured or encounters bugs, it can disrupt its functionality and can lead to problems like Wi-Fi networks not appearing on your Windows 11.
If you are facing such issues, you can reset the TCP/IP settings back to their default settings. Follow the below steps to do so:
1: Search for “Command Prompt” and select “Run as administrator”.
2: Now, type the below command and press Enter:
netsh winsock reset

This command will reset the TCP/IP.
3: Now, type the following command and press Enter:
netsh int ip reset

This command will flush the DNS cache.
After executing the above two commands, close the command prompt and restart the PC.
Method 4: Set Services to Automatic
In Windows 11, services help to make the device run smoothly in the background. They usually start automatically when your device starts up, but you can also set them to start automatically if you’ve been having issues with Wi-Fi networks not showing up on Windows 11.
Here are the steps to set Services to Automatic:
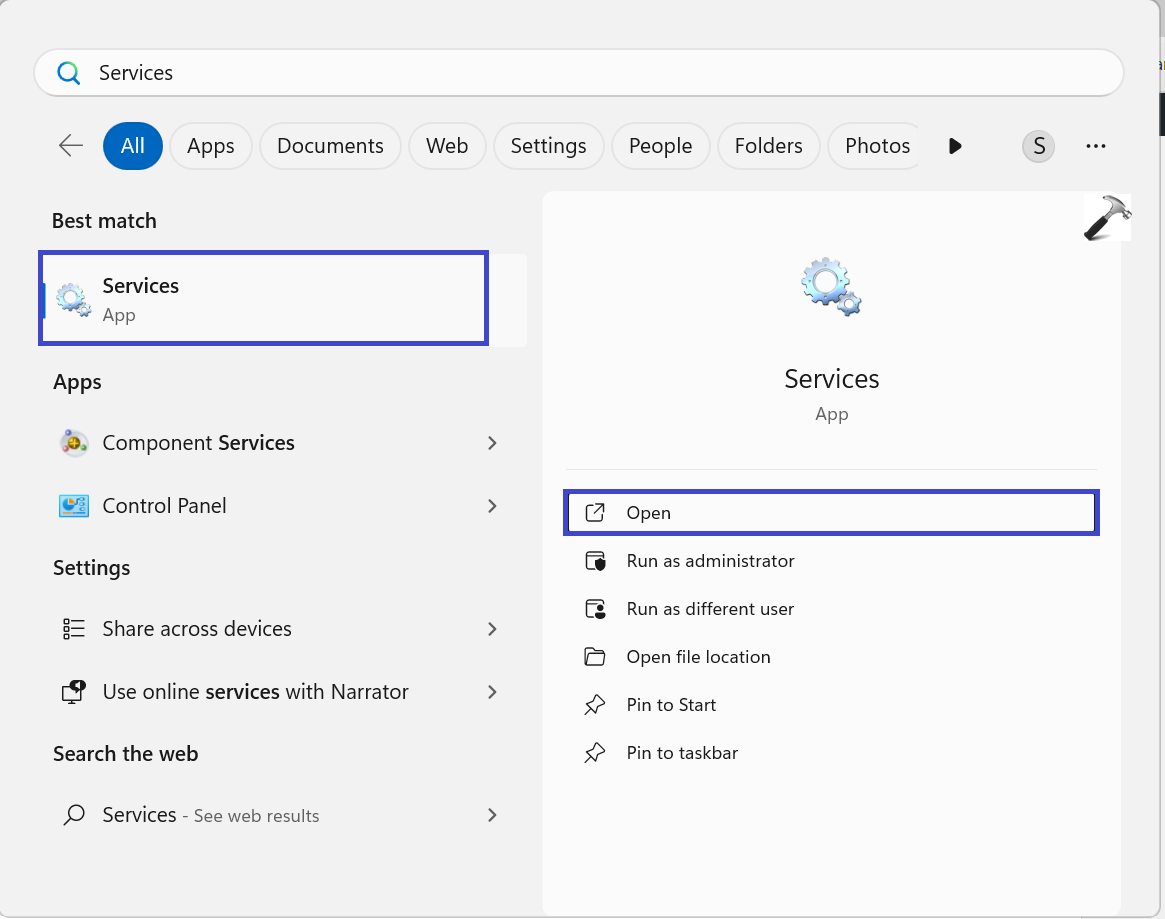
1: Open the Search box and type “Services“. Click on “Services“.
2: Now, look for “WLAN AutoConfig” and double-click on it.
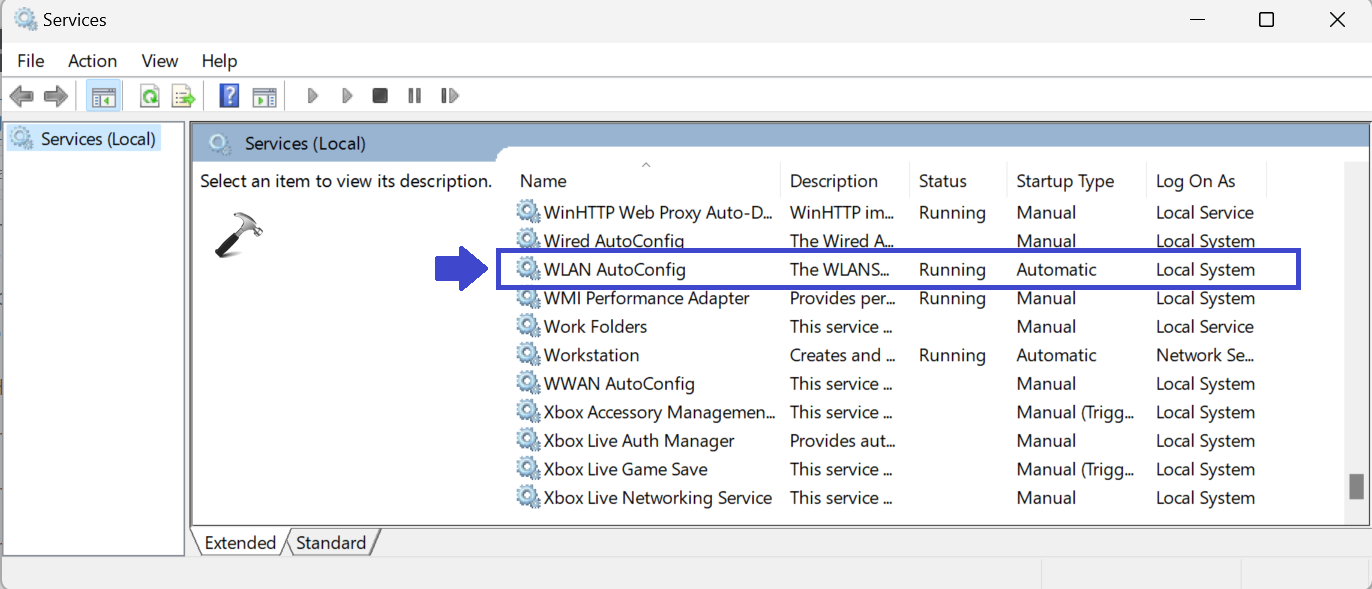
3: A prompt box will appear. Under the startup type, select “Automatic“.
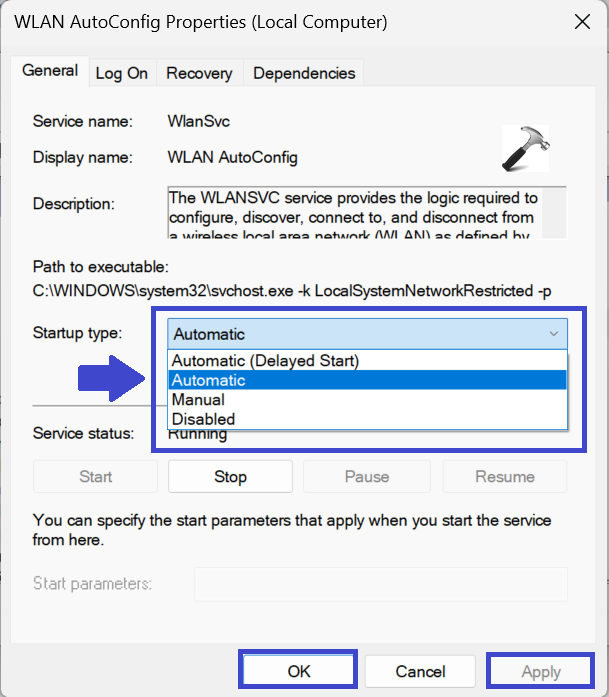
4: Click OK followed by Apply.
Close the Window and restart the PC to apply the settings.
Method 5: Reset a Network
A network reset refreshes and re-establishes your network setup, often resolving issues related to Wi-Fi network detection errors on Windows 11. When you perform a network reset on your Windows device, it erases all network-related elements such as network adapters, drivers, and third-party VPN software.
Afterward, Windows reinstalls default network drivers and adapters, while also removing any third-party apps or services that might be causing issues on your Windows 11 device.
Follow the below steps to reset a network:
1: Press the Windows keys + I to open the Settings App.
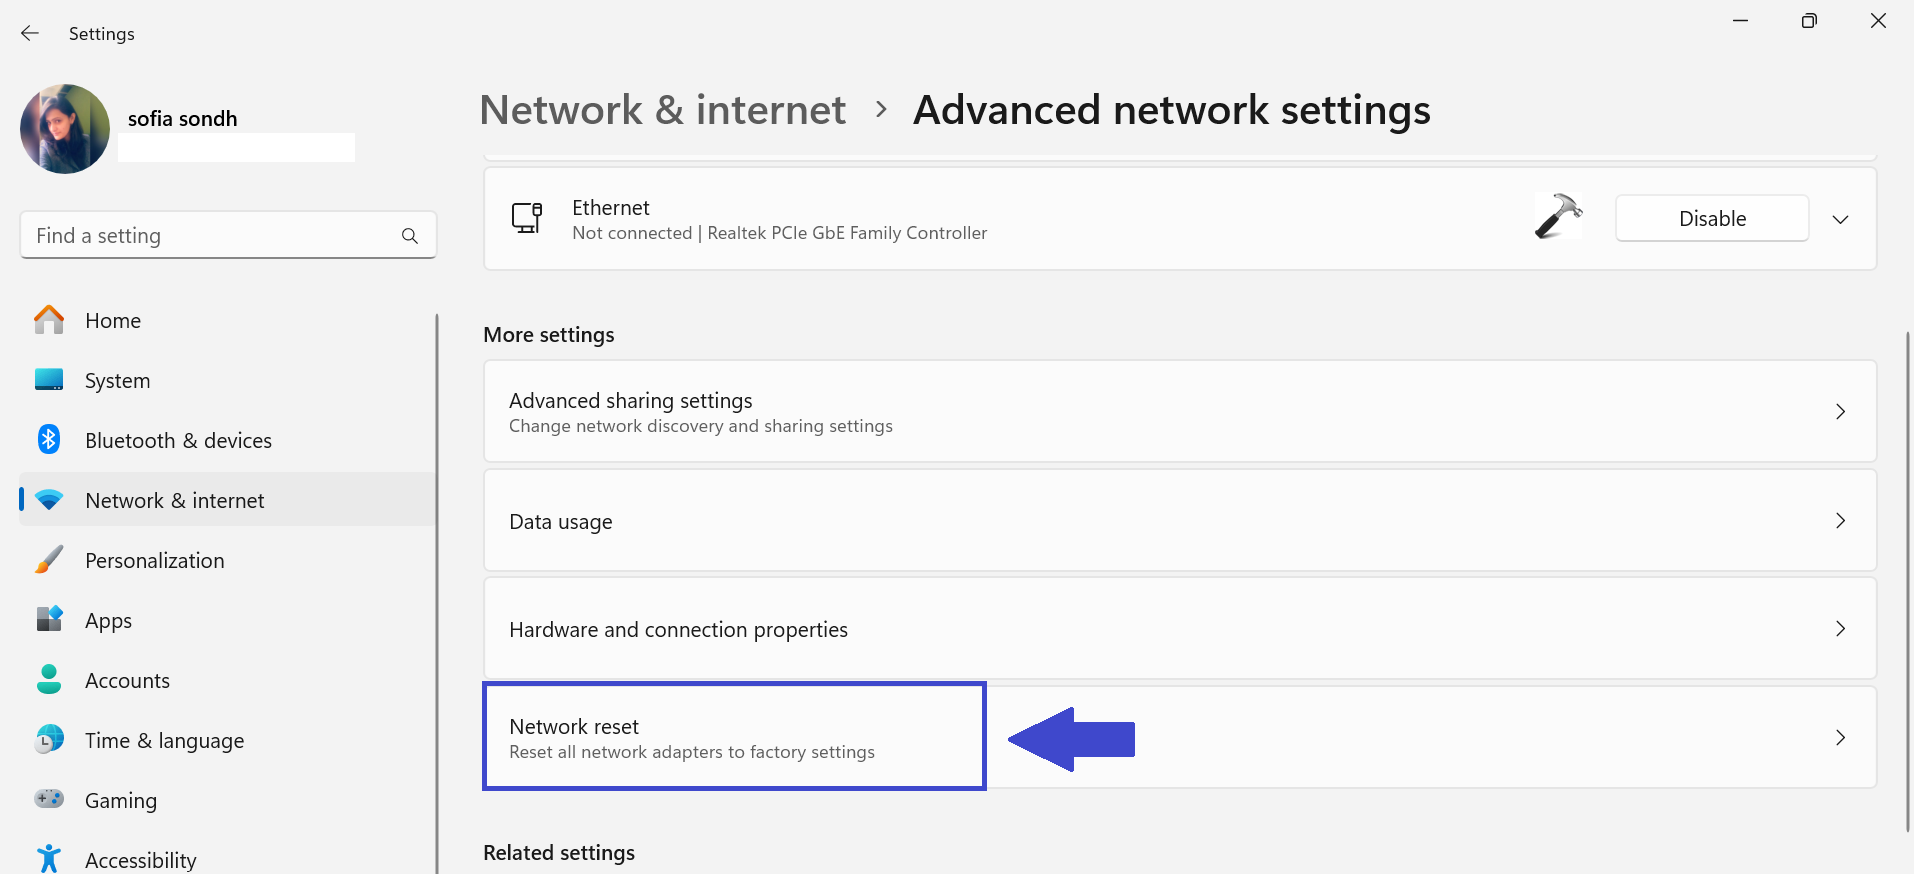
2: Go to “Network & Internet” and select “Advanced network settings“.

3: Under “More settings“, click on “Network reset“.
4: Now, click on “Reset now“.

5: Click “Yes” when a prompt box appears. It will start the reset process.

After that, restart the PC to apply the settings and check whether you are able to see the network option or not.
Method 6: Check for Driver Updates
Network drivers are like helpers for your device to talk to other devices over the internet. Normally, they update on their own, but if your Windows 11 laptop can’t find Wi-Fi networks, you can check and update them manually.
Here are the steps to manually check for driver updates:
1: Press the Windows key + X and select “Device Manager“.

2: Now, click on “Network Adapters” to expand the options.
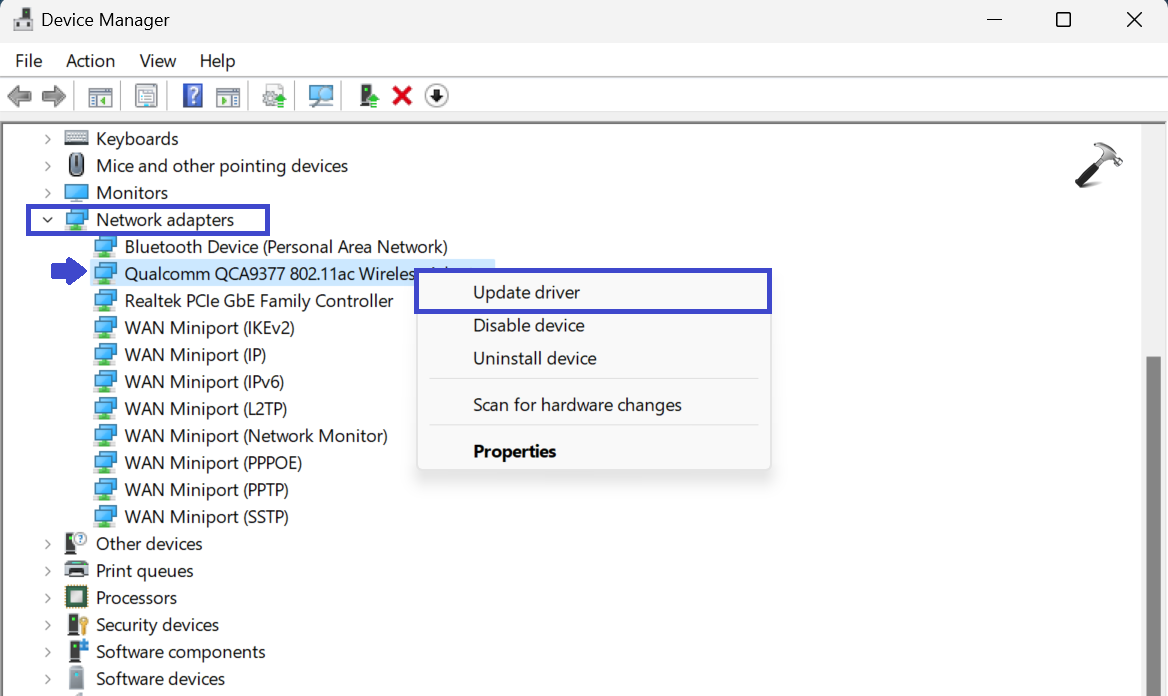
3: Right-click your Wi-Fi driver and click “Update driver“.
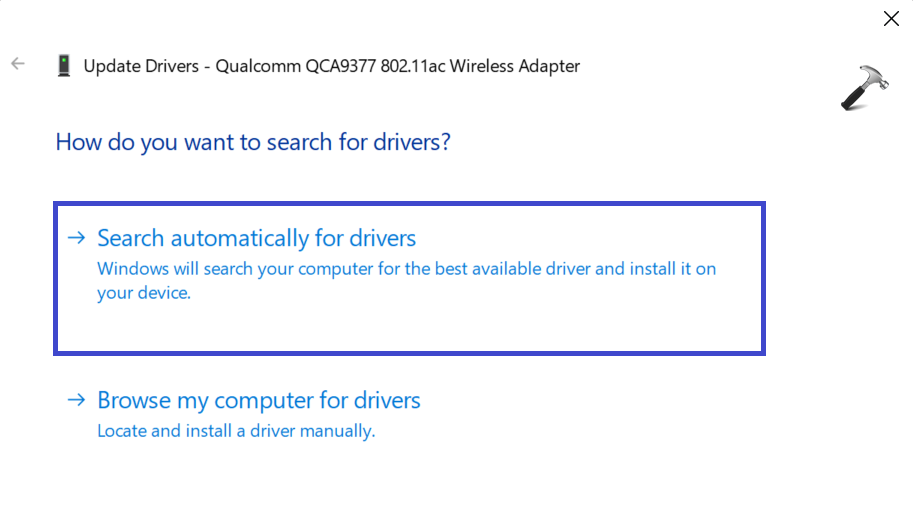
4: Then, click on “Search automatically for drivers“.
Method 7: Run Network troubleshooter
You can use the Windows troubleshooter to find and fix problems with your computer’s network all by itself. When you run it, it looks for issues and tells you how to fix them.
Here’s how to run a network troubleshooter:
1: Open Settings App and click “Troubleshoot“.
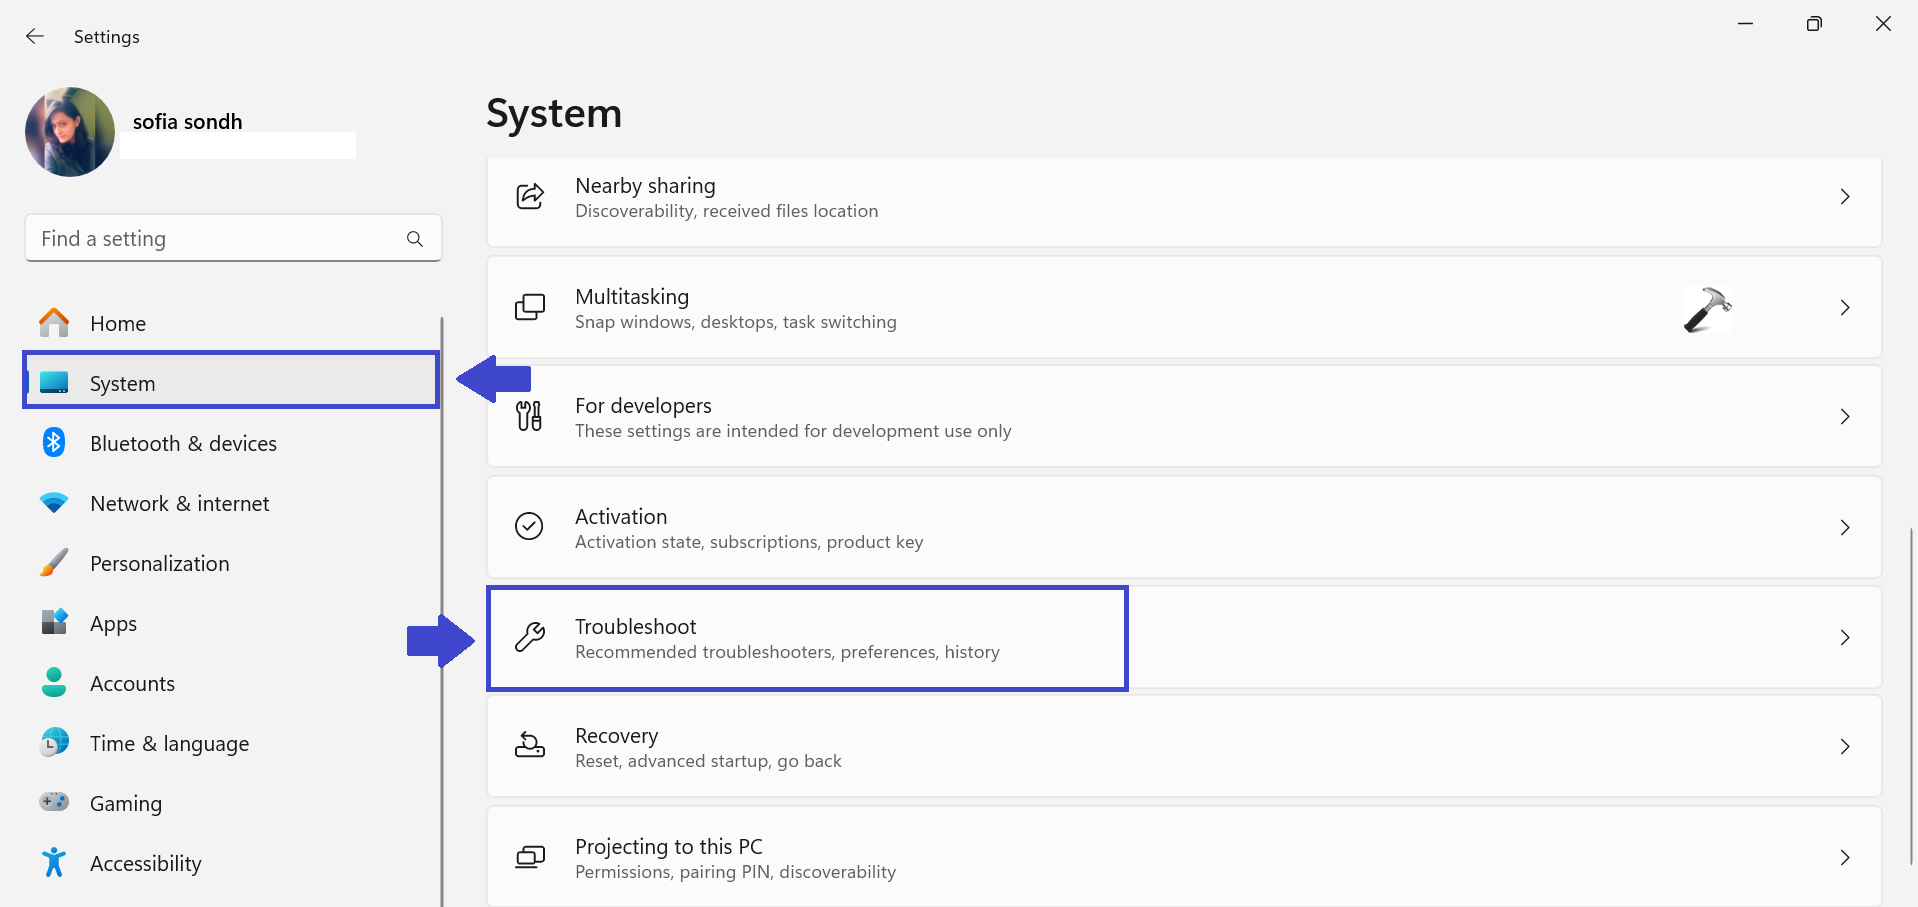
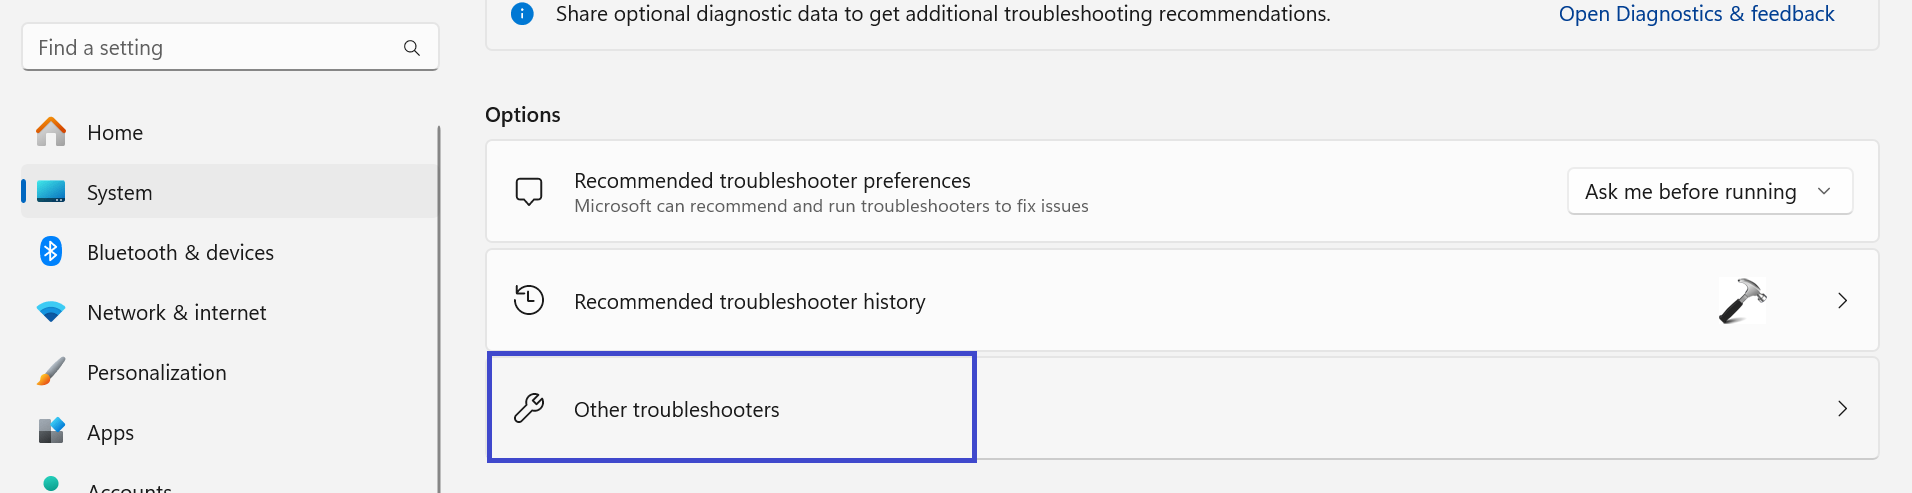
2: Now, click on “Other Troubleshooters“.
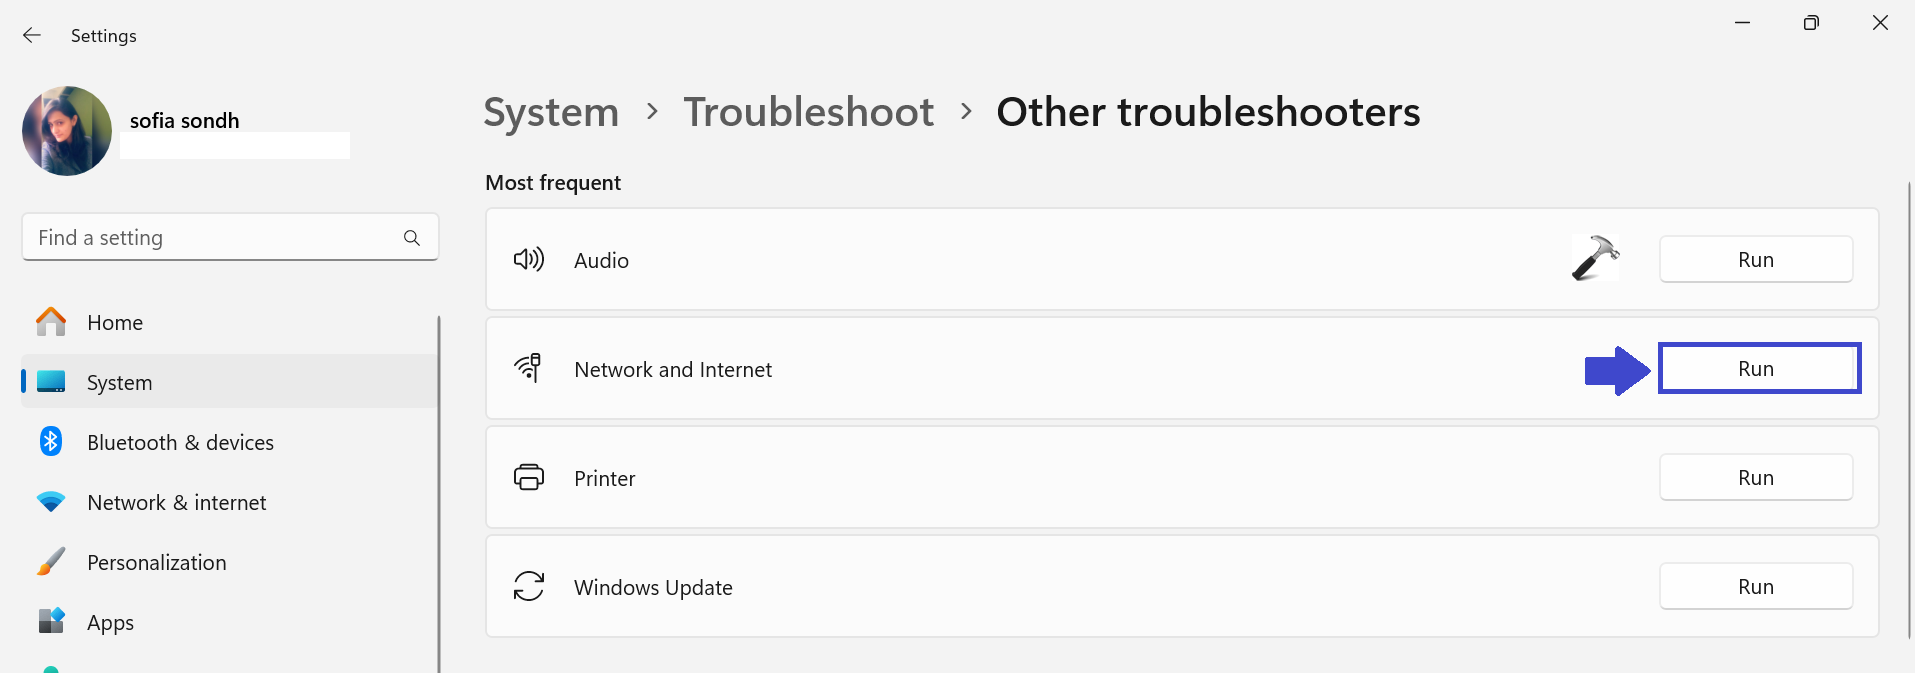
3: Click “Run” next to the “Network and Internet“.
Now, Windows will look on the internet for any updates for the network driver you chose. If there’s an update, let it install, and then restart your computer. After that, check if your Wi-Fi networks show up on your device.
Method 8: Forget and Reconnect the Network
If you’re having trouble with Windows 11 not finding a Wi-Fi network that it used to connect to, you can try making it forget that network and then reconnecting to it. This can also help if the network has a different name before.
Here’s how you can do it:
1: Open the Settings App by pressing Windows key + I.
2: Now, select “Network & Internet” and click on “Wi-Fi“.

3: Click on “Manage known networks“.

4: From the given list, choose the particular network and click on “Forget“.

5: Again, go back to the Wi-Fi page and click on “Show available networks“.

6: Now, click “Connect” to connect to the relevant network.
7: Enter the password and click “Next“.
You will be able to see the Wi-Fi network on your Windows.
That’s It!