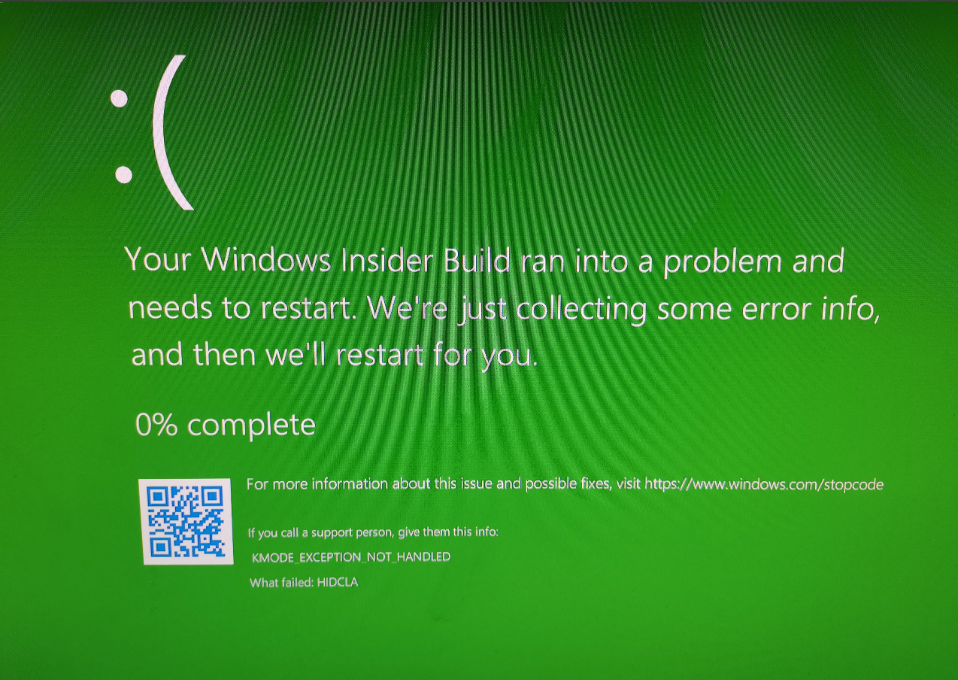
If you are a Windows 11 Insider Preview Build and encounter the error message “Your Windows Insider build ran into a problem,” you might be experiencing difficulties while trying to install or update the latest Windows Insider build. Fortunately, there are several troubleshooting steps you can take to fix the issue. Whether it involves uninstalling third-party antivirus software, finding and disconnecting malfunctioning hardware, or exploring other solutions, this guide aims to provide you with helpful tips to overcome the problem and successfully install or update your Windows Insider build. By following these steps, you can ensure a smoother and more reliable experience as a Windows Insider, enabling you to access the latest features and improvements offered by Microsoft.
Page Contents
Fix: Your Windows Insider build ran into a problem
Fix 1: Scan for Viruses or Malware on the System
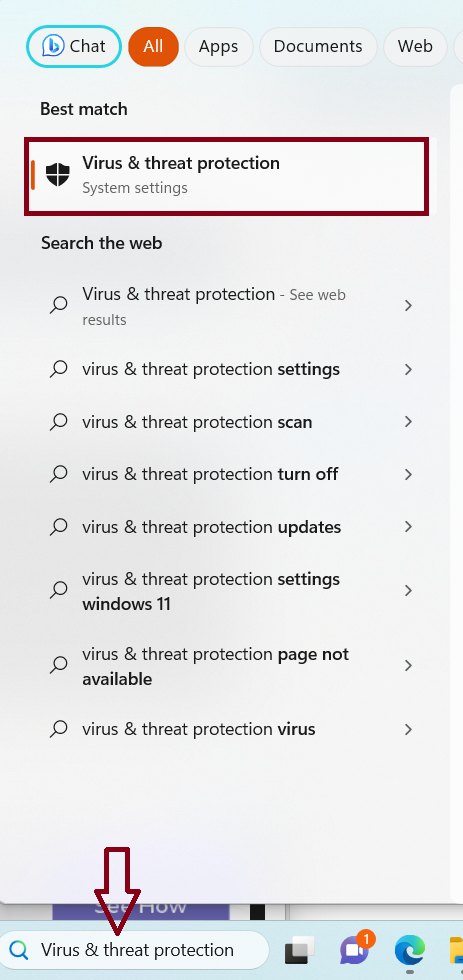
1. Open “Virus & threat protection” by searching it in the Search bar.
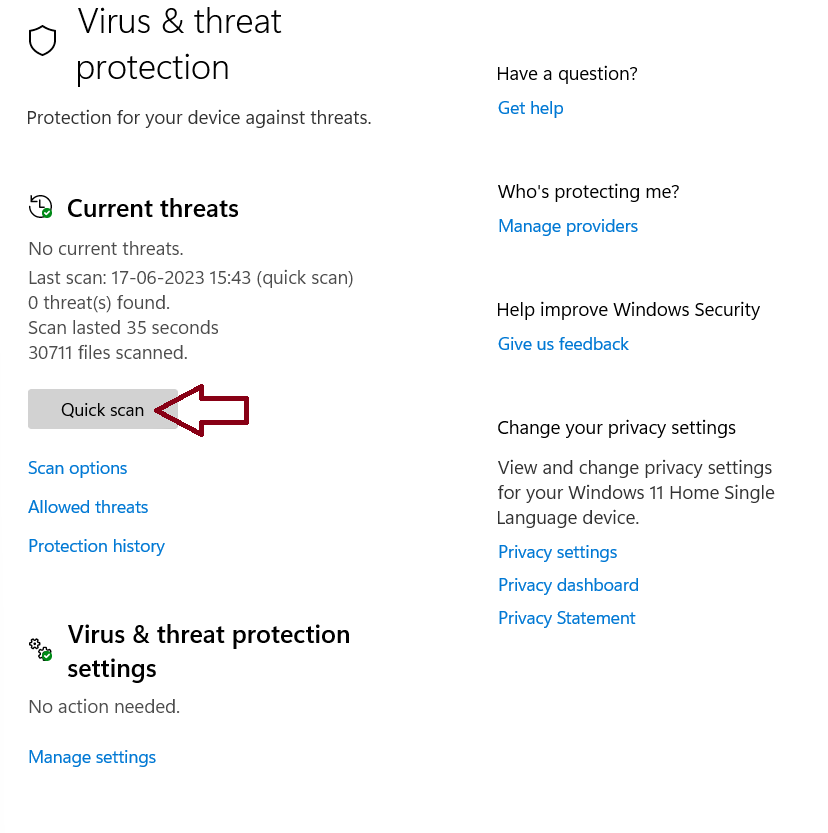
2. Click on “Quick scan”.
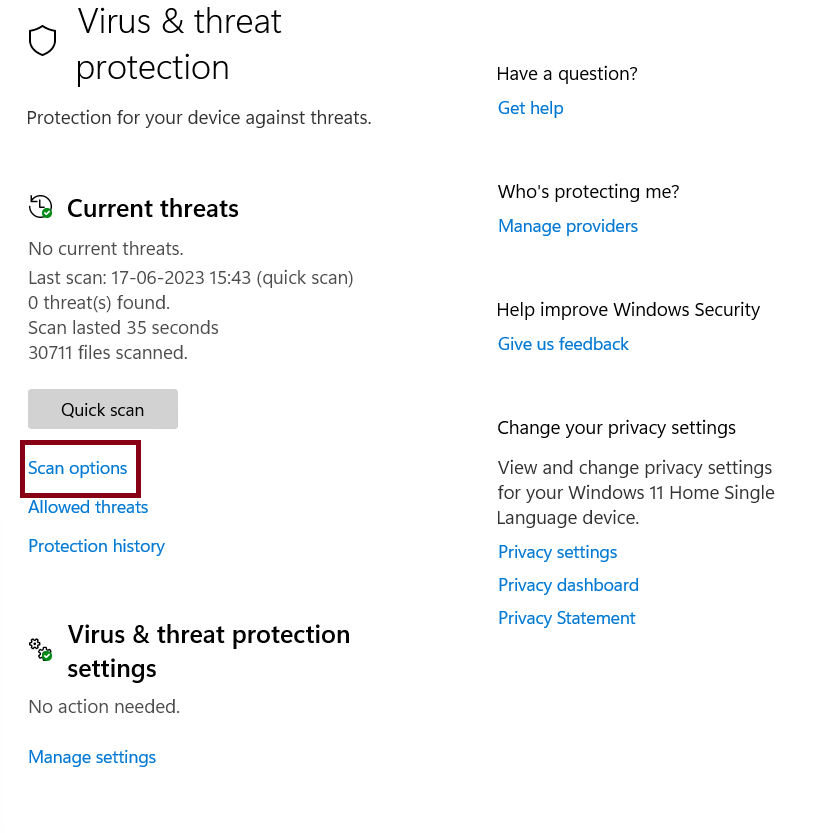
3. Once the quick scan is completed, click on “scan options”.
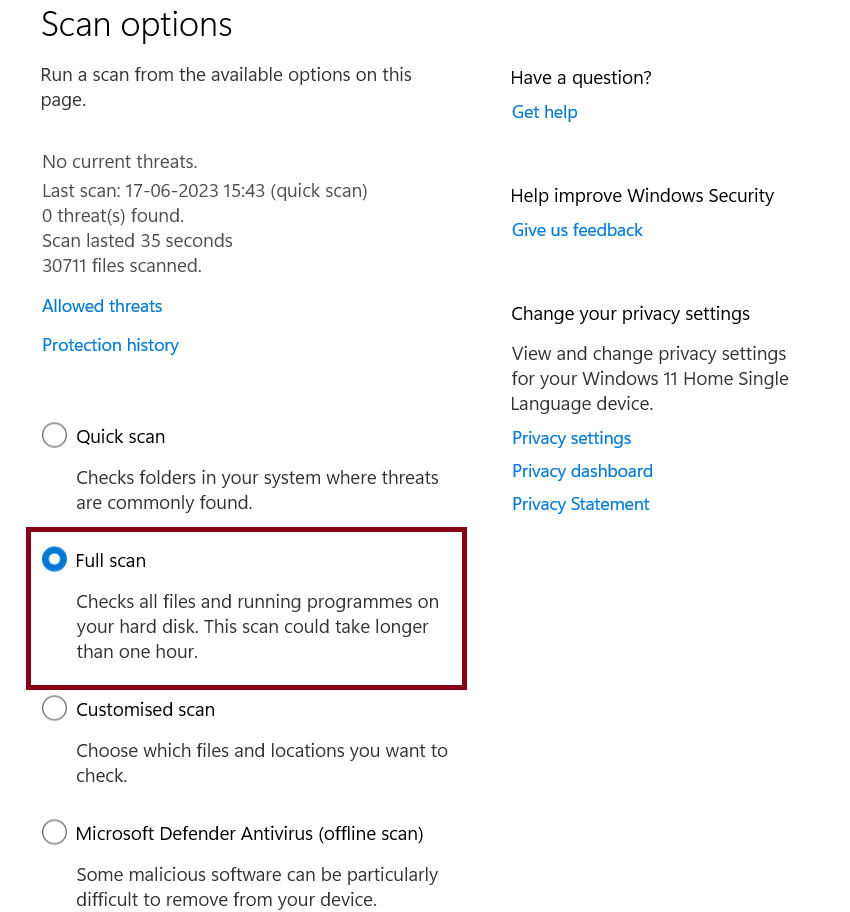
4. Click on “Full scan” > then click on the “Scan now” button.
5. Restart your computer after the scan gets completed.
Fix 2: Update display drivers
1. Open Device Manager.
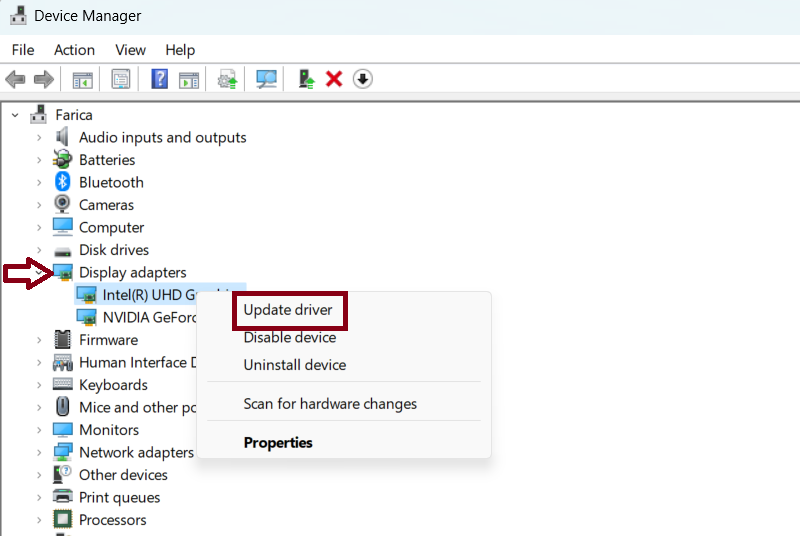
2. Click on “Display adapters”.
3. Right-click on display/graphic driver and choose “Update driver”.
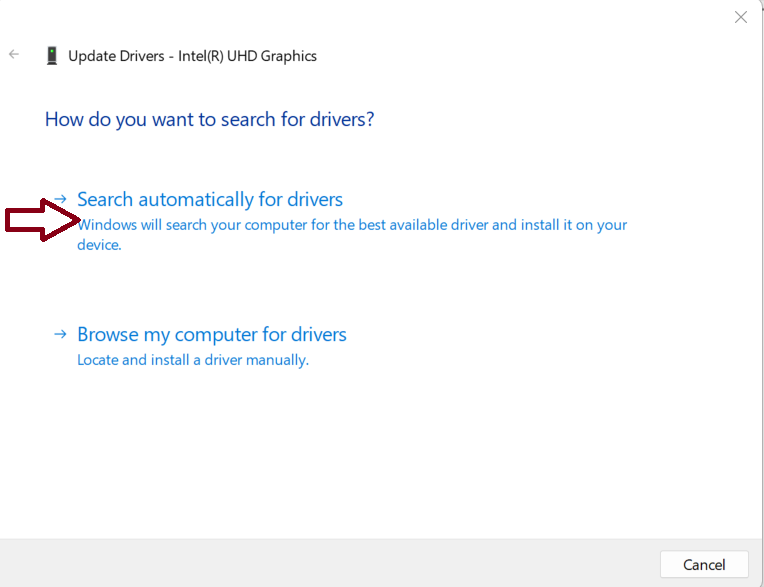
4. Click on “Search automatically for drivers”.
5. Once drivers are updated, restart your computer.
Fix 3: Uninstall third-party antivirus program to Fix Your Windows Insider build ran into a problem issue
If your Windows Insider build ran into a problem, one potential solution is to uninstall any third-party antivirus program installed on your system. Third-party antivirus software, although designed to protect your computer, can sometimes interfere with the installation and functioning of Windows Insider builds. To resolve this issue, you can go to the Control Panel or the Settings app in Windows and locate the installed antivirus program. Uninstall it from your system and then attempt to install or update the Windows Insider build again. By removing the third-party antivirus program, you eliminate any potential conflicts and increase the chances of a successful installation or update.
Fix 4: Run SFC, DISM, & CHKDSK Scan To Fix & Repair Corrupted System Files
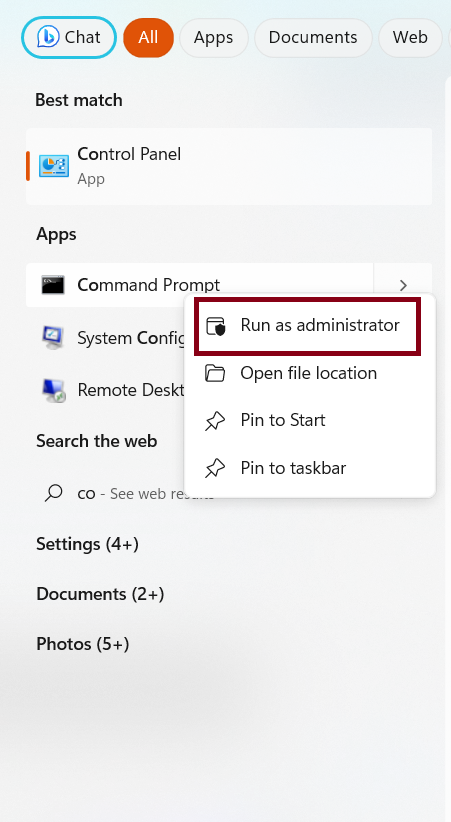
1. Open Command Prompt as an administrator.
2. Type this command and press Enter to execute it:
sfc /scannow
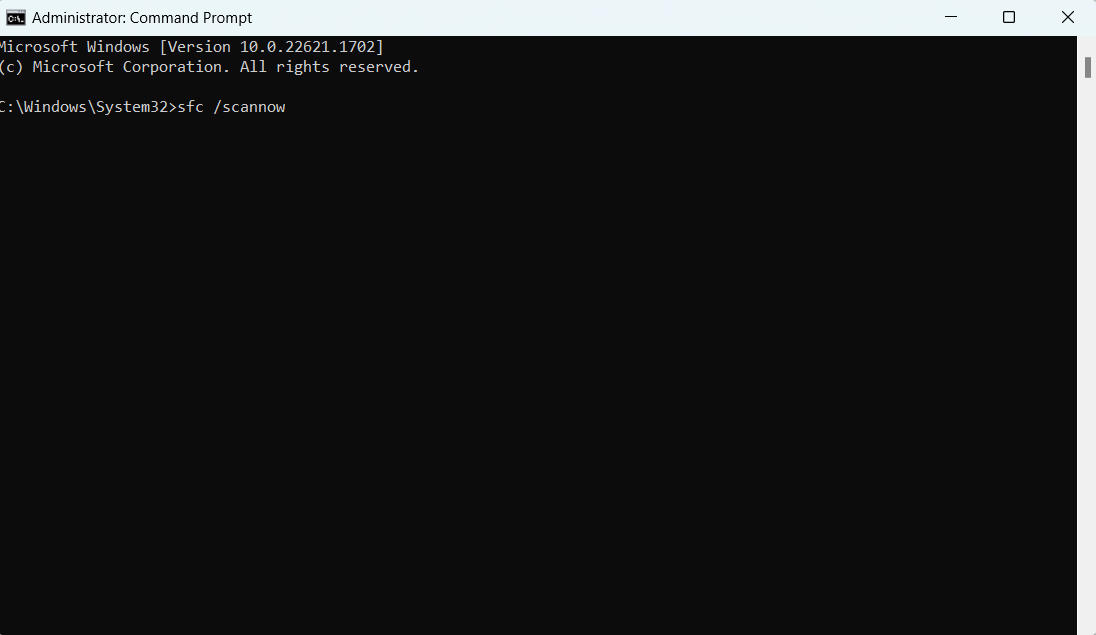
3. Next execute this command:
chkdsk /r /x C:
4. Now execute this command:
DISM.exe /Online /Cleanup-Image /Restorehealth
5. Restart your computer.
Fix 5: Uninstall malfunctioning Windows 11 updates
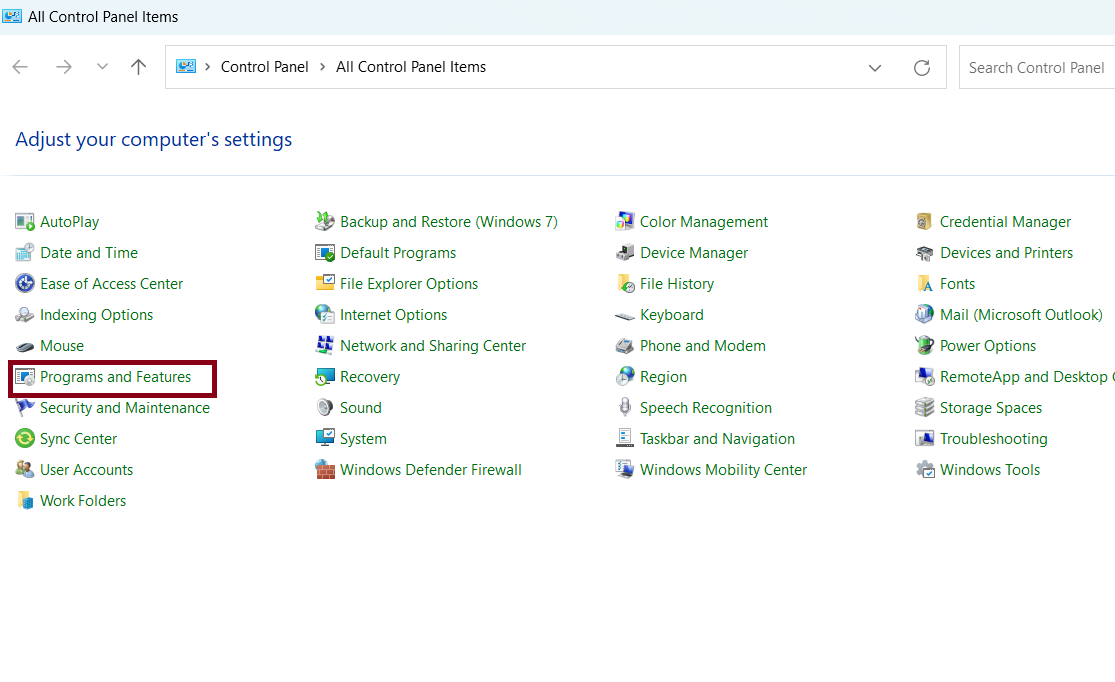
1. Open Control Panel.
2. Click on “Programs and Features”.
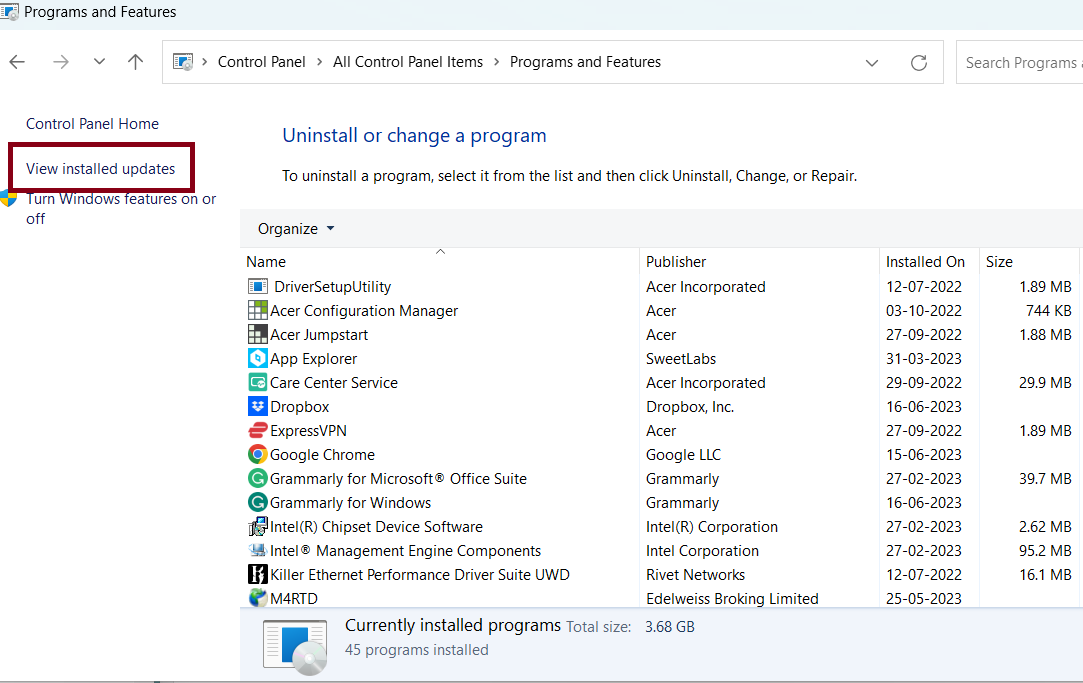
3. Click on “View installed updates”.
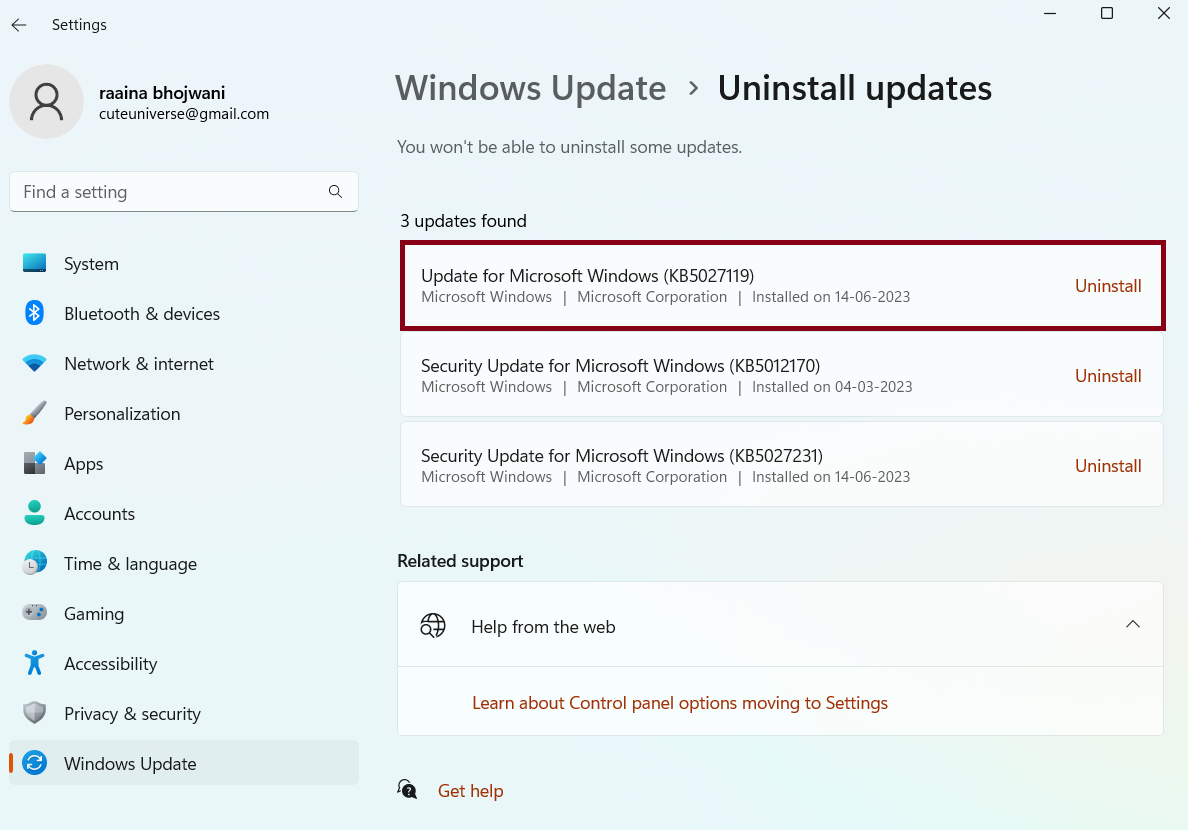
4. Click on “Uninstall” next to the Windows update that you want to uninstall.
5. Restart your computer after the update has been uninstalled.
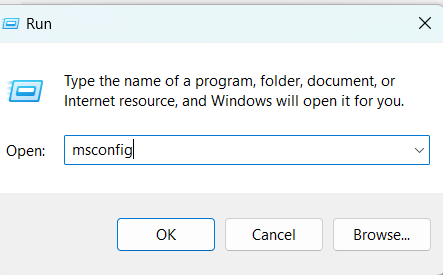
Fix 6: Use PC in Safe Mode
1. Open the Run prompt. Type msconfig and hit Enter key to open the System Configuration window.
2. Click on the “Boot” tab.
3. Check on the “Safe boot” checkbox.
4. Click on Apply > OK.
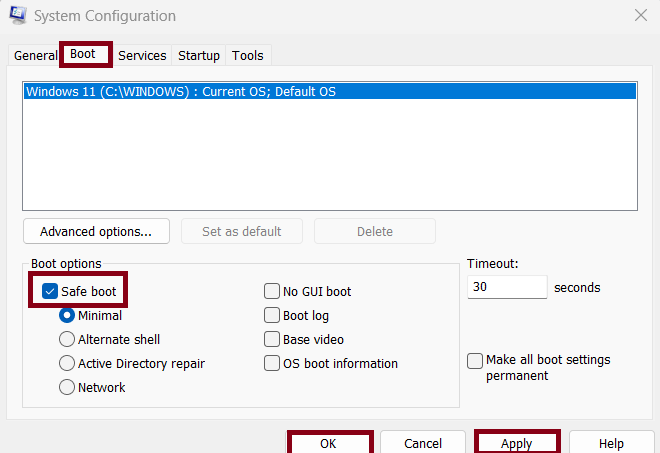
5. Restart your computer.
Fix 7: Find & Disconnect the Malfunctioning Hardware Connected
Another troubleshooting step you can take is to find and disconnect any malfunctioning hardware connected to your system. Faulty hardware components, such as a malfunctioning graphics card or incompatible peripheral devices, can sometimes cause compatibility issues with Windows Insider builds. To address this, start by disconnecting any external devices connected to your computer, such as printers, scanners, or USB devices. If the issue persists, you can open your computer’s case and carefully disconnect any internal hardware that you suspect may be causing the problem, such as an additional graphics card or RAM modules. By removing the potentially malfunctioning hardware, you eliminate the possibility of it interfering with the Windows Insider build and increase the chances of a successful installation or update. However, exercise caution when handling hardware components and consider seeking assistance from a professional if needed.
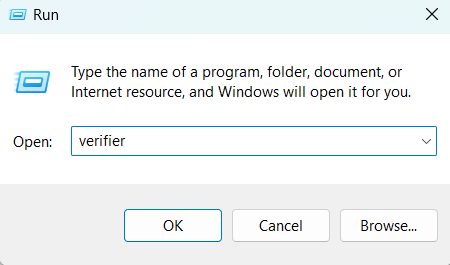
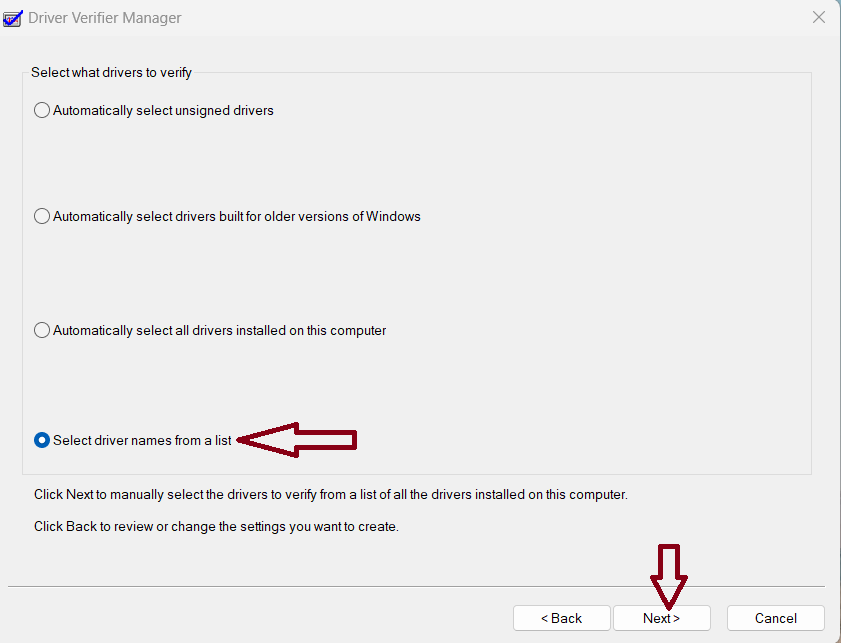
Fix 8: Run the built-in driver verifier
1. Open the Run prompt. Type “verifier” and hit Enter key to open the Driver Verifier Manager window.
2. Click on “Create standard settings” > “Next”.
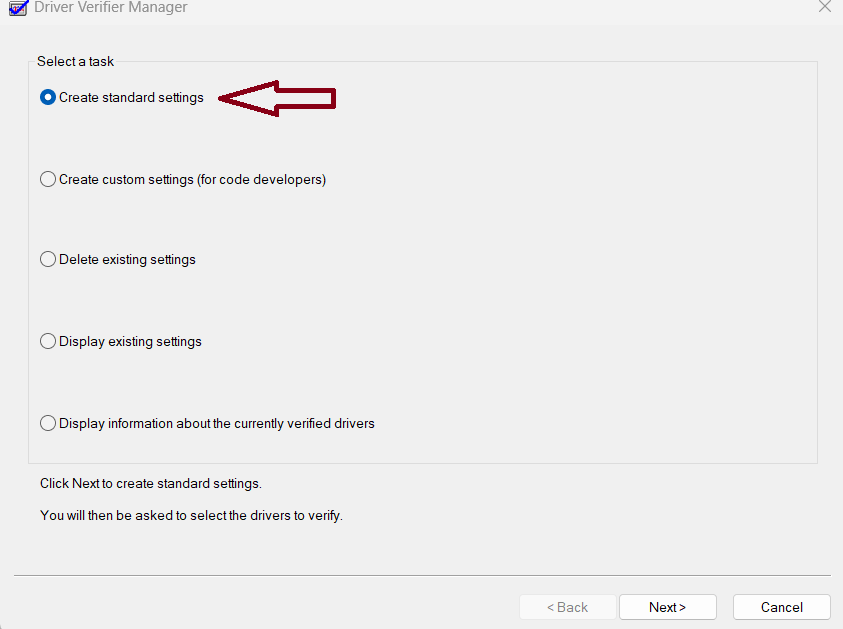
3. Click on “Select driver name from a list” > “Next”.
4. Click on “Select all” > “Finish”.
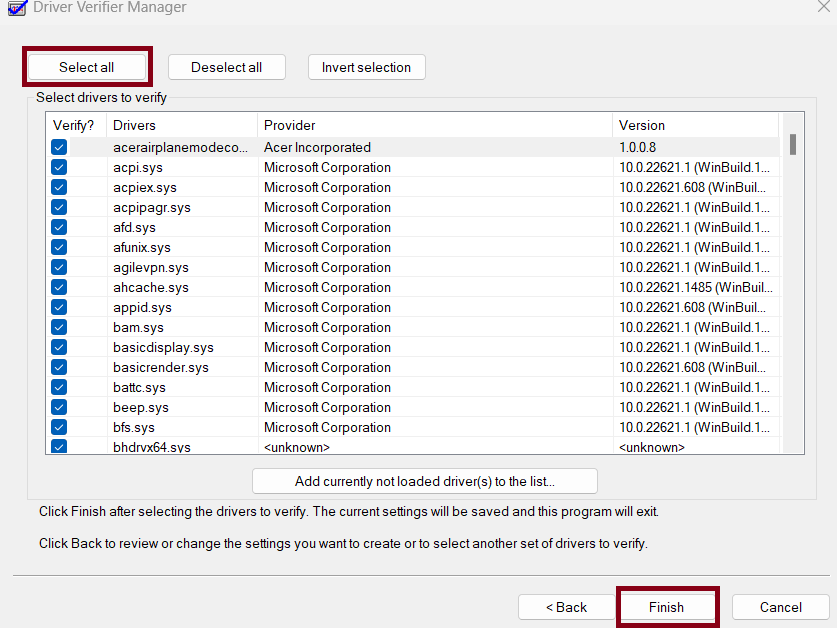
5. Close the Driver Verifier Manager window and restart your computer.
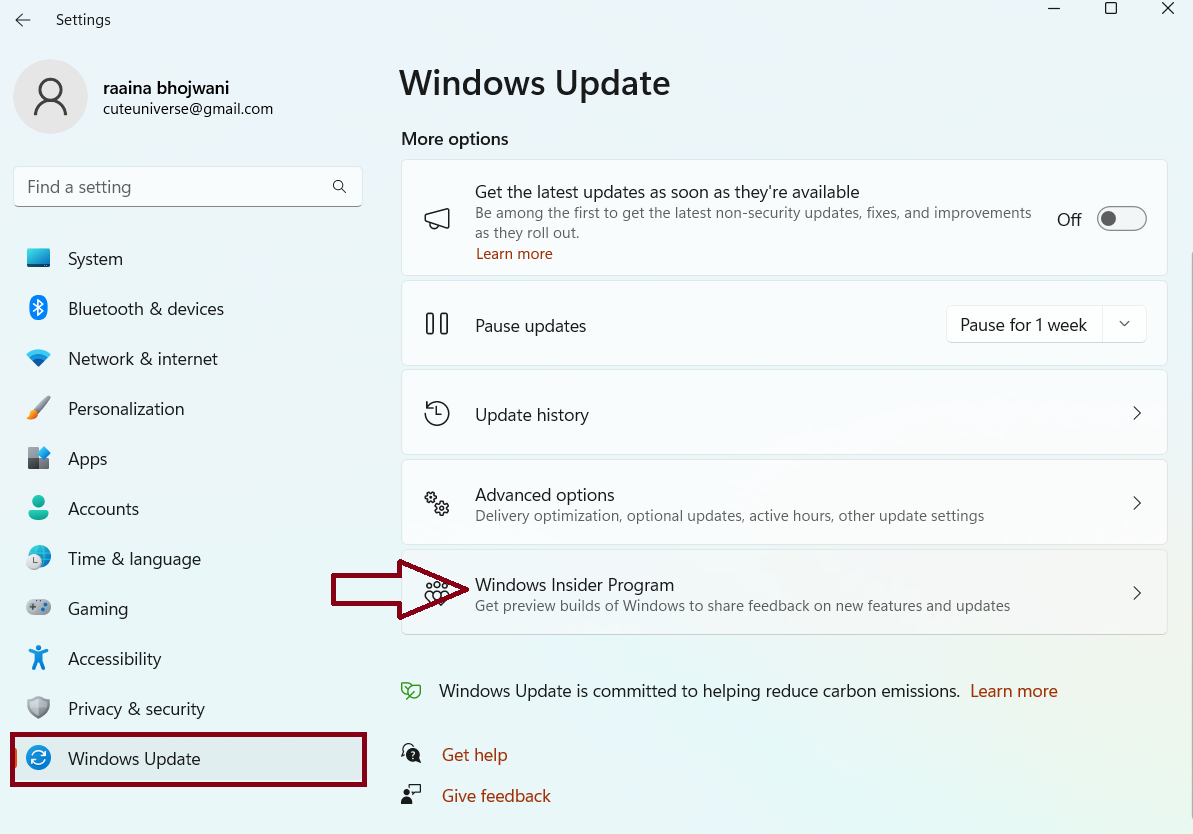
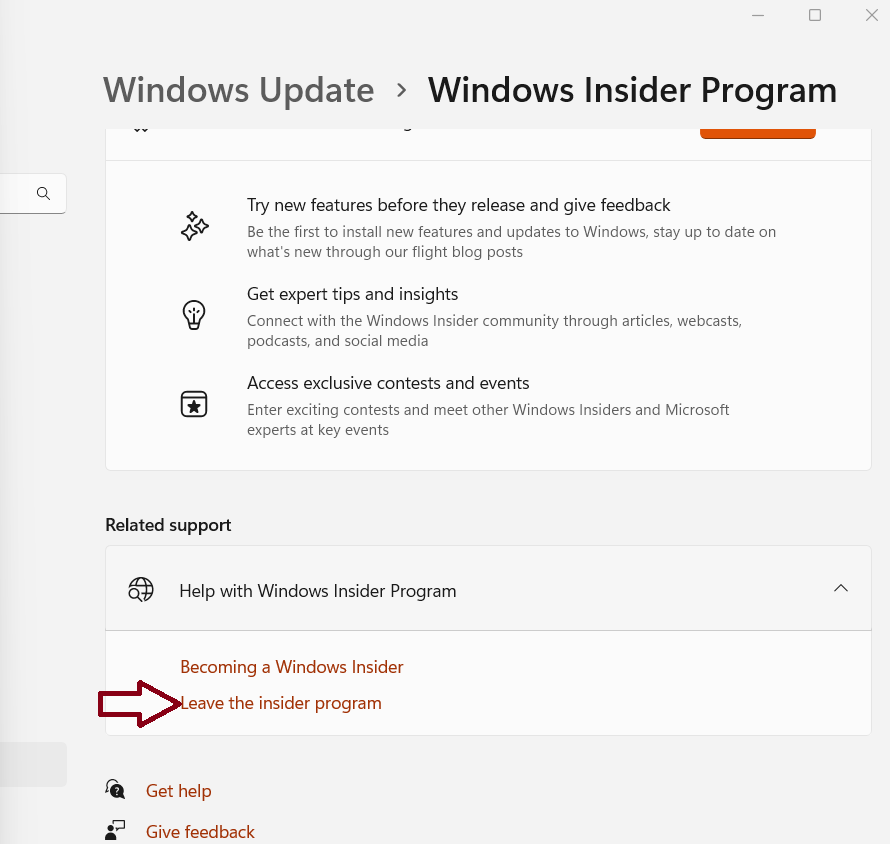
Fix 9: Leave Windows 11 Insider program to fix Your Windows Insider build ran into a problem issue
1. Open Settings by pressing the Windows + I keys.
2. Click on “Windows Update” > “Windows Insider Program”.
3. Click on “Stop getting preview builds” > “Leave the Insider Program”.
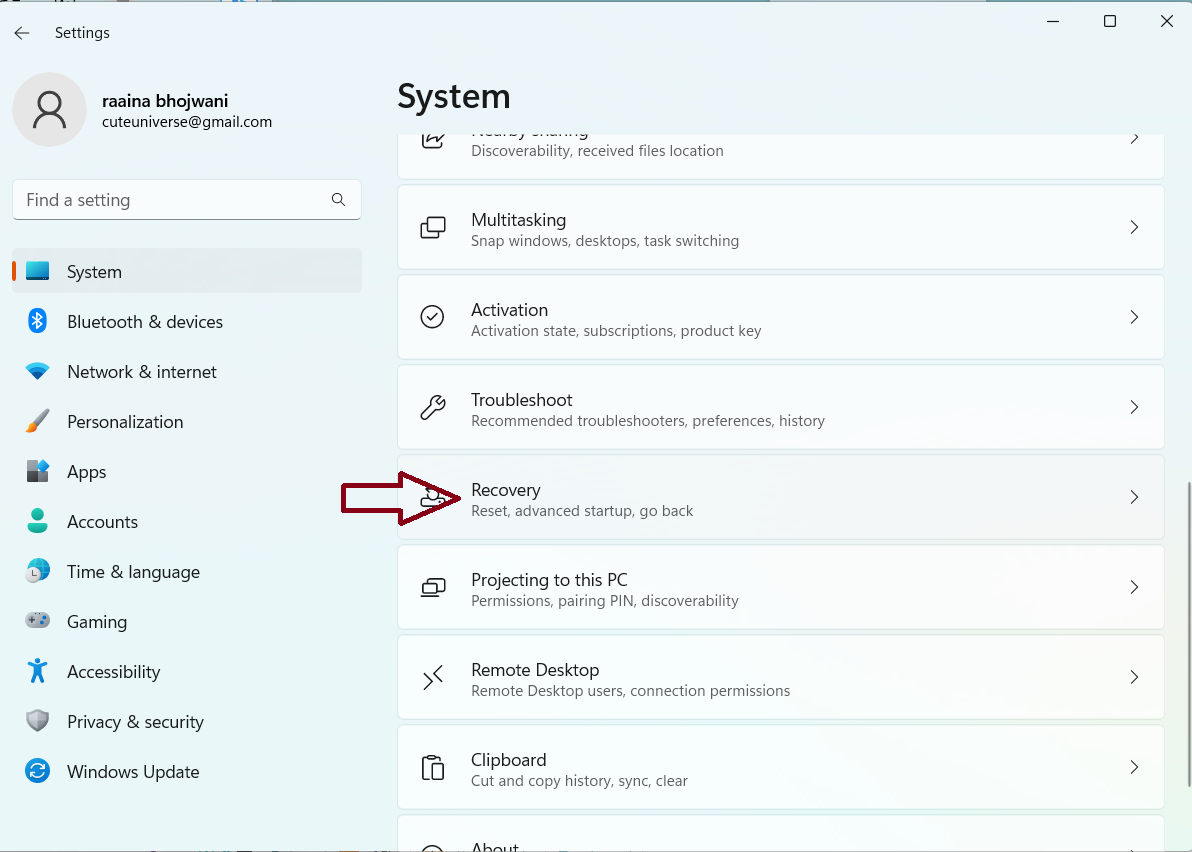
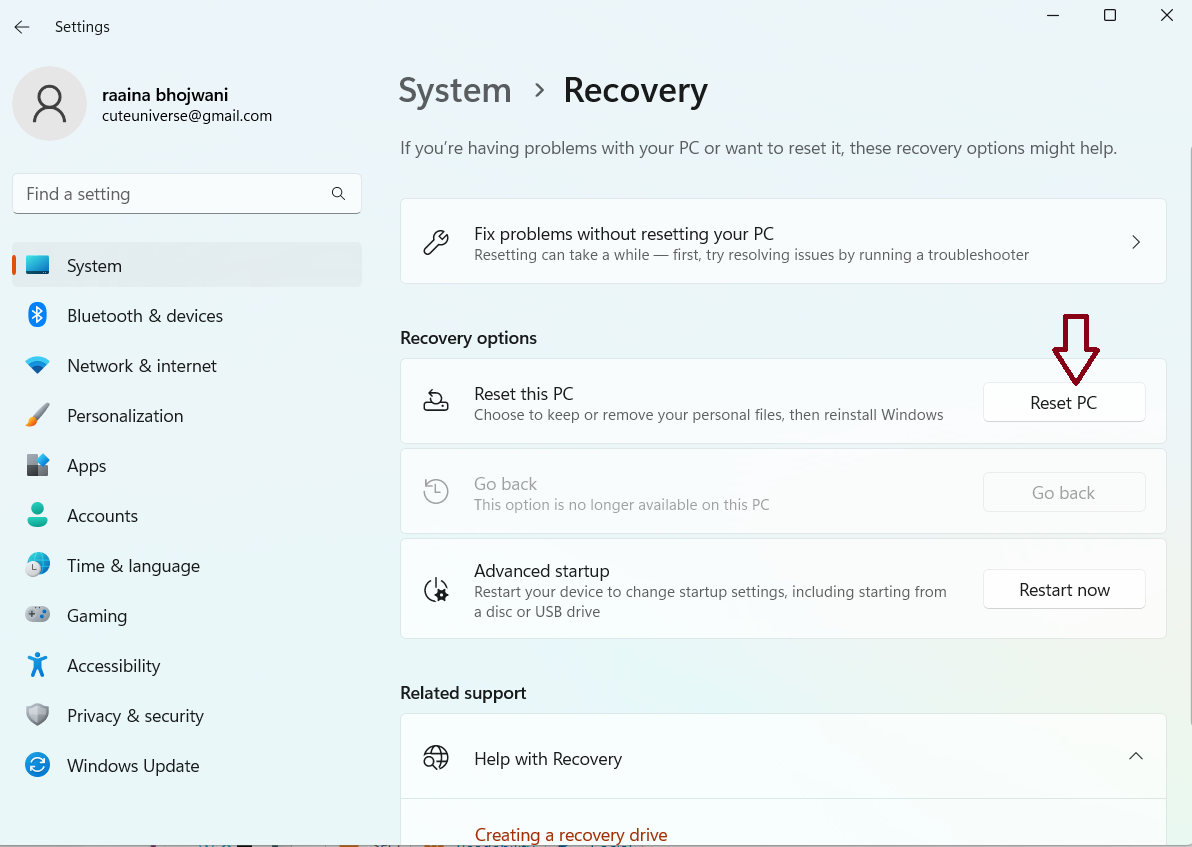
Fix 10: Reset your Windows 11 PC to Fix Your Windows Insider build ran into a problem issue
1. Open Settings by pressing the Windows + I keys.
2. Click on Recovery.
3. Click on the Reset PC button.
That’s it!