

Recently, we covered a tutorial on how to add 256-bit grade encryption for a BitLocker drive. BitLocker easily encrypts your drive data so that it can be kept safe for long decade. However, using a higher grade encryption is better to use, as we have seen previously.
Now, today in this article, I’ll show you how you can lock a BitLocker drive simply from the right click context menu of drive. First of all, you should be aware with locking procedure of drives. To lock an unlocked removable data drive eg. USB drive encrypted by BitLocker, you would normally disconnect it or restart the computer. Whereas to lock an unlocked fixed data drive eg. internal hard drive encrypted by BitLocker, you would normally restart the computer.
Now to make the way simpler, by adding lock drive to the drive context, you’ll be able to able to lock the drive in Windows 7 and Windows 8 without having to restart the computer for fixed data drives, disconnect removable data drives, and still be able to leave auto-unlock turned on for any data drives.
Before proceeding, make sure you are running Windows as administrator. Also, its obvious to mention here that you can’t lock the root drive (on which Windows is currently running, most probably C: drive). In Windows 7, BitLocker Drive Encryption is only available in the Windows 7 Ultimate and Windows 7 Enterprise editions.In Windows 8, BitLocker Drive Encryption is only available in the Windows 8 Pro and Windows 8 Enterprise editions.
Now here is what to do. Follow the simple steps illustrated below:
Page Contents
Add “Lock Drive” To Context Menu For BitLocker Drives
1. Download the zip (compressed file) from below link and extract it to Desktop:
2. After extracting above said file, you’ll got two files, one is registry script namely Add-Lock-Drive.reg and secondly a visual basic script (VBS) namely lock-bde.vbs. Copy the VBS to System32 folder of C:\Windows.
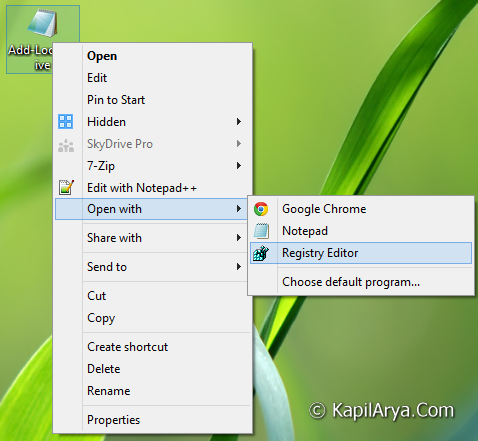
3. Now open the registry script Add-Lock-Drive.reg with Registry Editor (refer screenshot above). That’s it! You should be now able to see lock drive option to context menu.
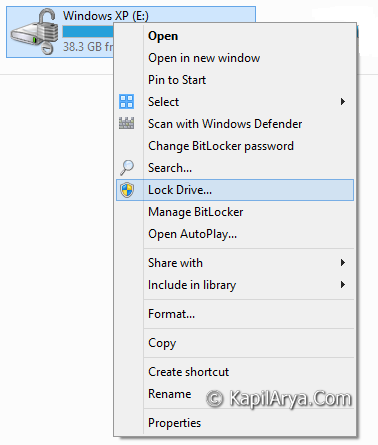
Remove “Lock Drive” From Context
In order to remove lock drive from the context menu, simply download the following registry script and then open it with Registry Editor (in similar way as done it step 3). After doing so, you will no longer able to see lock drive option under the hood of drive context.
Hope you find the article useful!



Hi dear Kapil..
Can I lock the C Drive? I’m running Windows 7 Ultimate.
^^ Nope. We’ve already mentioned that you can’t lock current drive on which Windows is installed.
working, thanks.
example, when I start my pc all 4 HDD starting. i set HDD stop after 5 second but no C drive, ok but if i install application all HDD start.
how no start all HDD when install one application ?
^^ They all are independent of each other, so that contradiction can be avoided, they will be messed otherwise :)
Hi, I thought this workaround would work also in Win7 Enterprise x86 but it doesn’t (it just doesn’t do anything). Is there a way to get the Lock Drive (Bitlocker protected open drive) functionality also in my Win7? Thanks.
^^ This should have worked, please try once again :) If the issue still persists, you can lock drive from BitLocker section manually.
Thank You
Thanks Buddy !! (y)
It works Great!
^^ Glad we could help :)