In Windows 10, you can allow Remote Desktop from other systems. It will give you facility to control a target system remotely, using client machine.
When you allow your system for Remote Desktop connectivity, you actually open a port on your system which other systems in your local network can connect. If you want to secure remote connectivity, you need to enable Network Level Authentication (NLA). The benefit of this is that users need to authenticate themselves to establish remote session. In this way, your Remote Desktop connectivity will become more secure and it will prevent unauthorized users to connect your system. Microsoft also recommends you to have remote sessions only with NLA enabled.
Here are the methods you can deploy to enable NLA on your Windows system:
Page Contents
How To Configure Network Level Authentication For Remote Desktop Connections In Windows 10/8/7
Method 1 – Via Settings App In Windows 10
1. Right click Start Button or press  + X keys and select Settings.
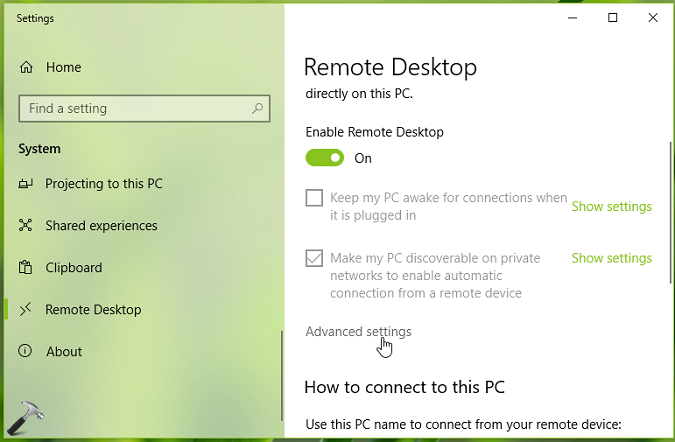
2. In the Settings app, navigate to System > Remote Desktop.
3. Now in right pane of Remote Desktop, click on Advanced settings link.
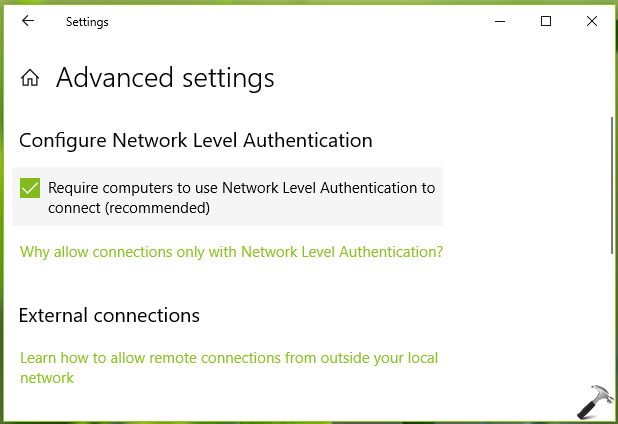
4. Under Advanced settings, check Require user authentication for remote connections by using Network Level Authentication option.
This setting will be immediately applied, so you’ve NLA enabled over remote sessions. Another alternative to enable NLA is via registry manipulation, which is mentioned in Method 2 below.
Method 2 – Via Registry Editor In Windows 10/8.1/8/7
Registry Disclaimer: The further steps will involve registry manipulation. Making mistakes while manipulating registry could affect your system adversely. So be careful while editing registry entries and create a System Restore point first.
1. Press + R and put regedit in Run dialog box to open Registry Editor (if you’re not familiar with Registry Editor, then click here). Click OK.

2. In left pane of Registry Editor window, navigate to following registry key:
HKEY_LOCAL_MACHINE\SYSTEM\CurrentControlSet\Control\Terminal Server\WinStations\RDP-Tcp
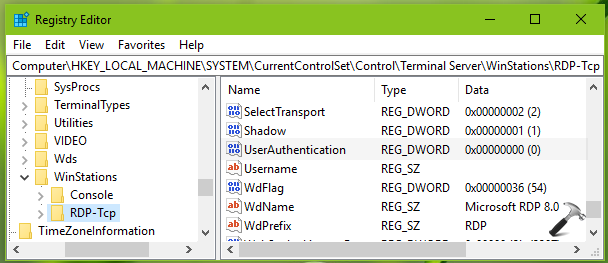
3. Now in the right pane of RDP-Tcp registry key, you might see UserAuthentication named registry DWORD (REG_DWORD) which is set to 0. This registry DWORD can be used to enable/disable NLA in Windows 10. So double click on this registry DWORD to modify its Value data:
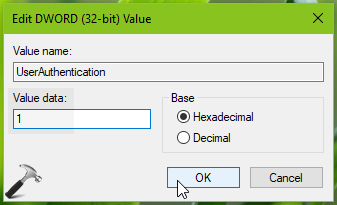
4. Finally, set the Value data to 1 and click OK to enable NLA. Close Registry Editor and reboot to make changes effective.
After restarting your system, NLA would be enabled for your Remote Desktop sessions.
That’s it!