In Windows operating system, the secure boot is used to load only trusted operating system bootloaders, provided the device is equipped with UEFI Firmware and Trusted Platform Module. Secure boot was first introduced with Windows 8 and also supported in latest Windows 10 version as of this writing. The main objective of the secure boot is to protect your Windows 10 device from malware.
According to Microsoft, a system with secure boot enabled, the firmware examines the bootloader’s digital signature to verify that it hasn’t been modified. If the bootloader is intact, the firmware starts the bootloader only if the bootloader was signed using a trusted certificate or the user has manually approved the bootloader’s digital signature. More about the secure boot and its requirement can be learned in Microsoft’s documentation.
In this article, we’ll see how to enable or disable secure in your Windows 10 device. Note that if your system came pre-installed with Windows 10 and UEFI firmware, chances that you’ve secure boot enabled by default are high. IMO, when you’ve secure boot enabled, you won’t be able to boot using bootable USB drive to install new operating system and format/modify existing one. In such case, you may need to turn off secure boot which in turn will enable legacy boot. After enabling legacy boot, you should be able to make clean install of operating system with bootable USB.
Page Contents
How To Enable/Disable Secure Boot In Windows 10
Enable/Disable Secure Boot In Dell Systems
1. Repeatedly hit F10 key while you see Dell’s logo at starting machine and then press F12 key.
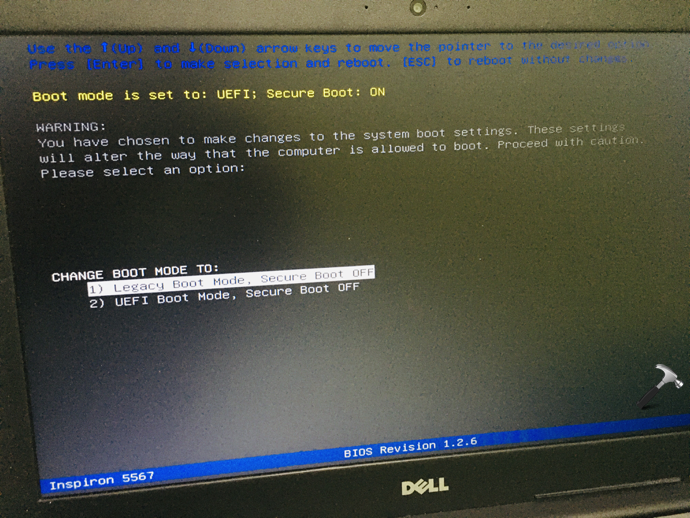
2. You should now see Boot mode is set to: UEFI; Secure Boot: ON. Use down arrow key to move to Change Boot Mode Settings and press Enter key.

3. Then change boot mode to either Legacy Boot Mode, Secure Boot OFF or UEFI Boot Mode, Secure Boot Mode OFF as per you choice. Both option will disable secure boot.
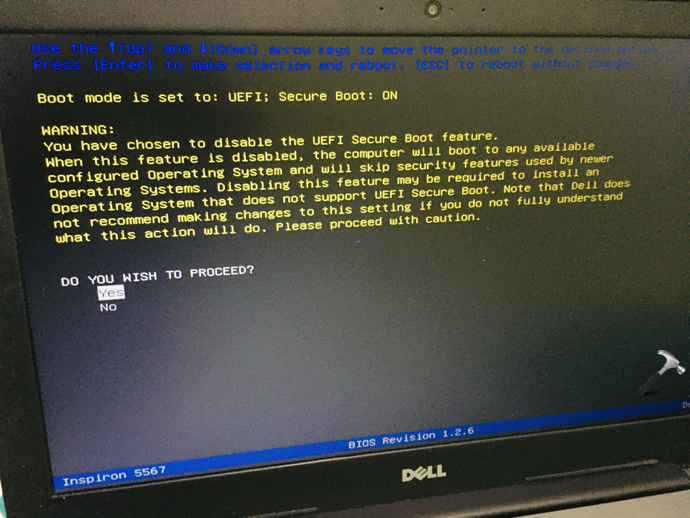
4. Next, in warning screen, select Yes and press Enter.
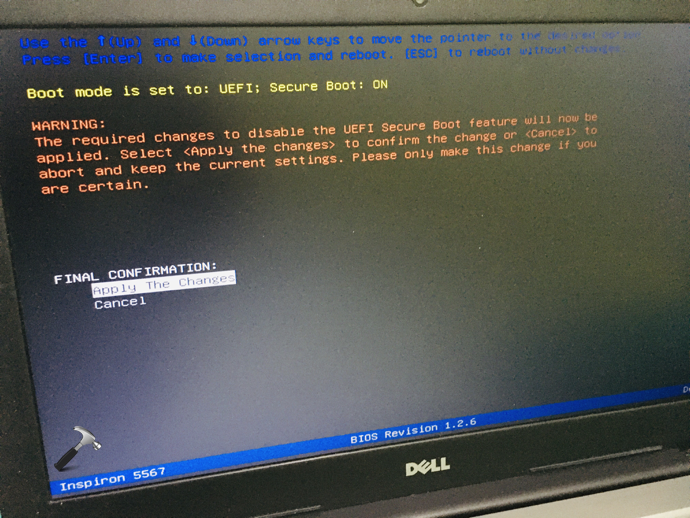
5. Then in confirmation screen, select Apply The Changes and press Enter key.
This should disable secure boot. To enable secure boot again, follow above process and then you need choose UEFI Boot Mode, Secure Boot Mode ON option.
Enable/Disable Secure Boot In Other Systems
1. Open Settings app > Update & Security > Recovery > Advanced Recovery > Restart now.
2. Then under Choose an option, select Troubleshoot > Advanced options > UEFI Firmware Settings > Restart.
3. At UEFI Firmware Settings, try this as per your device manufacturer:
- If you’ve HP system, under System Configuration, you should have Boot options. Then you’ll see Secure boot, set it to Enabled/Disabled to have corresponding effect.
- If you’ve ASUS system, switch to Security > and Secure boot to either Enabled or Disabled.
- If you’ve Acer device, under Boot options, you can turn on/off Secure boot.
For any other device, not mentioned here, you should boot to BIOS settings and check Boot tab. The Secure boot option is generally included there and configured in similar way described above.
That’s it!