
Server Message Block (SMB) protocol is a network file sharing protocol used in Windows operating system. Using the SMB protocol, an application can access files or other resources at a remote server. In this way, applications can read, create, and update files on the remote server. In Windows 10 Version 1709 or later, SMBv1 protocol is no longer installed by default. Due to security reasons, Microsoft no longer recommends using SMBv1. It is recommended that you use either SMBv2 or above. In this article, we’ll see how to enable/disable SMBv2 in Windows 10?
In case of SMBv1, it was quite easy to enable this protocol via ‘Turn Windows Features On or Off’. However the same is not applicable to SMBv2. You cannot enable or disable this protocol from ‘Turn Windows Features On or Off’. But there is nothing to worry about. You can also enable or disable SMB protocols using some other ways. So here is how you can enable or disable SMBv2 in your Windows 10. Note that by default, SMBv2 is enabled on Windows 10.
Page Contents
How to enable/disable SMBv2 in Windows 10?
Method 1 – Using Windows PowerShell
Follow these steps to enable or disable SMBv2 using PowerShell.
1. Right click Start Button or press  + X keys and select Windows PowerShell (Admin).
2. In administrative Windows PowerShell window, paste following and press Enter key:
Get-SmbServerConfiguration | Select EnableSMB2Protocol
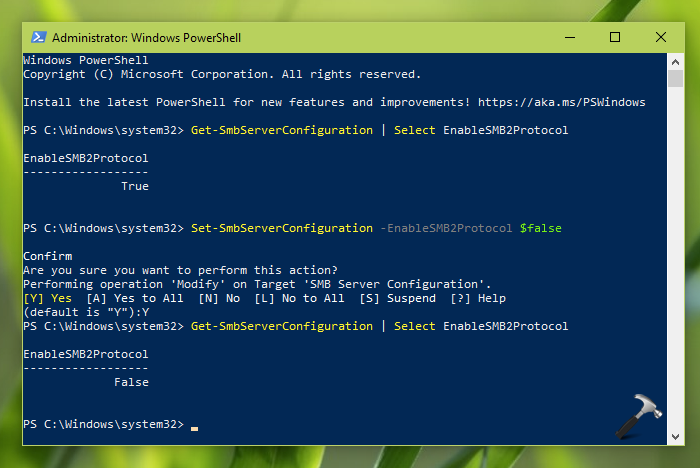
If the response of above command is True, then SMBv2 protocol is enabled.
3. To disable SMBv2 protocol on your system, execute following command:
Set-SmbServerConfiguration -EnableSMB2Protocol $false
After this, you’ll need to press Y to confirm this operation. In few seconds, the SMBv2 protocol will be disabled. You can again check the status of protocol using cmdlet mentioned in step 2.
If later you need to enable SMBv2 protocol again, use this command and similarly confirm the operation by pressing Y key:
Set-SmbServerConfiguration -EnableSMB2Protocol $true
So this is how you can manage SMB protocol using PowerShell.
Method 2 – Using Registry
To enable or disable SMBv2 protocol via registry, follow these steps:
1. Run regedit command to open Registry Editor.
2. In left pane of Registry Editor window, go to:
HKEY_LOCAL_MACHINE\SYSTEM\CurrentControlSet\Services\LanmanServer\Parameters
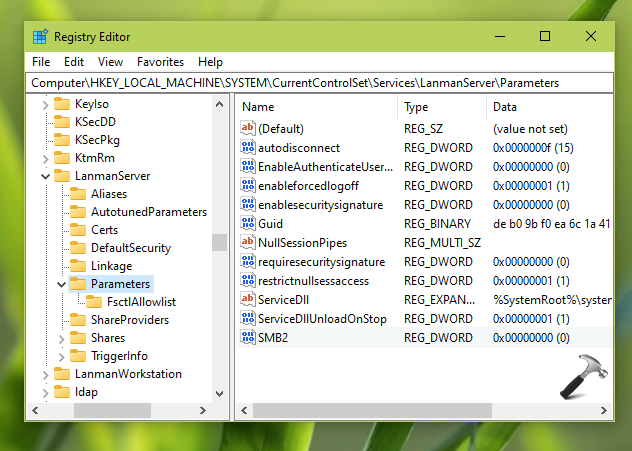
3. In right pane of Parameters, set the Value data of SMB2 registry DWORD to 0 to disable SMBv2 protocol. If you want to enable SMBv2 protocol, set its Value data to 1.
4. Close Registry Editor and reboot to make your changes effective.
Check out this video to see how to fix a common issue, when SMBv2 is disabled:
That’s it!


How do I switch my s mode windows 10 to windows 10 pro I have tried to upgrade through Microsoft but the windows is asking for to buy product key or or to provide on
^^ Free upgrade is not possible. You need to buy Pro upgrade by paying around $100.