Indexing is a process which maintains the index of file properties for speeding up searches in Windows. However, while performing searches in Windows 11, the Search Indexing may sometimes stop working. The search may start and then pause without creating any result. Thus, this post consists of the fixes which the users can attempt when Indexing is not running.
Page Contents
Fix: Indexing is not running on Windows 11
A popup saying ‘Search indexing was turned off ‘may also appear at times. If the user selects ‘Turn indexing back on ‘, then another error message appears saying, ‘Indexing is not running’. The problem appears when the Index is disabled. Thus, let us check the main fixes for fixing the issue of Indexing is not running in detail.
Fix 1: Correctly Configuring Windows Search Service
The users can try changing Windows Search Service at first for fixing the issue of Indexing is not running with the steps provided below.
Step 1- Firstly, press Win + R. Thereafter, right the command below and press Enter.
services.msc
Step 2- Now, in the Services widow, go to Windows Search Service. Double-click it.
Step 3- Next, check if the Status is running and the Startup Type is set to Startup Type to Automatic (Delayed Start).

Step 4- Lastly, press Apply > OK for saving the changes. Reboot the PC and check if this solves the problem.
Fix 2: Changing Registry Value
If the above step does not work, then try changing the registry for fixing the problem. Follow the steps below for doing the same.
Step 1- Primarily, click Win + R and write the prompt given below and click Enter. Press Yes if any prompt appears.
regedit
Step 2- Now, go to the path below in the Registry Editor.
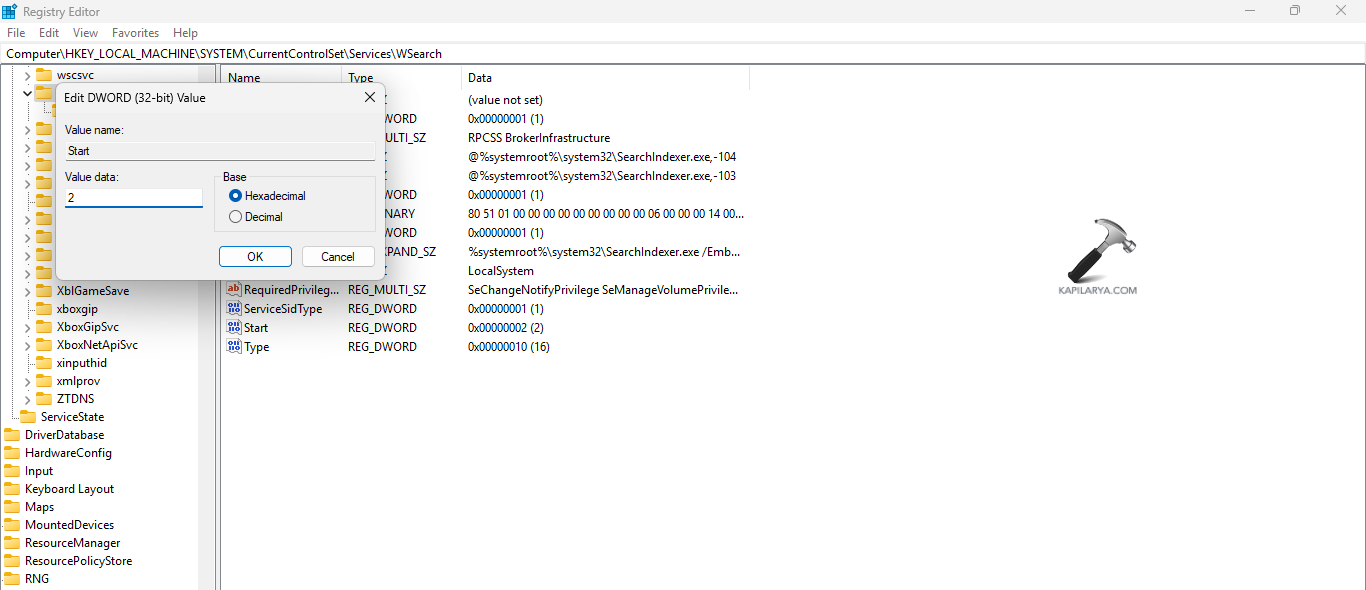
HKEY_LOCAL_MACHINE\SYSTEM\CurrentControlSet\Services\WSearch
Step 3- Double-click Start located at the right panel. Set the value to 2. This will make sure Windows Search starts automatically. Press OK and exit the Registry Editor. Restart the PC and see if this fixes the problem.
Step 4- However, if the indexing starts but it does not update new files then rename the key given below.
FileChangeClientConfigs
This key has subkeys and values which define which file change notifications Windows Search hears for indexing. Renaming this key will make Windows reset indexing configurations.
Step 5- Further, go to the key below-
HKEY_LOCAL_MACHINE\SOFTWARE\Microsoft\Windows Search\FileChangeClientConfigs
Step 6- Right-click the key given below.
FileChangeClientConfigs

Step 7- Press Rename and change the key to the key provided below. Thereafter, exit the Registry Editor and restart the Windows Search service. Lastly, reboot the PC.
FileChangeClientConfigsBAK
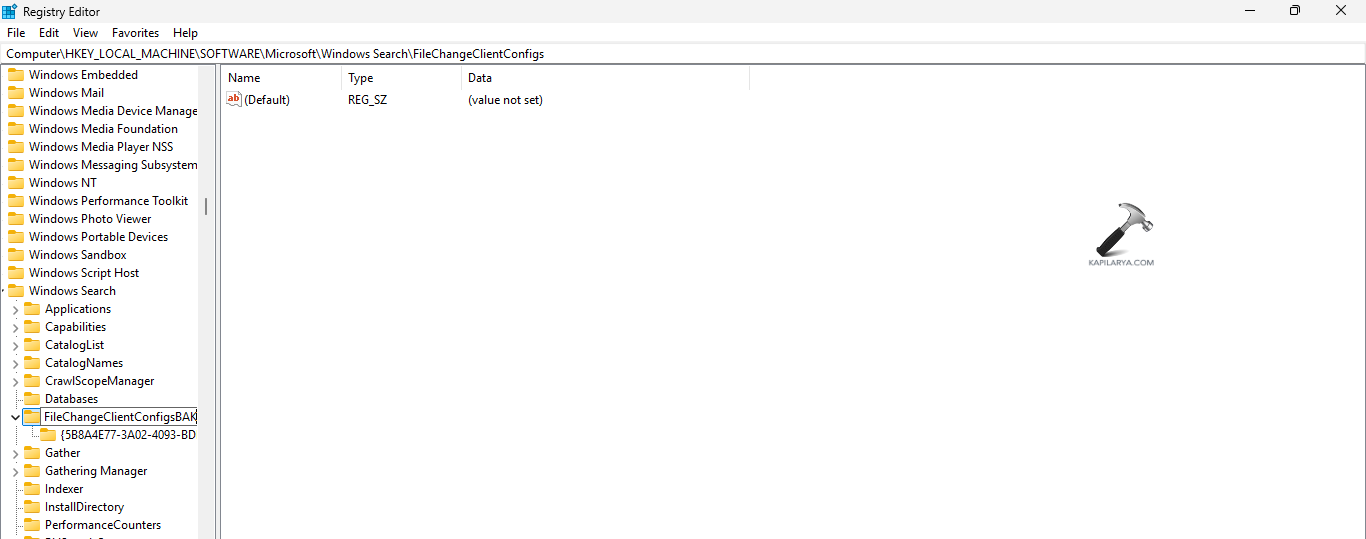
After the PC starts, Windows will detect that the FileChangeClientConfigs key is missing. Hence, it will recreate the key with default values and fix the indexing issues. If however, this does not work, then restoring the old settings through renaming FileChangeClientConfigsBAK back to its original name.
Fix 3: Deleting and Rebuilding Index
Deleting and rebuilding index is another option for solving the issue. Try it with the instructions provided below.
Step 1- Firstly, open Settings. Next, go to Privacy & Security > Searching Windows.

Step 2- Further, below Related settings, select Advanced indexing options.

Step 3- Next, in the Indexing Options window press the Advanced button.

Step 4- Now, press Rebuild option in the Advanced Options window. If any prompt appears, press OK. Wait for the completion of the indexing.

Fix 4: Deleting .BLF and .REGTRANS-MS files
Another option for fixing the problem is deleting .BLF and .REGTRANS-MS files from the TxR folder. Now, the instructions for doing the same are below.
Step 1- Primarily, open File Explorer and go to the path below-
C:\windows\system32\config\TxR
Step 2- Here, delete all the files ending with .BLF and .REGTRANS-MS. Reboot the PC for saving all the changes. Also, the files in the TxR folder are hidden. For viewing and deleting them, change the system to unhide protected operating system files and take ownership of specific folders. Make sure to backup before deleting the files.
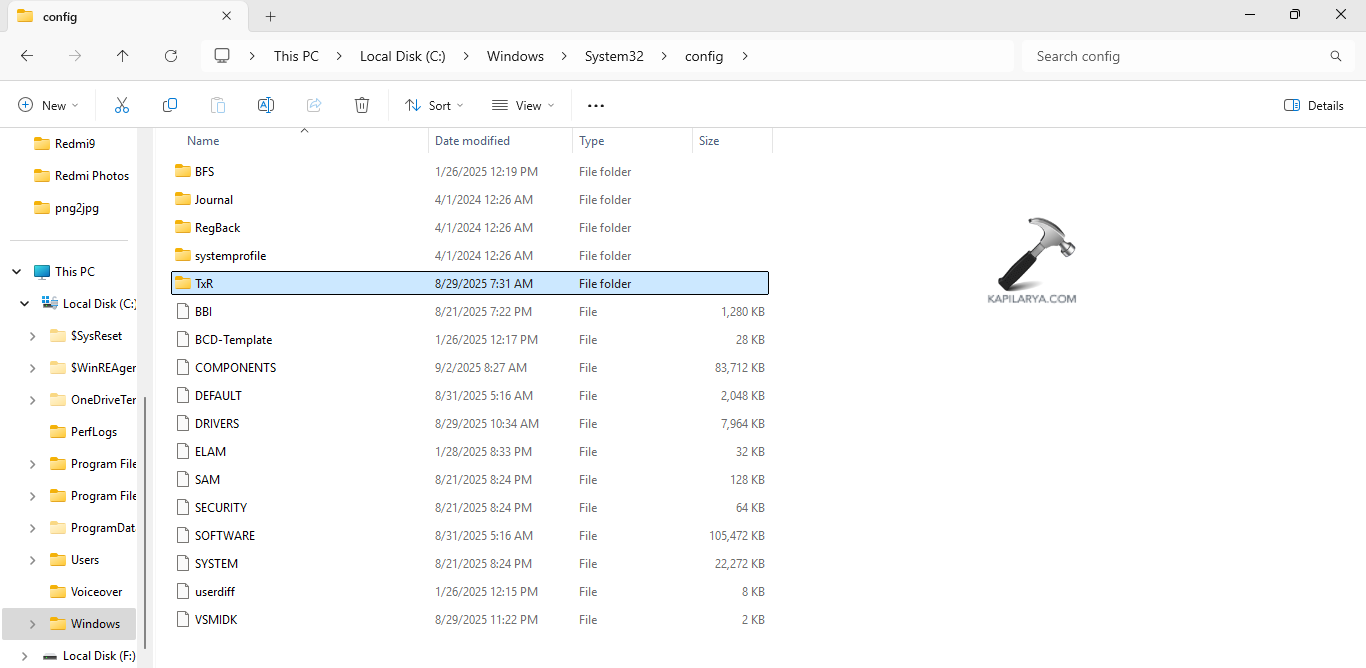
After deleting the files and restarting the PC, the Windows Search service will search automatically and begin rebuilding the index. Moreover, High CPU may appear when the Search Index is rebuilt
Fix 5: Running the Search and Indexing Troubleshooter
The last solution for solving the problem is running the Search and Indexing Troubleshooter using the steps below.
Step 1- At first, open Settings. Then, go to Privacy & Security > Searching Windows.

Step 2- Now, below Related settings, select Indexer troubleshooter.
OR
Step 2- Run Command Prompt as an Administrator and run the prompt given below-
msdt.exe -ep WindowsHelp id SearchDiagnostic
Now, it will open the Search and Indexing troubleshooter. Run it and see if this fixes the problem.
Hoping that this helps!