Windows 11 comes preinstalled with various apps. These general apps are enough for an user to perform day-to-day task. However, sometimes users may not be interested in using these pre-installed apps and consider them burden on system using resources. For those cases, Microsoft has introduced Group Policy to remove pre-installed apps from Windows 11.

Starting with Windows 11 Version 24H2 and later, this Group Policy is available on systems with latest updates installed. Of course the policy is available to Windows Insiders for sure. You can configure the Remove Default Microsoft Store packages from the system policy using either of methods mentioned below.
Page Contents
Remove pre-installed apps via Windows 11 Group Policy
Using Group Policy
1. Run gpedit command to open Group Policy Editor.
2. Navigate here:
Computer Configuration > Administrative Templates > Windows Components > App Package Deployment
3. Locate the policy setting name Remove Default Microsoft Store packages from the system. Double click on it to configure the policy.
4. Set the policy to Enabled. Under Options, you can check mark the pre-installed apps you want to remove.
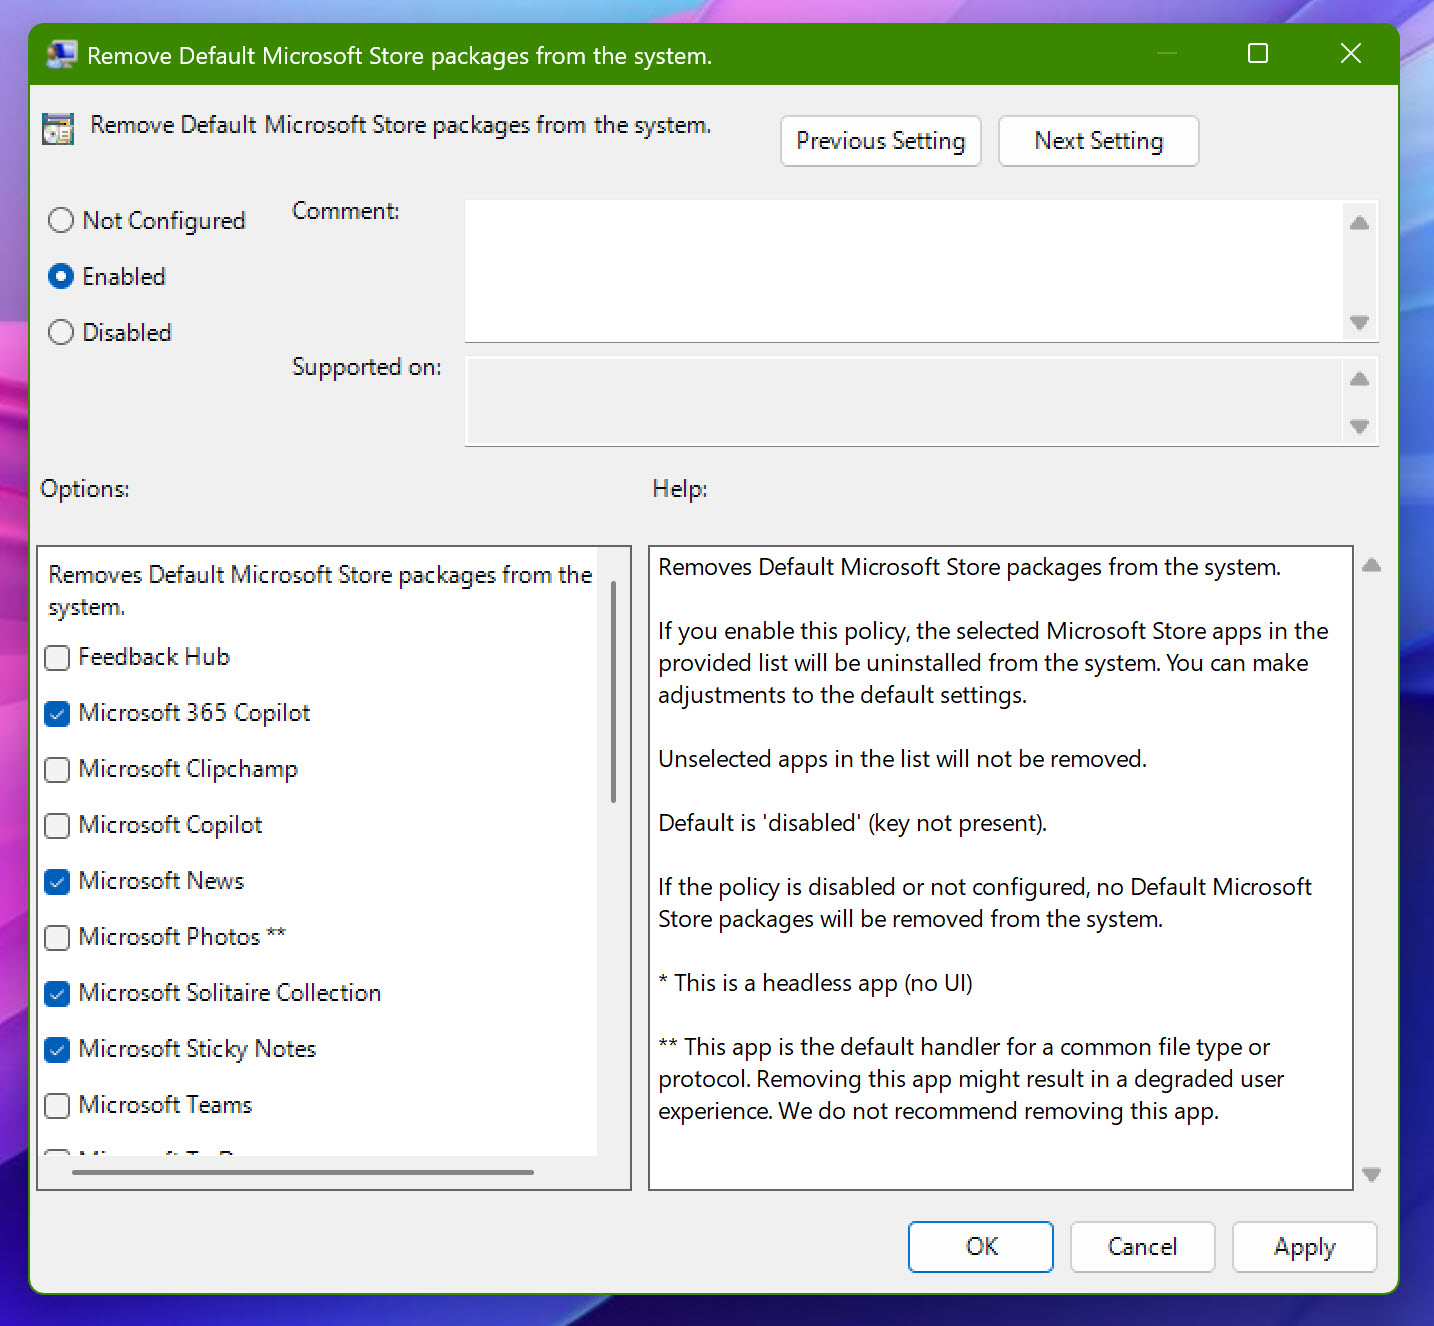
5. Click Apply, OK.
Using Registry
You can make same changes with registry edit as well. If you’re new to registry, consider creating System Restore point before editing registry.
1. Open Registry Editor using regedit command.
2. In the Registry Editor window, go to:
HKEY_LOCAL_MACHINE\SOFTWARE\Policies\Microsoft\Windows\Appx
3. Create a new registry sub-key to Appx and name it RemoveDefaultMicrosoftStorePackages.
4. In the right pane of RemoveDefaultMicrosoftStorePackages registry key, create a registry DWORD named Enabled and set it to Value data 1.

5. Now you can create registry sub-key next to RemoveDefaultMicrosoftStorePackages registry key. Name it as per below table.
| App name | Registry sub-key name |
|---|---|
| Xbox Identity Provider | Microsoft.XboxIdentityProvider_8wekyb3d8bbwe |
| Xbox Gaming Overlay | Microsoft.Xbox.TCUI_8wekyb3d8bbwe |
| Xbox Gaming App | Microsoft.GamingApp_8wekyb3d8bbwe |
| MSN Weather | Microsoft.BingWeather_8wekyb3d8bbwe |
| Microsoft Solitaire Collection | Microsoft.MicrosoftSolitaireCollection_8wekyb3d8bbwe |
| Microsoft Clipchamp | Clipchamp.Clipchamp_yxz26nhyzhsrt |
| Microsoft 365 Copilot | Microsoft.Copilot_8wekyb3d8bbwe |
| Feedback Hub | Microsoft.WindowsFeedbackHub_8wekyb3d8bbwe |
| Microsoft News | Microsoft.BingNews_8wekyb3d8bbwe |
| Microsoft Photos | Microsoft.Windows.Photos_8wekyb3d8bbwe |
| Xbox Speech To Text Overlay | Microsoft.XboxSpeechToTextOverlay_8wekyb3d8bbwe |
| Xbox TCUI | Microsoft.Xbox.TCUI_8wekyb3d8bbwe |
| Windows Terminal | Microsoft.WindowsTerminal_8wekyb3d8bbwe |
| Windows Sound Recorder | Microsoft.WindowsSoundRecorder_8wekyb3d8bbwe |
| Microsoft Sticky Notes | Microsoft.MicrosoftStickyNotes_8wekyb3d8bbwe |
| Microsoft Teams | MSTeams_8wekyb3d8bbwe |
| Microsoft To Do | Microsoft.Todos_8wekyb3d8bbwe |
| Outlook for Windows | Microsoft.OutlookForWindows_8wekyb3d8bbwe |
| Paint | Microsoft.Paint_8wekyb3d8bbwe |
| Quick Assist | MicrosoftCorporationII.QuickAssist_8wekyb3d8bbwe |
| Snipping Tool | Microsoft.ScreenSketch_8wekyb3d8bbwe |
| Windows Calculator | Microsoft.WindowsCalculator_8wekyb3d8bbwe |
| Windows Camera | Microsoft.WindowsCamera_8wekyb3d8bbwe |
| Windows Media Player | Microsoft.ZuneMusic_8wekyb3d8bbwe |
| Windows Notepad | Microsoft.WindowsNotepad_8wekyb3d8bbwe |

6. Once the app registry sub-key is created, go to it’s right pane and create a registry DWORD named RemovePackage and set it Value data to 1.
7. Close Registry Editor, restart your system to make changes effective.
That’s it!