By default, when you leave your Windows 10 for some time, it will be automatically turn off display and lock out. Basically to conserve power, the screen is turned off. This could be great thing for clients often leaving the system during break. While the same could be annoying for clients working with other devices along with Windows 10. So for those clients, we’ll see how to configure Windows 10 lock screen timeout settings, in this post.
There are two ways you can configure this setting. The first method is to use Settings app and set a larger time after which display should turn off. You need to increase the screen turn off time individually for on battery, and on AC power. The second way to configure this is via Power options.
Both the ways to manage Windows 10 lock screen timeout settings are here:
Page Contents
Configure Windows 10 Lock Screen Timeout Settings
Method 1 – Via Settings App
- Right click Start Button or press
 + X keys and select Settings.
 - In the Settings app, navigate to System > Power & sleep.
- In the right pane of Power & sleep, configure the options labelled On battery power, turn off after and When plugged in, turn off after to change screen lockout time on battery and AC power, respectively.
 + X keys and select Settings.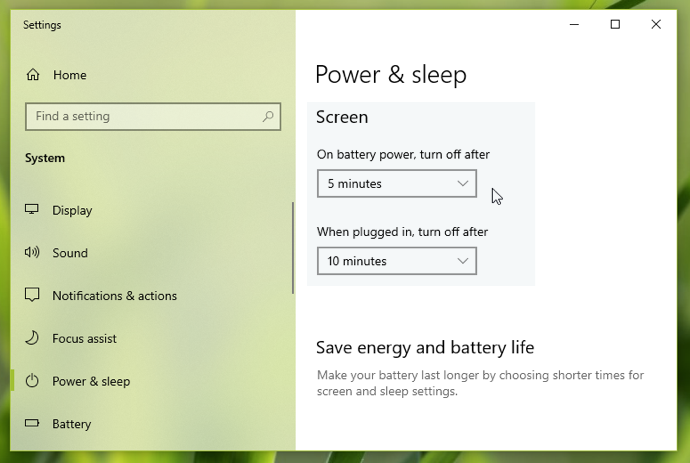
The settings you’ve configured should be applied immediately. You can close Settings app and return to your work.
Method 2 – Via Power Options
- On taskbar, right click on battery icon, select Power Options. Refer this fix, if battery icon missing from taskbar.
- Next, in the Power Options window, under Selected plan, click Change plan settings.
- Now in Edit Plan Settings window, hit the Change advanced power options link.
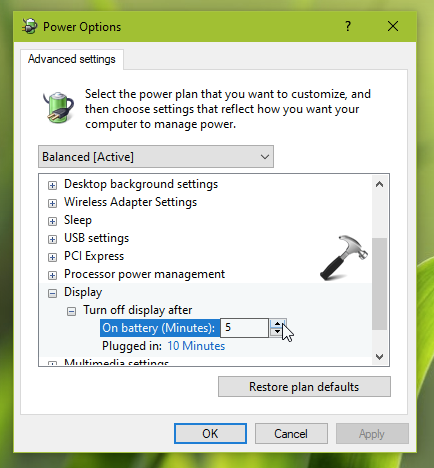
- In Power Options window, expand Display. For Turn off display after, set the screen lockout time while on battery and during plugged in. Click Apply, followed by OK.
So in this way you can configure screen time out settings on Windows 10.
That’s it!
Related: Disable password requirement after sleep in Windows 10.