In the newest Windows 11 operating system, there are many personalization abilities available. One of those personalizing abilities is the transparency effects. Windows 11 supports the transparency effects on different parts of the operating system with acrylic blur effect. In this article, you will read how to enable or disable transparency effects in Windows 11.
By default, when you install or upgrade to Windows 11, you will have the transparency effects enabled. You can see these transparency effects in following areas:
- Start Menu
- Desktop context menu
- Settings and others apps
- Login screen
- Recycle Bin menu
- Toast notifications and other fly-outs appearing along with notifications
- Action Center
- Taskbar and other related elements
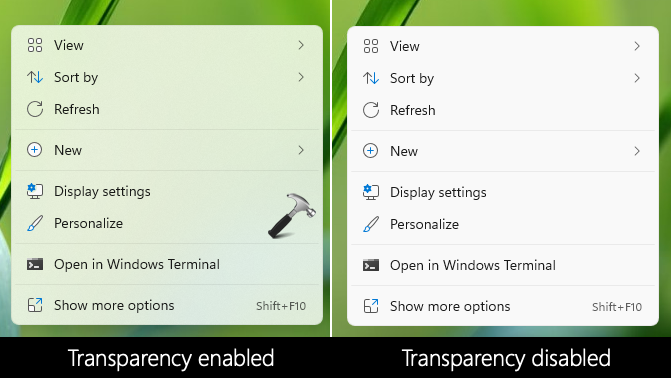
Here, you can see the example of Desktop context menu. In the left hand side of the below shown screenshot, we have transparency effects enabled. While, the right side of the screenshot shows transparency effects disabled.
Note that in Windows 11, we have acrylic blur effect which is also sometimes called fluent design. And therefore, we don’t have complete or glass like transparency effect on Windows 11 natively.
Here is how you can manage transparency effects in Windows 11.
Page Contents
Enable/disable transparency effects in Windows 11
Method 1 – Enable or disable transparency effects in Windows 11 using Settings app
1. Press  + I keys to open Settings app.
2. In the Settings app, go to Personalization > Colors.
3. In right pane of Colors, locate Transparency effects option. It must be On by default. To disable transparency effects, you can turn Off this option.
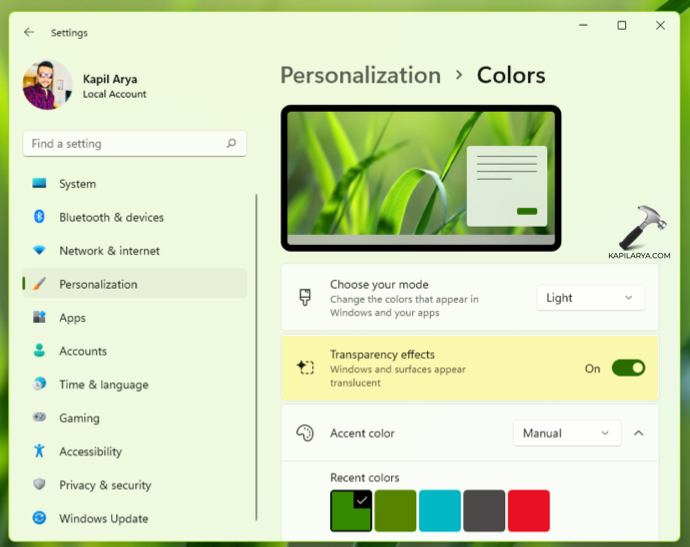
Your settings should be saved and applied immediately.
Method 2 – Enable or disable transparency effects in Windows 11 using registry
1. Run regedit command to open Registry Editor.
2. In the Registry Editor window, navigate to:
HKEY_CURRENT_USER\Software\Microsoft\Windows\CurrentVersion\Themes\Personalize
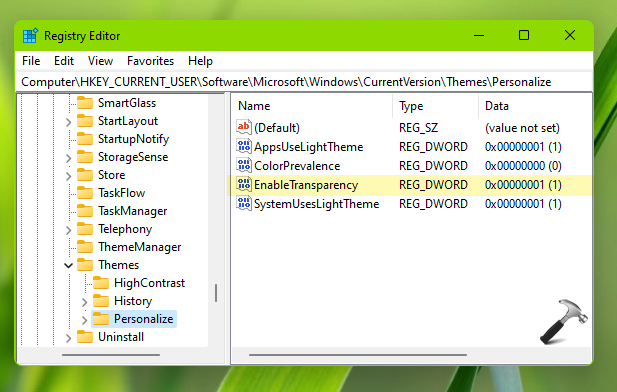
3. In the right pane of Personalize, locate the registry DWORD (REG_DWORD) named EnableTransparency. If its Value data is set to 1, you have transparency effects enabled. While, if its Value data is set to 0, you have transparency effects disabled.
4. Close Registry Editor, sign out and sign in back to apply changes.
That’s it!