
Are you encountering connectivity problems on your Windows 11 device? Don’t worry; we’ve got a solution for you. In this guide, we’ll walk you through the steps to fix DHCP is not enabled for Wi-Fi in Windows 11 issue, so you can get your Wi-Fi up and running smoothly.
Page Contents
What is DHCP?
DHCP stands for Dynamic Host Configuration Protocol. It is a network protocol that automatically assigns IP addresses, subnet masks, default gateways, and other network configuration information to devices on a network.
In Windows 11, DHCP is enabled by default for wired networks. However, it may not be enabled for Wi-Fi networks. If DHCP is not enabled for Wi-Fi in Windows 11, you will not be able to connect to the internet.
Why DHCP is important?
DHCP is important because it makes it easy to manage IP addresses on a network. It also helps to prevent IP address conflicts.
Here are some of the benefits of using DHCP:
- It saves time and effort by automatically assigning IP addresses to devices.
- It helps to prevent IP address conflicts.
- It makes it easier to manage network devices.
- It can improve network security.
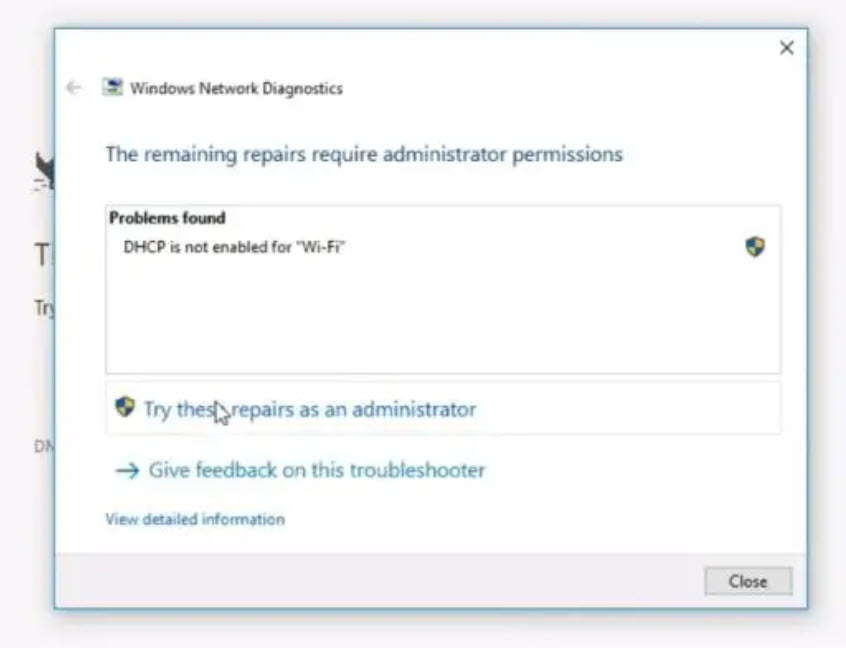
Fix: DHCP is not enabled for Wi-Fi in Windows 11
The issue behind “DHCP is not enabled for Wi-Fi in Windows 11” can be caused by several factors, such as:
- The Wi-Fi adapter is not properly configured.
- The DHCP server is not reachable.
- There is a problem with the DHCP configuration.
Here, we present 8 essential techniques to resolve this problem.
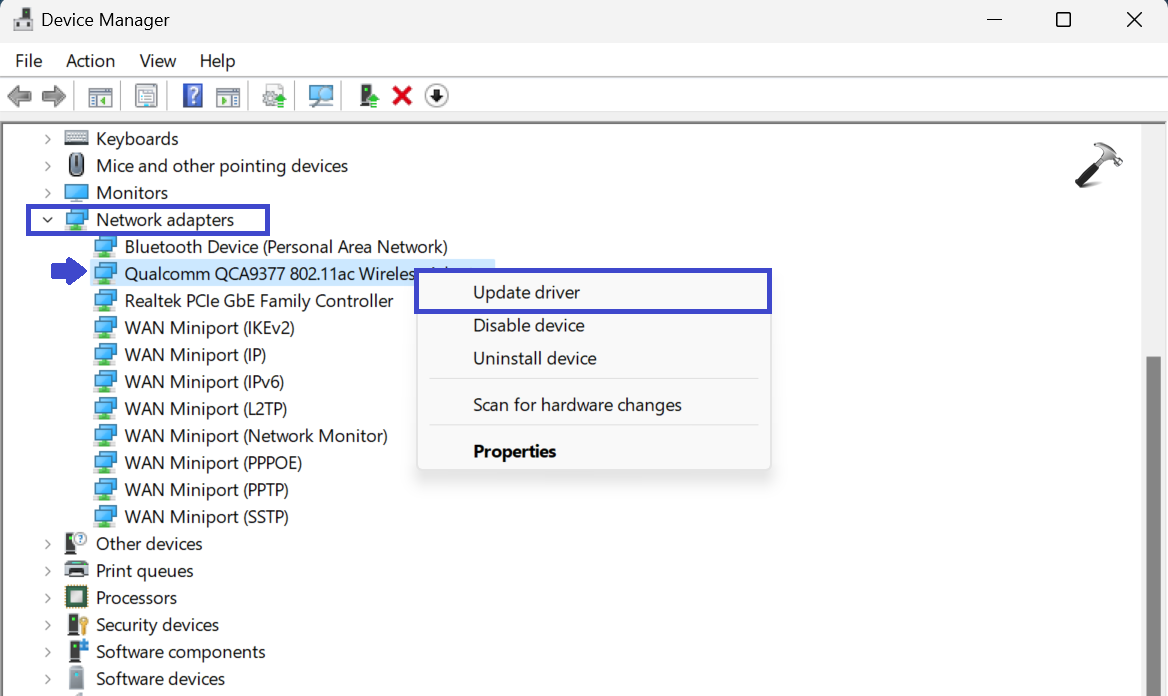
Fix 1: Update the Network Driver
The network driver allows your computer to communicate with the network adapter. If the network driver is outdated or corrupted, it can cause problems with your computer’s network connection.
To update the network driver in Windows 11, follow these steps:
1. Open the Power User Menu by pressing the Windows key + X and then select “Device Manager“.

2. Now, click on “Network Adapter“.
3. Right-click on the Wi-Fi adapter and click “Update driver“.
4. Now, select the “Search automatically for drivers” option.
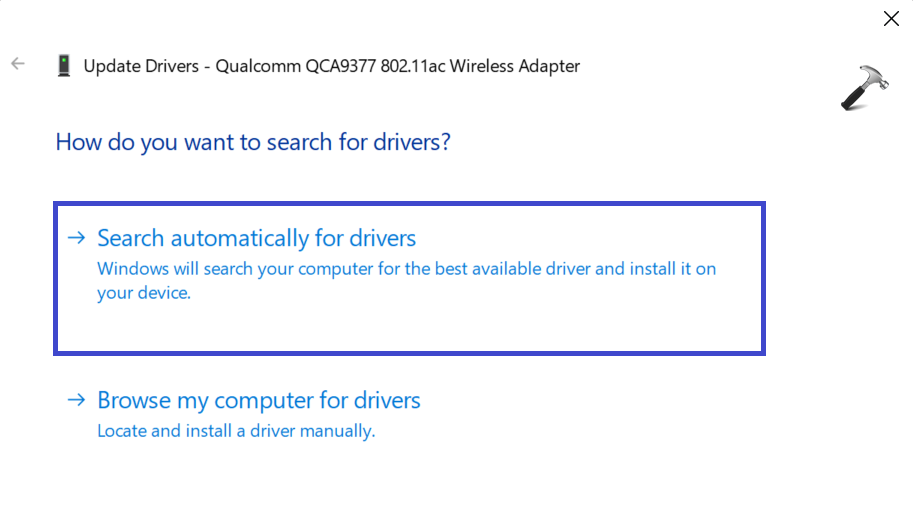
This will update the network driver automatically and will fix the issue. Make sure to restart the PC after updating the network driver.
Fix 2: Reset the Network Settings
Resetting network settings will delete all your saved network profiles, including your Wi-Fi passwords. So, you will need to re-enter your Wi-Fi passwords after resetting the network settings.
Follow the below steps to reset the network setting:
1. Open the Command prompt and run as administrator.
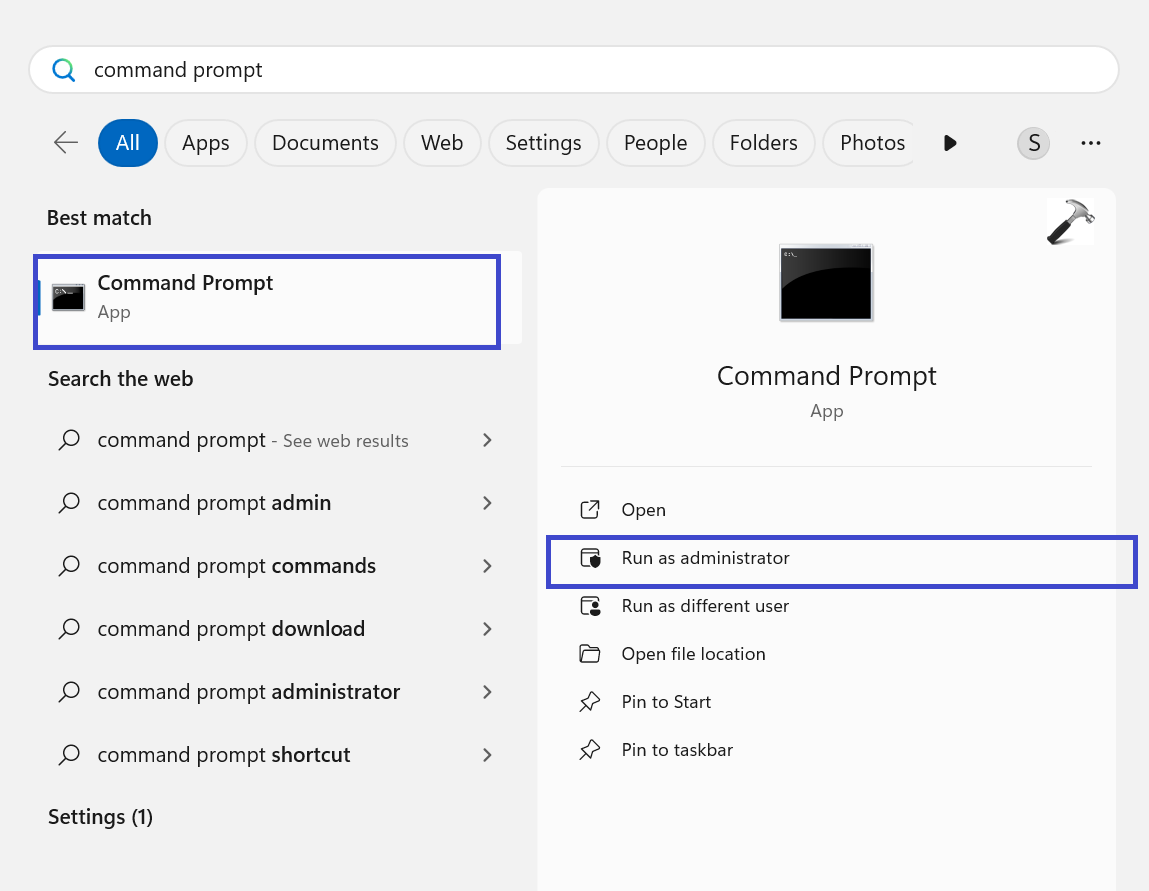
2. Paste the below commands. Press Enter and execute the commands one by one:
netsh winsock reset catalog

netsh int ip reset resetlog.txt
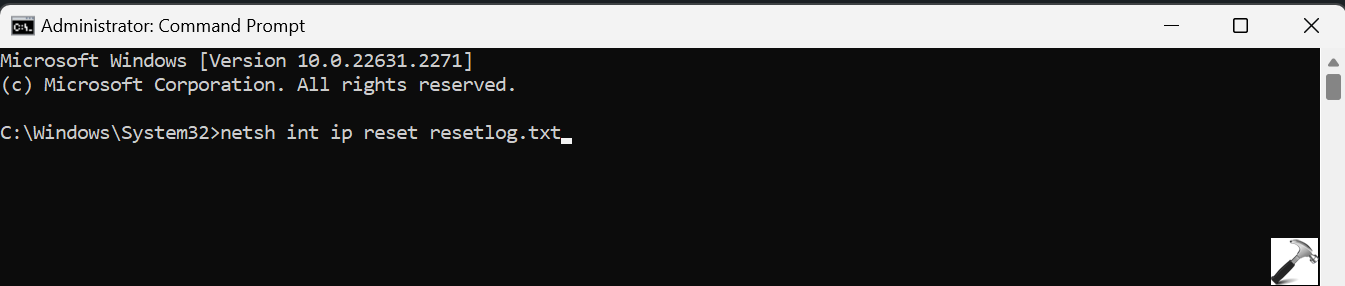
ipconfig /release

ipconfig /renew

3. After executing the above commands, restart the PC.
Now, check whether the issue is fixed for DHCP is not enabled for Wi-Fi in Windows 11.
Fix 3: Run the Network Troubleshooter
The Network Troubleshooter will scan your computer for any problems with your network adapters. If it finds any problems, it will try to fix them automatically.
Follow the below steps to run the network troubleshooter:
1. Open the Settings App by pressing Windows key + I.
2. Now, go to “System” and click on “Troubleshoot“.
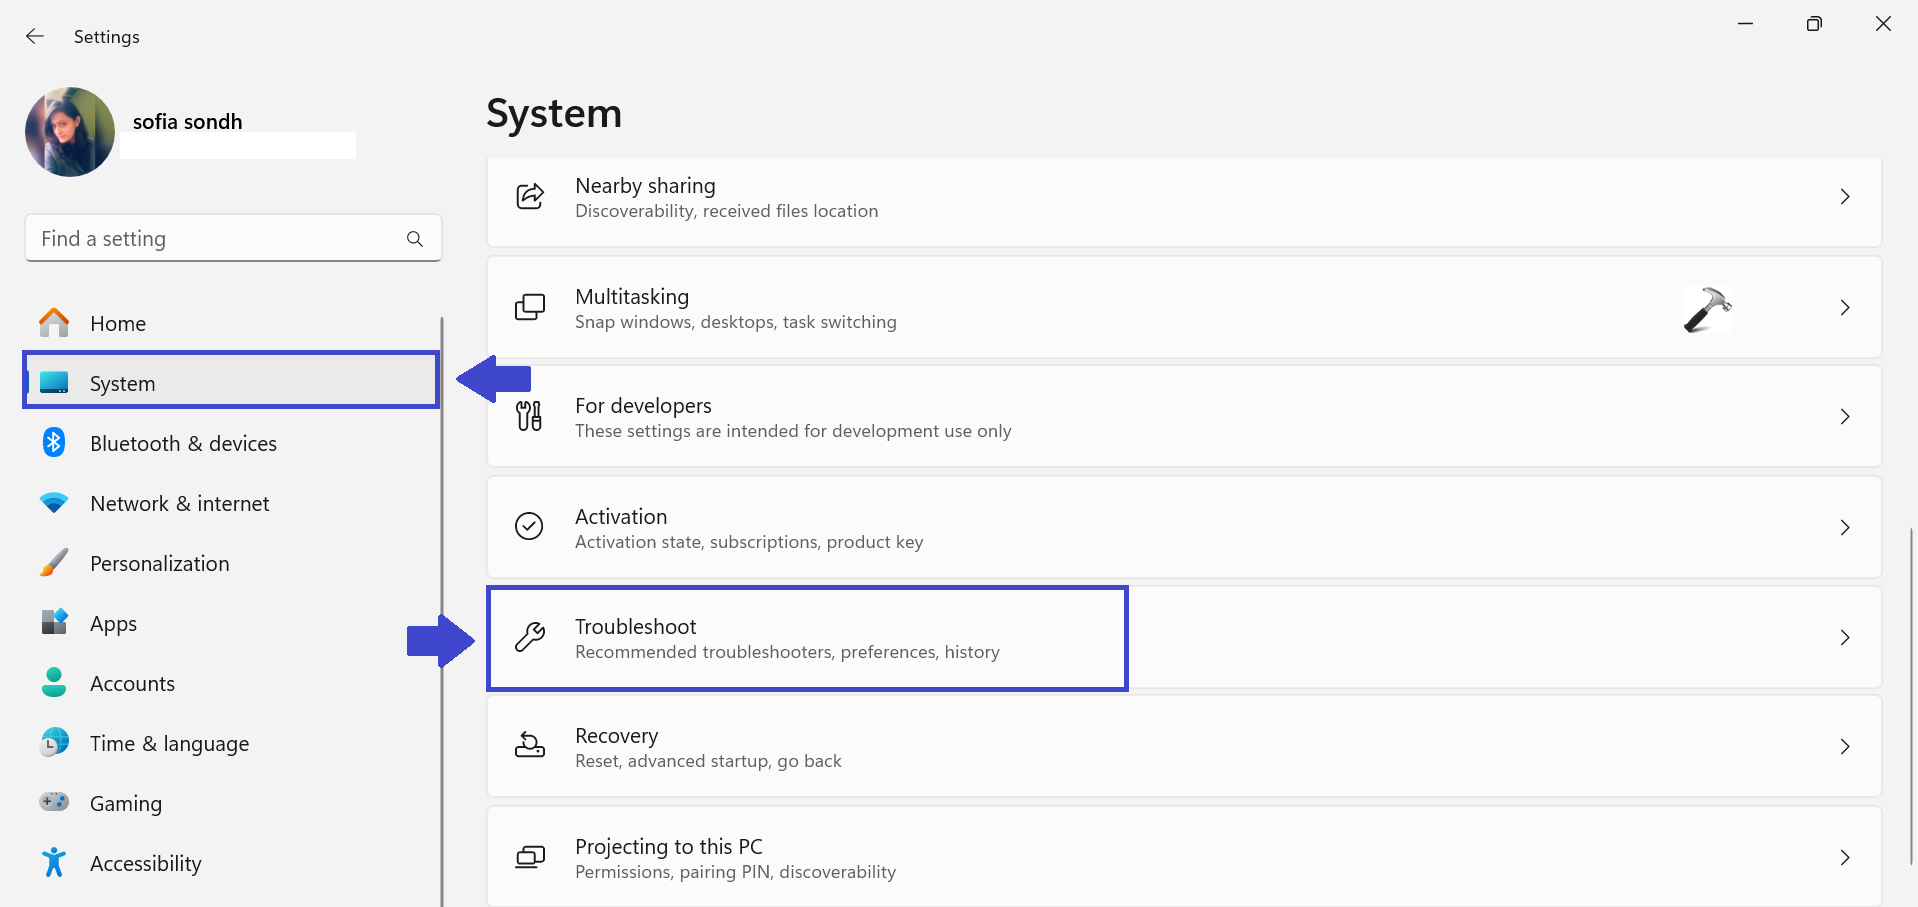
3. Here, click on “Other troubleshooters“.
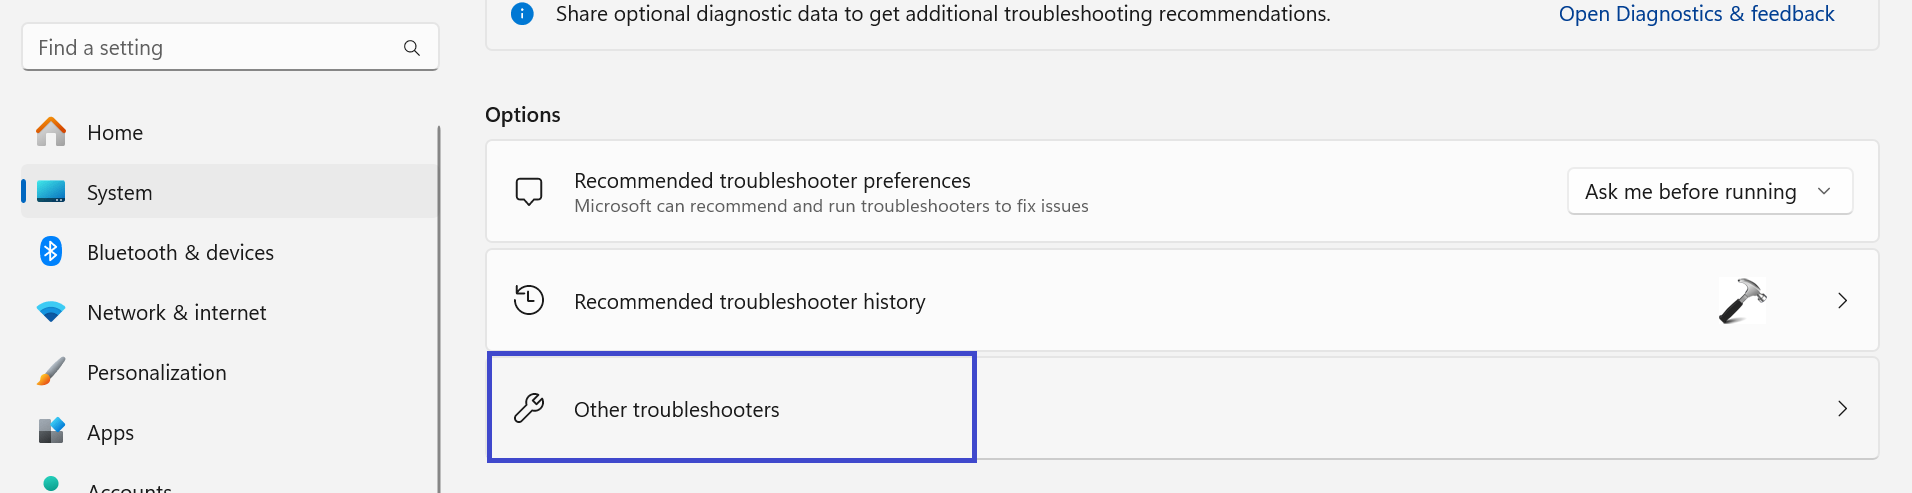
4. Now, click on “Run” next to the “Network and Internet” option.
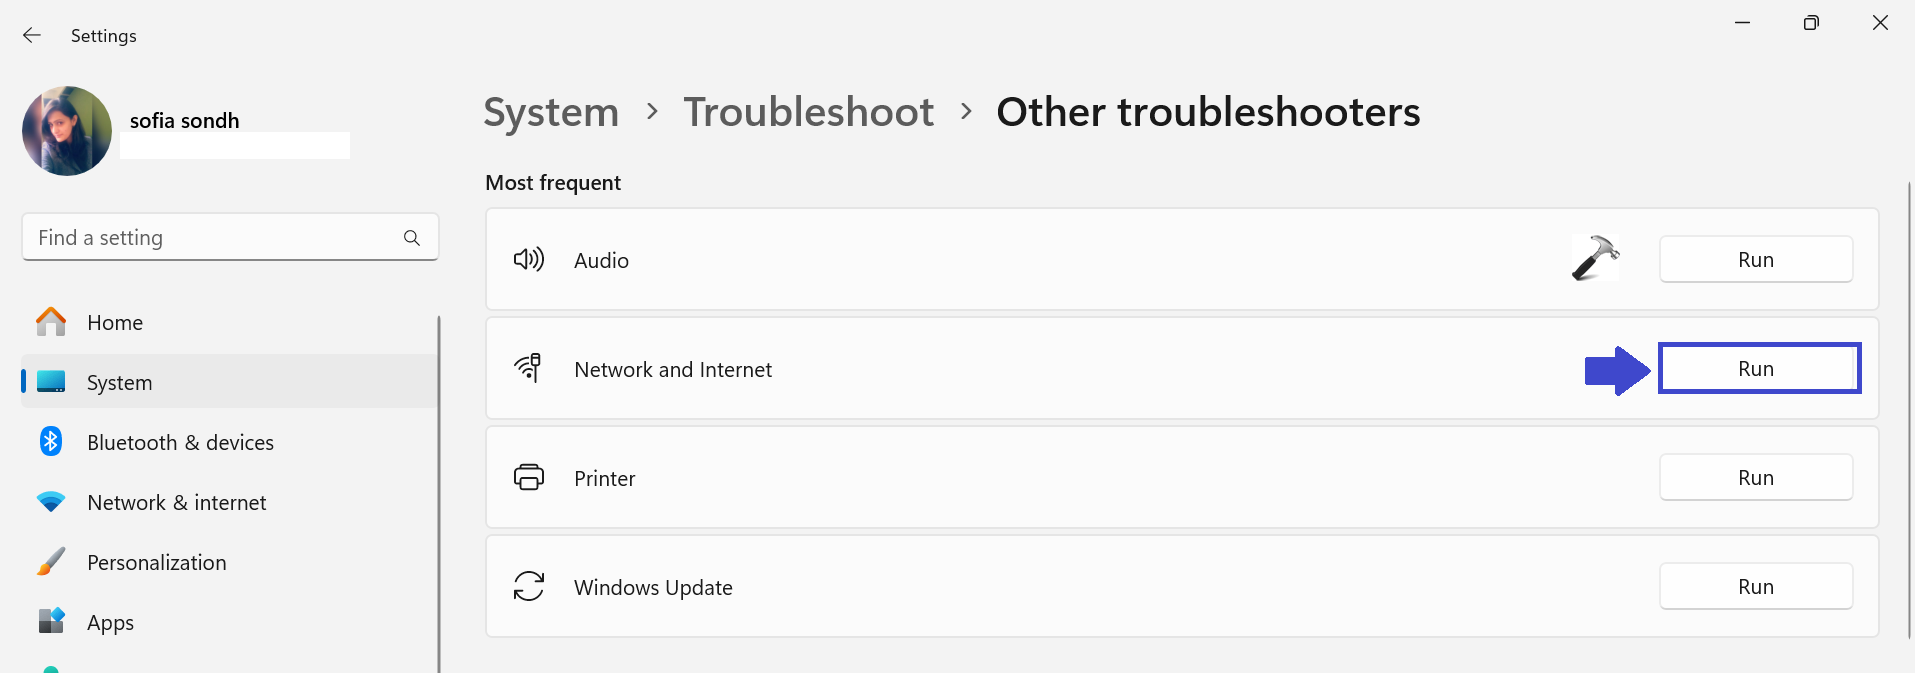
If the Network Troubleshooter is unable to fix: DHCP is not enabled for Wi-Fi in Windows 11 problem, you can try the next solution.
Fix 4: Disable Windows Firewall
Disabling Windows Firewall can make your computer more vulnerable to attacks. This is because it will allow all incoming and outgoing connections, even those from untrusted sources.
However, there are some cases where you may need to disable Windows Firewall. For example, if you are having problems connecting to a Wi-Fi network, disabling Windows Firewall may fix the problem.
To disable Windows Firewall in Windows 11, follow these steps:
1. Open Control Panel. Select the “System and Security” option.
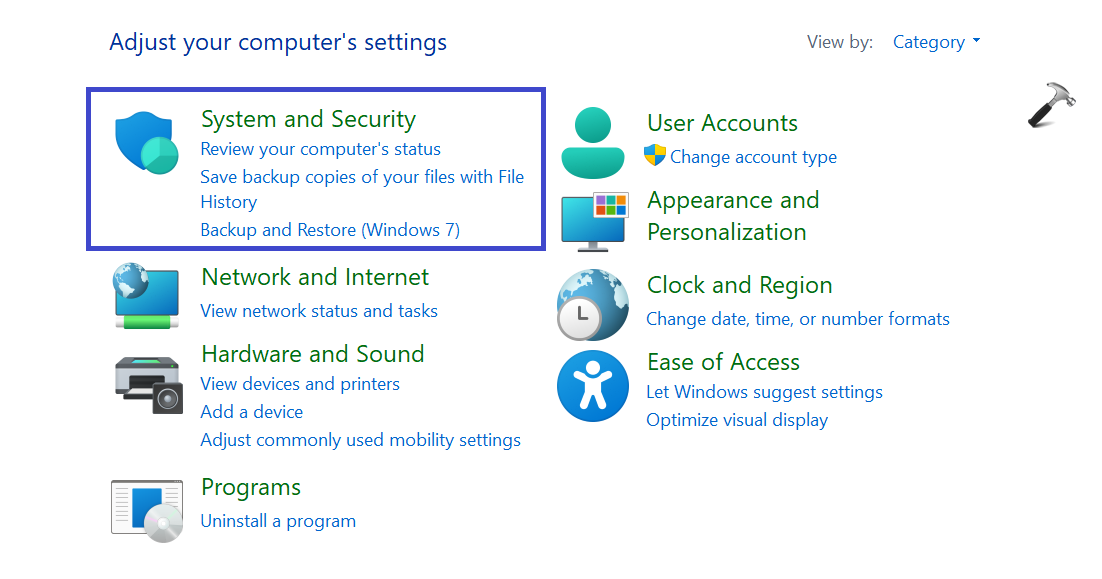
2. Now, click on “Windows Defender Firewall“.
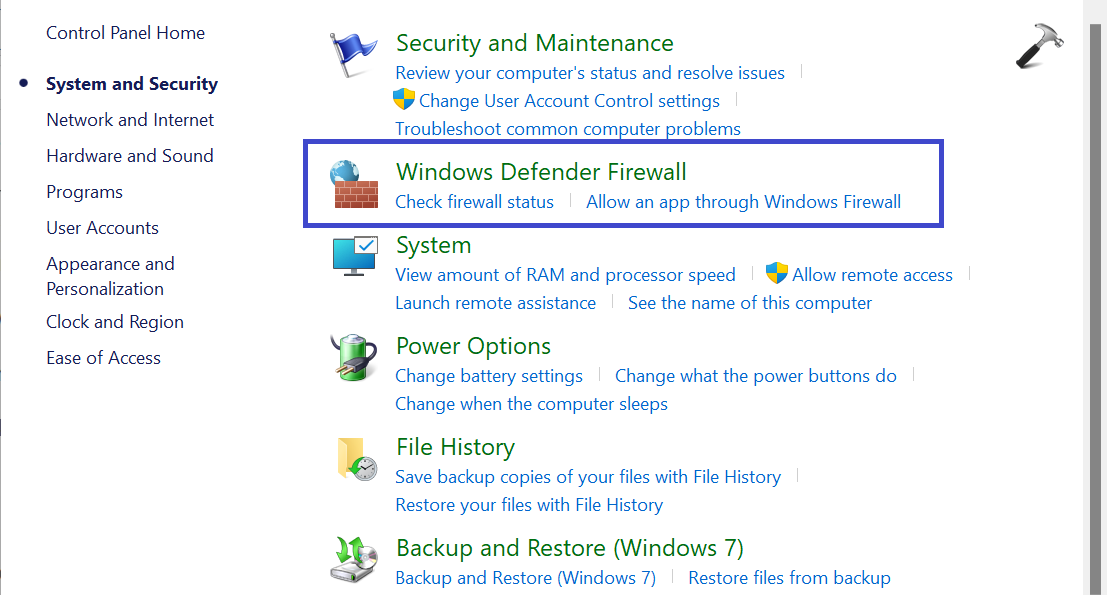
3. From the left panel, select “Turn Windows Defender Firewall on or off“.

4. Under Private Network Settings, select “Turn off Windows Defender Firewall (Not recommended)“.
Under Public network settings, select “Turn off Windows Defender Firewall (Not recommended)“.
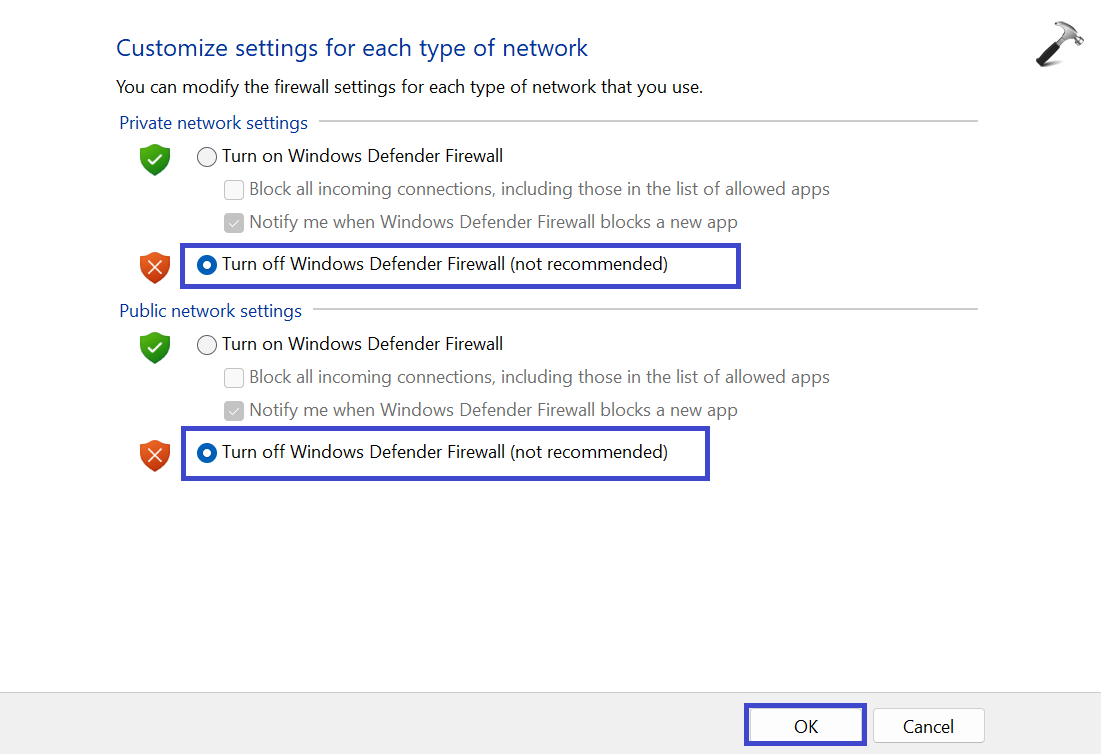
5. Click OK.
Restart your PC to apply the changes and verify whether the DHCP is enabled or not.
Once you have disabled Windows Firewall, you should try to connect to the Wi-Fi network again. If the problem is fixed, you can then enable Windows Firewall again.
Fix 5: Disable Proxy
If you are using a proxy server, your computer will not be able to obtain an IP address from a DHCP server. To fix this, you can try disabling the proxy server.
To disable the proxy server in Windows 11, follow these steps:
1. Open Settings App by pressing the Windows Key + I.
2. Go to “Network & Internet” and select “Proxy“.
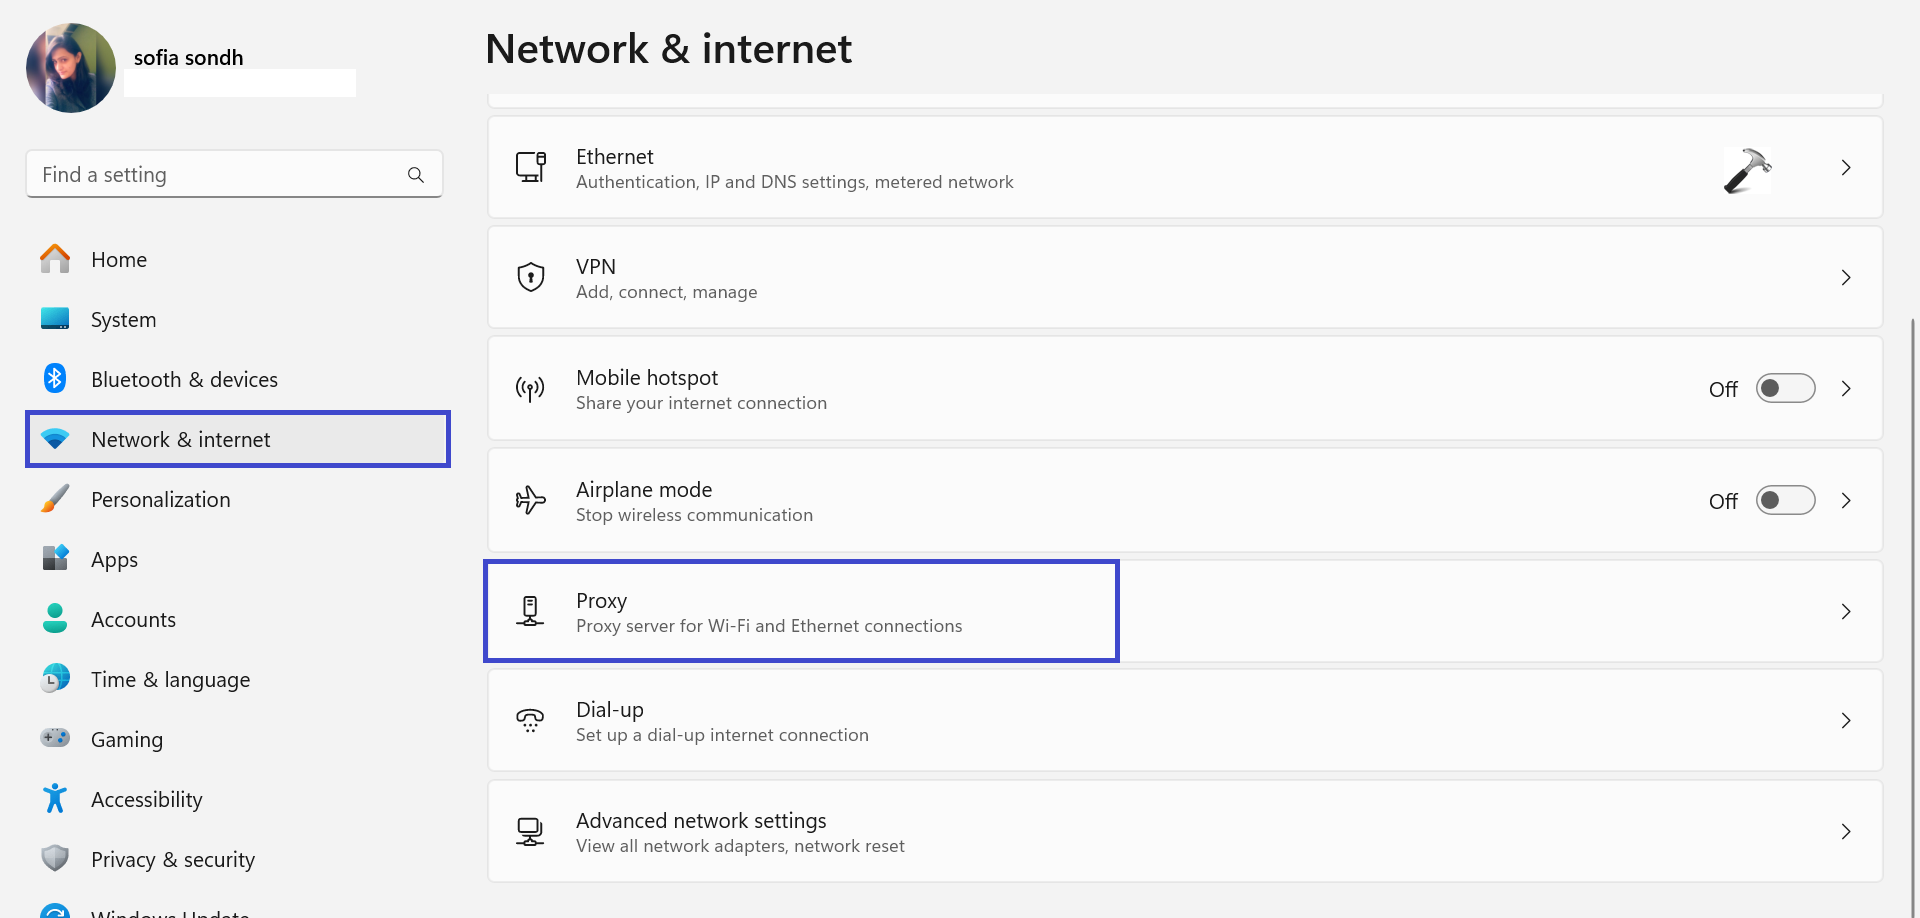
3. Under the “Automatic proxy startup” section, disable the toggle for “Automatically detect settings“.
Fix 6: Run the DHCP Client Service
The DHCP client service is a Windows service that allows your computer to obtain an IP address from a DHCP server. If the DHCP client service is not running, your computer will not be able to obtain an IP address and will not be able to connect to the internet.
To start the DHCP client service, follow these steps:
1. Open the search bar, type “Services” and then click “Services“.
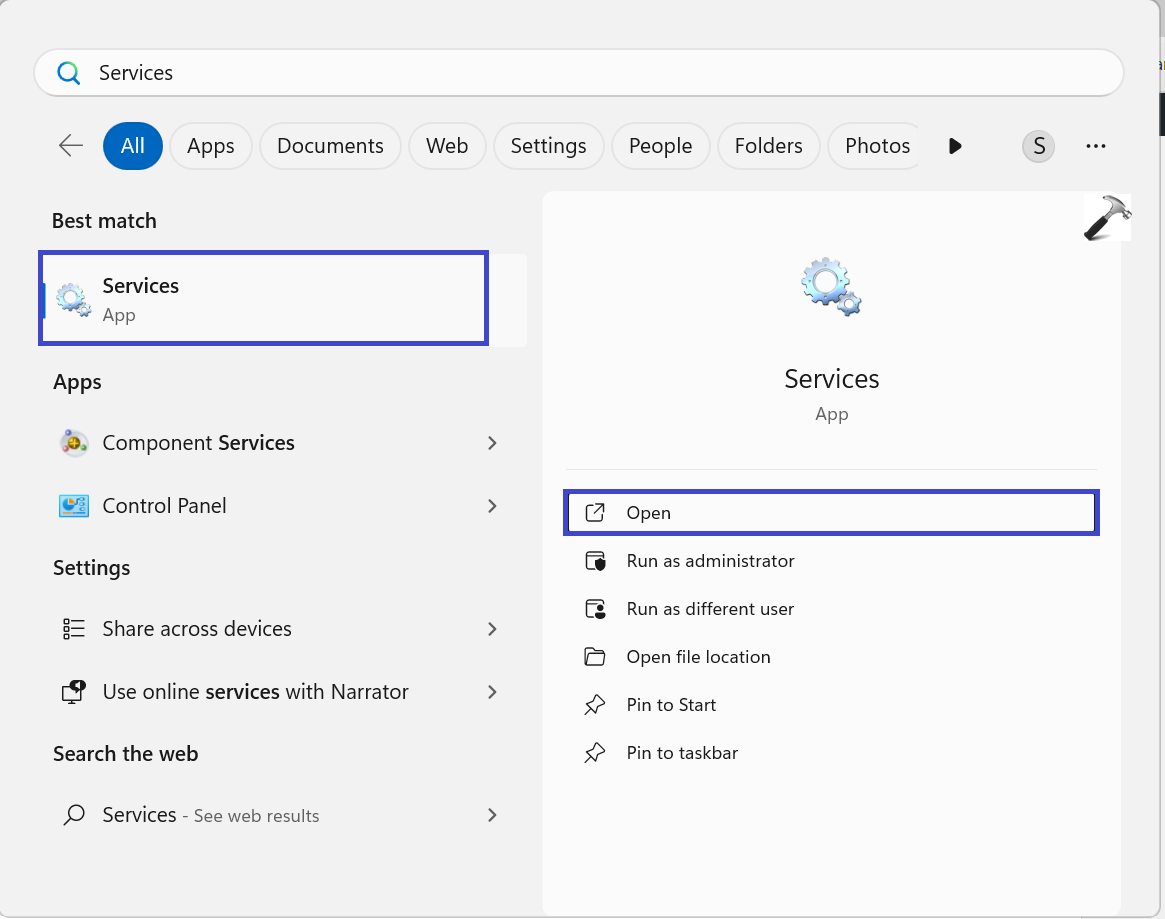
2. Search for the “DHCP Client” option.
3. Now, right-click the option and select “Properties“.
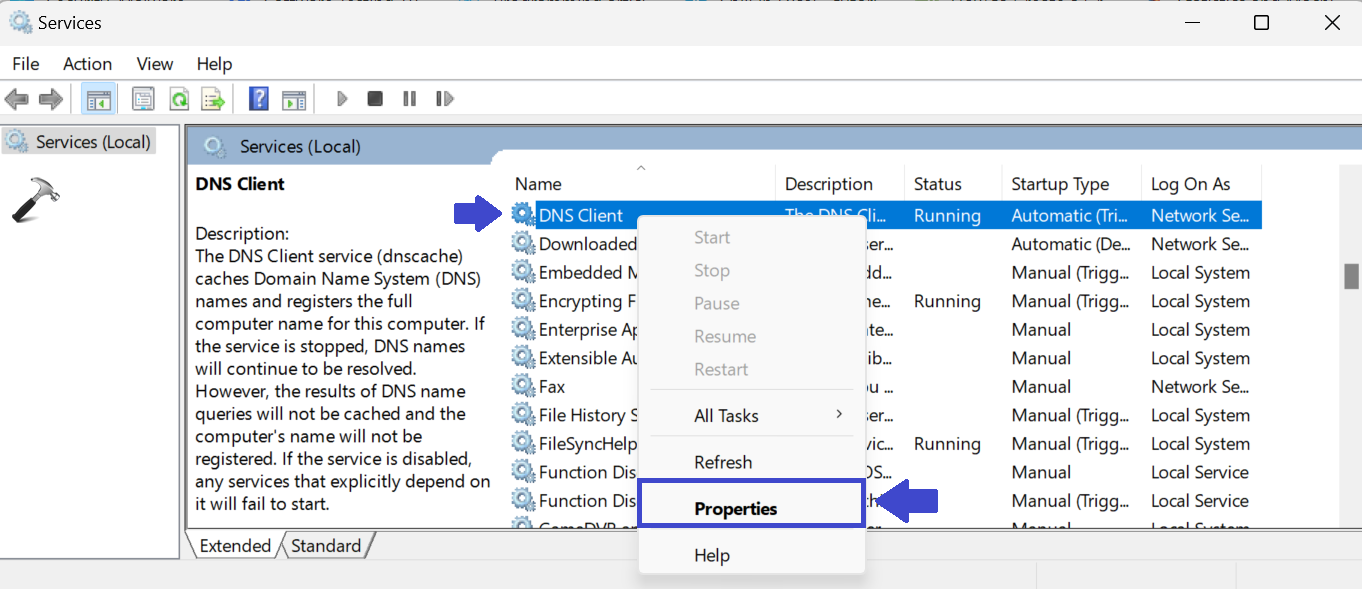
4. Here, under the “Startup type“, select the “Automatic” option.
5. After that, click on the “Start” button.

6. Click OK followed by Apply.
If the DHCP client service is still not working, you can try restarting your computer.
Fix 7: Configure the Network Adapter Settings
The network adapter settings are the configuration settings for your computer’s network adapters. These settings control how your computer connects to the network and how it uses the network.
If the DHCP client service is not enabled, you can try configuring the network adapter settings to fix the problem.
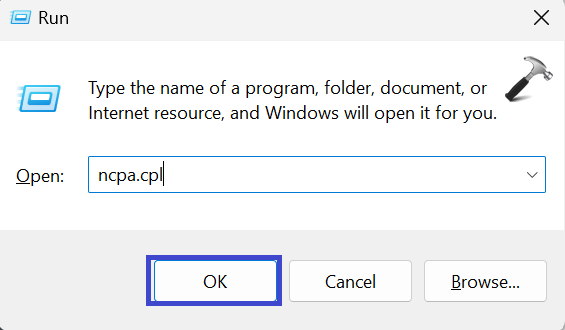
1. Press the Windows key + R to open the registry.
2. A prompt box will appear. Type “ncpa.cpl” and press Enter.
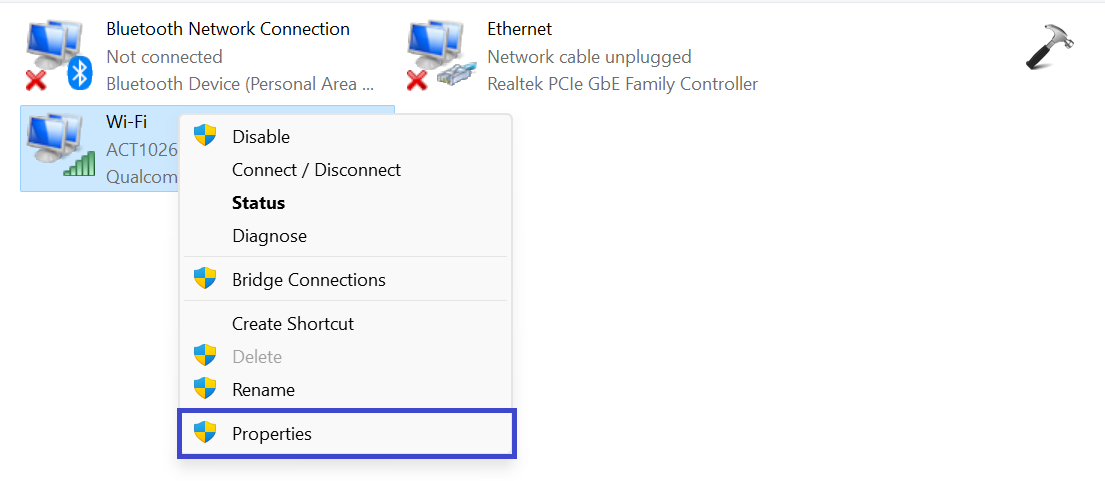
3. Now, right-click on “Wi-Fi Adapter” and select “Properties“.
4. Select the “Internet Protocol Version 4 (TCP/IPv4)” and select “Properties“.

5. Now, select the “Obtain an IP address automatically” and “Obtain DNS server address automatically” option.
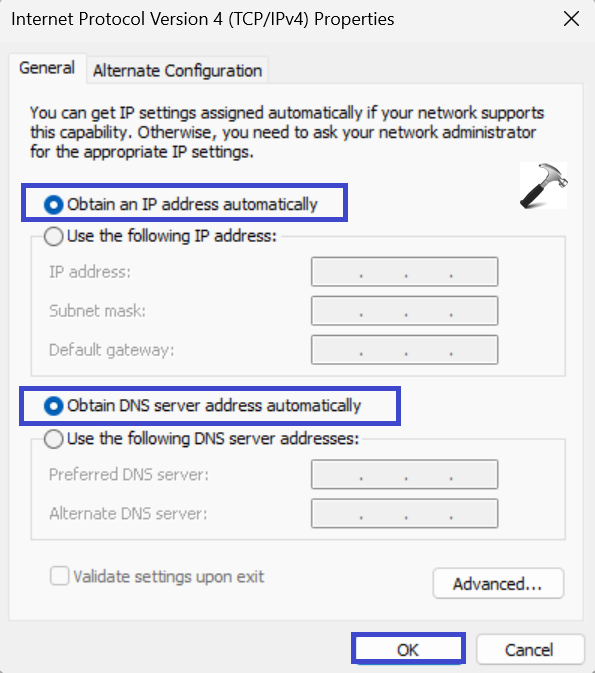
6. Click OK.
7. If your network connection replies to the protocol, then make sure you make similar changes on “Internet Protocol Version 6 (TCP/IPv6)“.
Once you have configured the network adapter settings, try connecting to the Wi-Fi network again.
Fix 8: Re-enable the Network Adapter and DHCP Service
If the network adapter or the DHCP client service is not running, your computer will not be able to connect to the internet. To fix this, you can try restarting the network adapter and the DHCP client service.
To restart the network adapter and the DHCP client service in Windows 11, follow these steps:
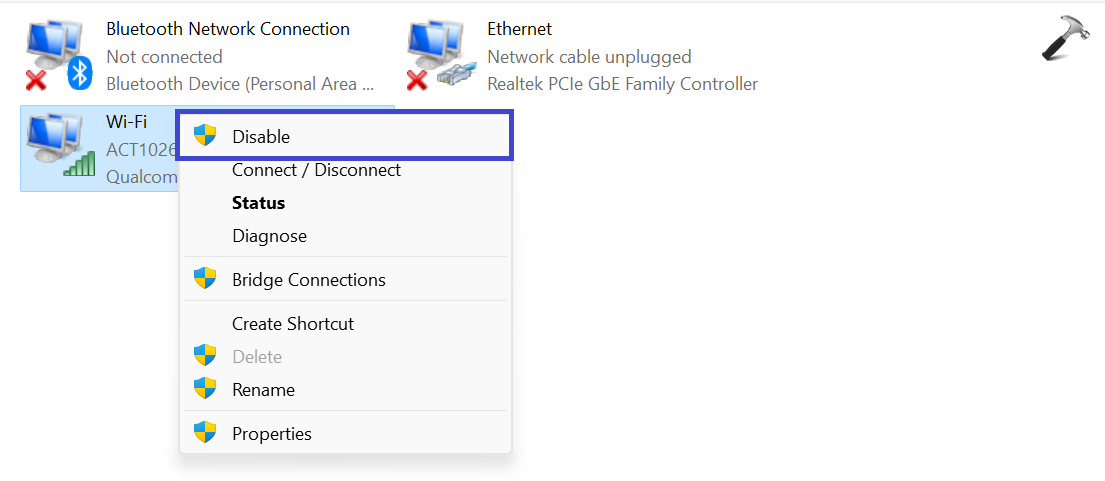
1. Here, again open the registry by pressing Windows key + R and type “ncpa.cpl”.
2. Right-click on the Wi-Fi Adapter and click “Disable“.
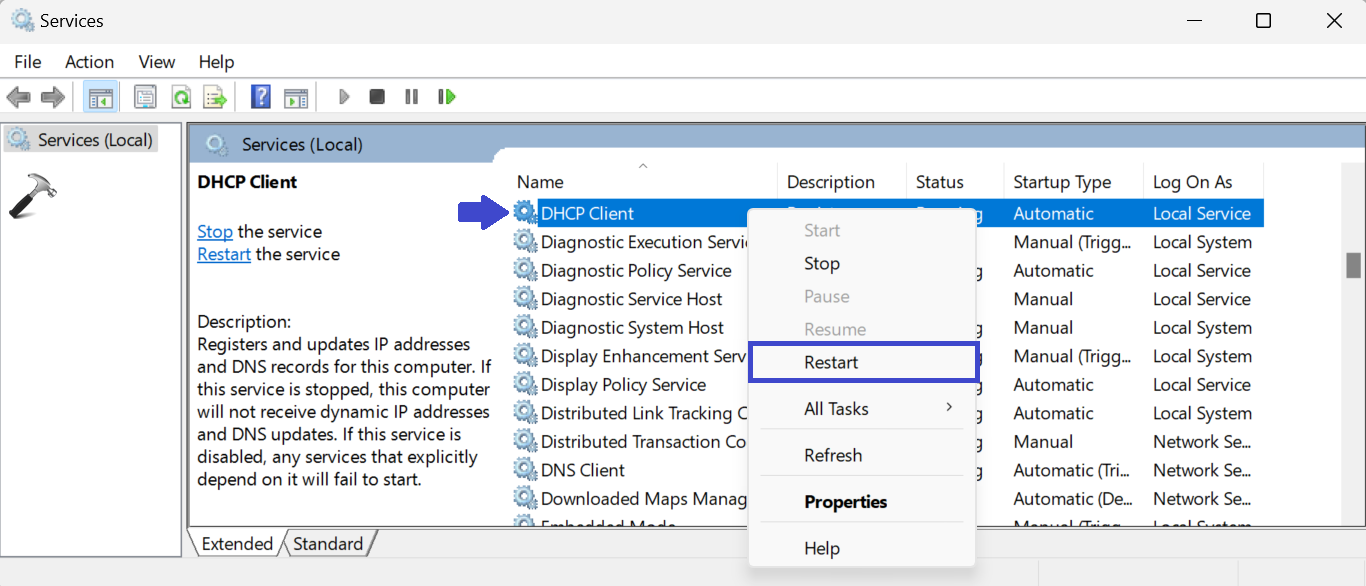
3. Now, open the “Services” Window. Just search “Services” in the search bar.
4. From the list, look for the “DHCP Client” option.
5. Right-click the option and click “Restart“.
6. Now, again go back to the Network connection. Right-click on the Wi-Fi Adapter and click “Enable“.
That’s It!


![The mapped network drive could not be created [Detailed fix]](https://www.kapilarya.com/assets/Network-Drive.jpg)

![Stop sharing a folder in Windows 11 [Guide]](https://www.kapilarya.com/assets/Network.png)