
In order to speed up your Windows 10 operating system processing, Superfetch or SysMain service (in Windows 10 V1809 or later) is there. This service is actually the successor of Prefetcher service, which was available in previous versions of Windows. This service is directly responsible for storage of program information and is thus able to speed up your machine.
By default, the Superfetch service is started automatically, when your computer boots up. The Superfetch technology smartly manages Windows background processes and attempts to speculates the upcoming processes. This helps the OS to load the required components, which will be then used in the upcoming processes. Superfetch service simply keeps the records of memory utilization for most used programs, which helps it to predict resource requirement for future occasions.
But due to Superfetch service, Windows users may came around a very common issue of high disk usage. This problem may heat up your system and in some cases disk failures may occur too. Better to understand here that not every system have high disk usage due to Superfetch service. However, if you’re facing the problem of high disk usage, you’re recommended to disable Superfetch service and see if it helps.
Here’s how you can disable Superfetch service in Windows 10.
Page Contents
How To Disable Superfetch In Windows 10
WAY 1 – Using Services Snap-in
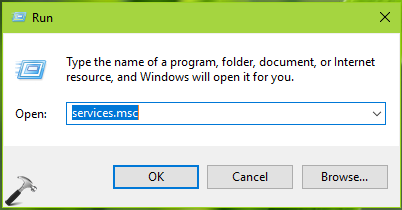
1. Press  + R and type services.msc in the Run dialog box, hit Enter key to open Services snap-in.
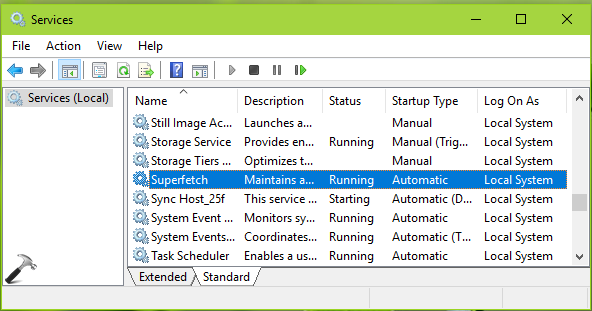
2. In Services snap-in window, scroll down and look for Superfetch service. Double click on the service to modify its status.
3. In the service property sheet, first hit the Stop button to terminate the service. Then select Startup type as Disabled. Click Apply followed by OK. Close Services snap-in.
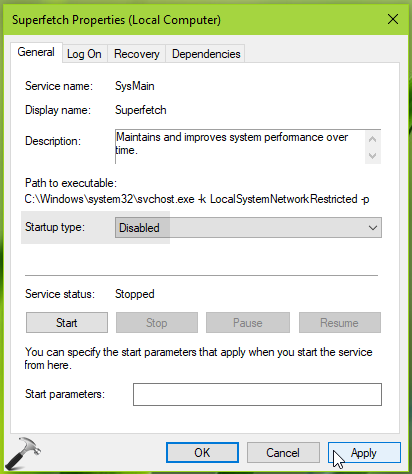
This should disable the Superfetch service on your machine.
WAY 2 – Via Command Prompt
1. Right click Start Button or press + X keys and select Command Prompt (Admin).
2. In Command Prompt window, type/paste following command and press Enter key:
sc stop "SysMain" & sc config "SysMain" start=disabled
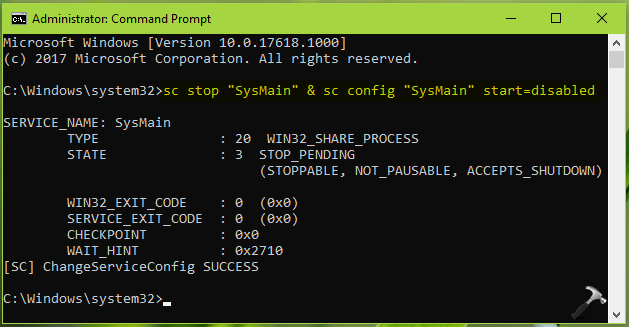
3. You should get [SC] ChangeServiceConfig SUCCESS in return, after running the command. This means you’ve successfully disabled Superfetch service.
Also, check this video for more info:
That’s it!


Try this : sc query “SysMain” & sc config “SysMain” start=disabled
instead of : sc stop “SysMain” & sc config “SysMain” start=disabled
Thank you very much Kapil Arya, it did solve my problems.
But what exactly is Superfetch for?
Why did it hugely affect my laptop goes hey-wired so badly, right after installing windows 10?
I do still perfer Window 8 on my laptop, sadly it cannot reverted since I have passed so many months due to the installation.
Btw, I’m just an IT idiot. Don’t understand a single magic word from the Matrix.
^^ Glad to help 😊 Thanks a lot for your inputs on this!
Thank you for your hints. Looks like the 100% disk usage is a very wide spread problem and there is no one single solution. Often there are proposals to eliminate this or that program but in reality there does not seem to be any relationship between the problem and any visibly running program because sometimes I see data throughput up to 50-60 MBps and disk usage is below 100% and other times the throughput is only a few MBps and the disk is used 100% of the time. This looks like there is significant disk usage that is not shown in the task manager. I have tried to set MSI in the registry to zero although Idon’t have the indicate inbox controller. At first it seemed to have resolved the problem but then it happened again. Unfortunately the problem happens randomly, so if you try to fix it, it may look like you got it but then it happens again. I agree with many other users that Microsoft and not their clients should provide a solution. If the problem is indeed complex , then there should be a problem resolver program that checks all the possible causes and identifies those which have to be fixed.
^^ See, 100% disk usage is not alone a problem, but also a condition where programs may take all over on the disk. If that is the case, it will continue to occur if your system limits are reached, there is no cure for this problem, unless you remove the program causing it. If you’re seeing the 100% disk usage in normal condition (without any program running), majority of fixes available on Internet will help you to resolve this problem.
can you help me….. disabling superfetch didnt lower disk usage nor did the thing where i switched value from 1 to 0
same like me. Also disable superfetch and switched 1 to 0. but disk still 100%
Could it be my hard drive is starting to fail?
Hi. I suffer from the same issue. However, there is no superfetch service listed under services.msc. On windows+X I only see windows power shell (admin) option and not command prompt; and the given command throws a syntax error. I also checked other solutions by you but the details don’t match.
My system details:
IDE Controller: Intel 6th Gen Core Processor Family Platform I/O SATA AHCI Controller,
Driver name: iaStorAC.sys
OS: Win10 ver 20H2, OS build 19042.630.
^^ Search for Command Prompt, run it as administrator and type sc stop “SysMain” & sc config “SysMain” start=disabled, press Enter key. Let me know if there is any error message.
Hey Kapil! I’ve set my value to 0 from solution one, I used Command Prompt (ran it as admin) and stopped Sysmain. I couldn’t find Superfetch in my services.msc so that’s not an option, however, I still have 100% disc usage?? What now :(
^^ Try registry fix mentioned here: https://www.kapilarya.com/fix-windows-10-100-percent-disk-usage-problem.
I do not have the option to change the registry value in solution 1. I have disabled superfetch but the 100% disk usage still occurs. What else could be causing this? Any suggestions?
^^ Try performing clean boot: https://www.kapilarya.com/how-to-perform-clean-boot-in-windows-10.
Hi. This worked for a Dell ProBook 450 with a physical hdd. Thanks! It immediately became quick and usable as it should! Crazy!
^^ Glad it helped!
I’ve had this issue for a while, a couple months ago it came up for the first time, I believe then I attempted the Superfetch fix but I don’t believe it did anything. But after I waited a day the issue seemed to have resolved itself. Now a couple months later it has come up again but doesn’t seem to be leaving this time. I’ve tried every single fix I have been able to find on the web to no avail. I’m starting to believe it’s a hardware issue but I built my Desktop myself from scratch merely 2 years ago. I’ve checked the condition of my drive and it still has 98% life left according to Windows. I’ve done the fix registry, I’ve done the clean reboot, and I’ve done whats been explained here. My last attempt to fix this will be saving what I can and wiping and reinstalling everything, But if I can resolve this any way that would be preferred. Anything is appreciated