Recently we discussed about the new Timeline feature for Windows 10, in following article:
How to enable and use Timeline feature in Windows 10
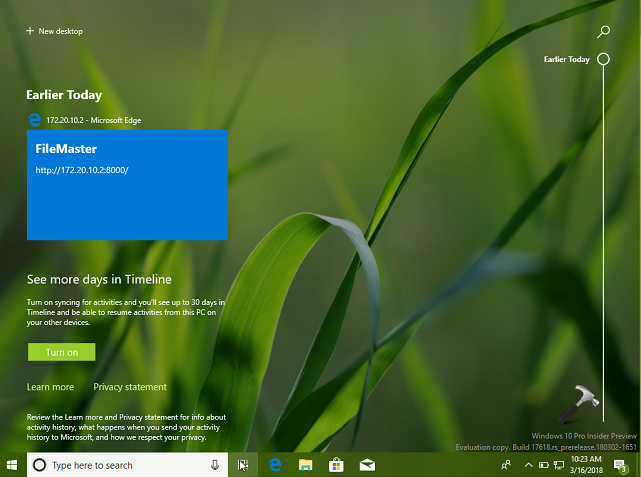
The Timeline feature beautifully displays collected user activities on the Task View screen. The feature is actually the time saving feature to check your previous records associated with the Microsoft account.
If you need to disable the Timeline feature ever, your best choice is to switch to local account from Microsoft account. This is because the Timeline feature is not available for local account users. Hence once you switched to local account, the Timeline feature would be disabled automatically, without any extra effort.
However, if you still want to be on Microsoft account but look for disabling Timeline feature, you can perform the below mentioned registry tweak.
How To Disable Timeline In Windows 10
Registry Disclaimer: The further steps will involve registry manipulation. Making mistakes while manipulating registry could affect your system adversely. So be careful while editing registry entries and create a System Restore point first.
1. Press  + R and put regedit in Run dialog box to open Registry Editor (if you’re not familiar with Registry Editor, then click here). Click OK.

2. In left pane of Registry Editor window, navigate to following registry key:
HKEY_LOCAL_MACHINE\SOFTWARE\Policies\Microsoft\Windows\System
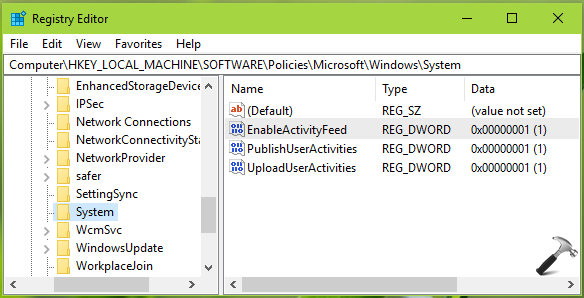
3. In the right pane of System registry key, look for the registry DWORD (REG_DWORD) named EnableActivityFeed. It must be having its Value data set to 1, which means Timeline is enabled. Double click on the DWORD to modify its Value data:
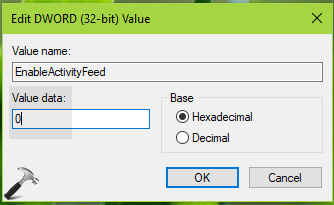
4. Finally, set the Value data to 0 and click OK. Close the Registry Editor and reboot the machine.
After restarting your system, the Timeline should be disabled on your system and you’ll be able to see classic Task View screen.
To enable the Timeline feature again later, restore the EnableActivityFeed DWORD value to 1.
That’s it!