
We either use “wired” or “wireless” connection to connect our Windows to the Internet. Connecting Windows to web via various networks at different times leaves a long list of known networks on the machine at some time. Windows connects either of these known networks automatically, as soon as it detect them. I’m sure, some of the known networks in this list are those one, which you might not want to connect to prevent network bandwidth loss or due to some other reason. If this is the case with you, this post is for you!
When you found that only few known networks on your Windows are relevant to you, you may want to remove the rest. Removing these useless networks is termed as Forgetting the network in the science of wireless communication. Once you forget a network, Windows will never connect it automatically. This post guides you to remove unwanted known networks manually and by using registry manipulation.
Both the methods are mentioned here, try them as per your convenience.
Page Contents
How To Forget Known WiFi Networks In Windows 10
FIX 1 – Manually Using Settings Apps
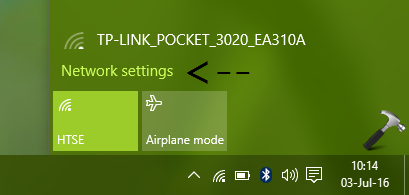
1. Click on the WiFi icon in taskbar notification area. A list of networks will be populated now on a flyout menu. Click Network settings here.
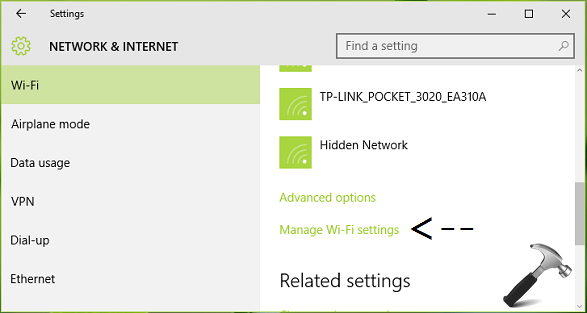
2. You’ll be now redirected to Settings app > Network & Internet > Wi-Fi. In the right pane of the app, click Manage Wi-Fi settings link.
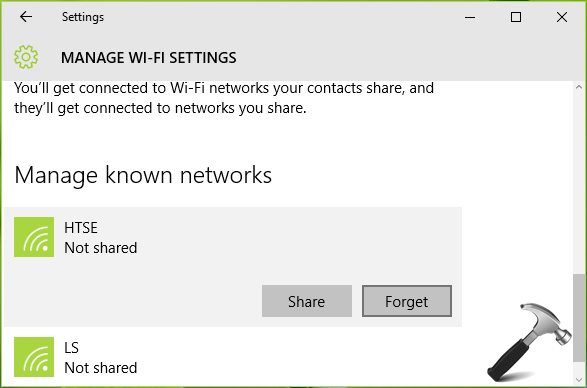
3. In the next screen, scroll down to bottom until you find Manage known networks heading. Click on the network entry you wish to remove and click Forget.
That’s it! Now the forgotten network will be detected, but Windows will not connect to it automatically.
FIX 2 – Using Registry Editor
Registry Disclaimer: The further steps will involve registry manipulation. Making mistakes while manipulating registry could affect your system adversely. So be careful while editing registry entries and create a System Restore point first.
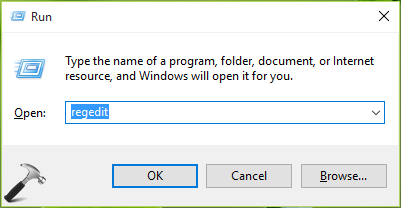
1. Press  + R and put regedit in Run dialog box to open Registry Editor (if you’re not familiar with Registry Editor, then click here). Click OK.
2. In the left pane of Registry Editor, navigate to following registry key:
HKEY_LOCAL_MACHINE\SOFTWARE\Microsoft\Windows NT\CurrentVersion\NetworkList\Profiles
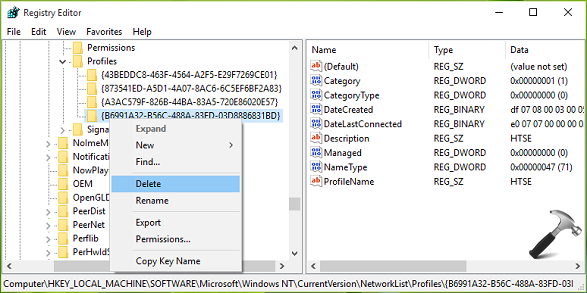
3. Expand the Profiles registry key. Here the number of subkeys to Profiles will be equal to known networks to your Windows. Click on these subkeys one by one and look for ProfileName registry string (REG_SZ) in corresponding right pane. When you found the correct registry subkey for the network you wish to forget, right click over the subkey and select Delete. Provide your confirmation here by clicking Yes:

That’s all you need to do! Once you reboot, the known network will forgotten by Windows.
Also check:
1. [How To] Switch Network From Public To Private And Domain In Windows 10
2. [FIX] Windows Was Unable To Connect With Your Bluetooth Network Device
3. [FIX] Unable To Use Network Sharing In Windows Due To IPv6 Issues


![The mapped network drive could not be created [Detailed fix]](https://www.kapilarya.com/assets/Network-Drive-768x511.jpg)

![Stop sharing a folder in Windows 11 [Guide]](https://www.kapilarya.com/assets/Network-768x522.png)