
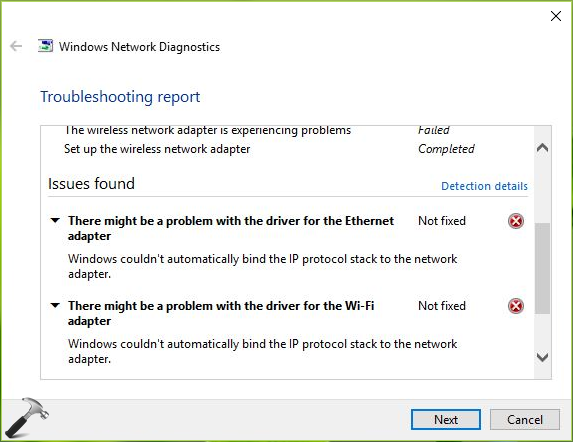
We all know that Windows 11 comes with built-in troubleshooters that helps you to deal various issues on your system. Recently, I came around a network related problem on my Windows 10 Pro machine. In this scenario, there were no Internet connectivity on my system though the router was working perfectly and other devices were able to connect it. Using built-in Windows troubleshooter for network issues, I finally found the root cause for the problem. The Windows Network Diagnostics enlisted Windows couldn’t automatically bind the IP protocol stack to the network adapter error but couldn’t fix it.
As the built-in troubleshooter was unable to fix the issue, we need to fix it manually. The reason behind this problem is that Windows is unable to get IP address using Dynamic Host Configuration Protocol (DHCP) discover packets. On some systems having this issue, it might be possible that third-party Virtual Private Network (VPN) clients or network tools installed are causing this problem. The first step to solve the problem is to remove these third-party clients and reset Windows Sockets. If the issue still persists, try these fixes:
Page Contents
Fix: Windows couldn’t automatically bind the IP protocol stack to the network adapter in Windows 11/10
Fix 1: Via Network Adapter Properties
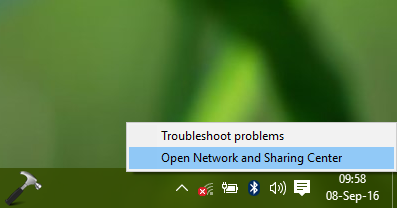
1. Right click on network icon on taskbar and select Open Network and Sharing Center.
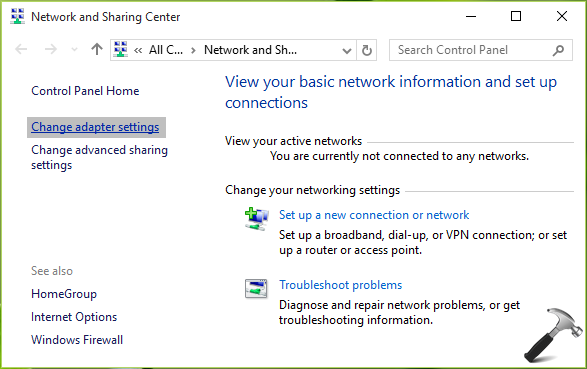
2. In the Network and Sharing Center window, click Change adapter settings link.
3. Next, in the Network Connections window, right click on the network adapter with which you’re facing issue and select Properties.

4. Moving on, in your network adapter property sheet, under This connection uses the following items section, keep only these entries checked and uncheck remaining ones:
- Client for Microsoft Networks
- File and Printer Sharing for Microsoft Networks
- QoS packet scheduler
- Link-Layer Topology Discovery Responder
- Internet Protocol Version 4 (TCP/IPv4)
- Link-Layer Topology Discovery Mapper I/O driver
- Microsoft LLDP Protocol Driver
- Internet Protocol Version 6 (TCP/IPv6)
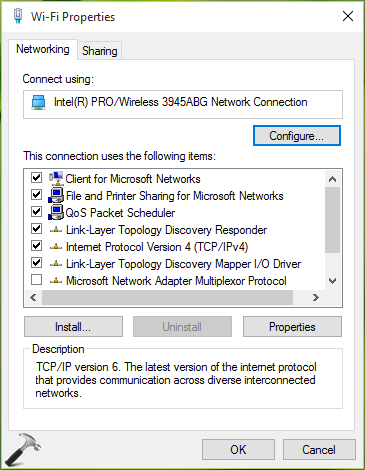
Click OK and close Network and Sharing Center. You can now check the status of the issue and it must be resolved by now. If it isn’t, carry on the steps provided in FIX 2.
Fix 2: Using Registry Editor
1. Press  + R and type regedit in Run dialog box to open Registry Editor. Click OK.

2. In the Registry Editor window, navigate to following registry key:
HKEY_LOCAL_MACHINE\SOFTWARE\Microsoft\Windows NT\CurrentVersion\NetworkCards
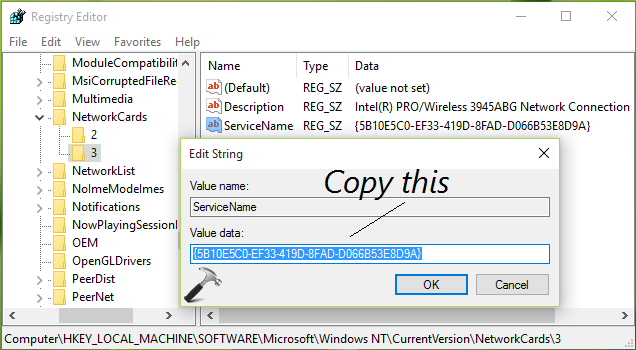
3. Expand the NetworkCards registry key and you’ll see some key numbered 2, 3 and so on. For each of these registry sub-key, in the corresponding right pane, you’ll see Description registry string (REG_SZ). Using Description’s Value data, you can identify to which adapter the registry sub-key corresponds. So in this way, when you spot your network adapter’s registry sub-key, double click on ServiceName registry string (REG_SZ) and copy its Value data. This data will be required in next step.
4. Now navigate to this registry key:
HKEY_LOCAL_MACHINE\SYSTEM\CurrentControlSet\Services\Tcpip\Parameters\Interfaces\<Value Data of ServiceName string>
Replace <Value Data of ServiceName string> with the value we copied in previous step.
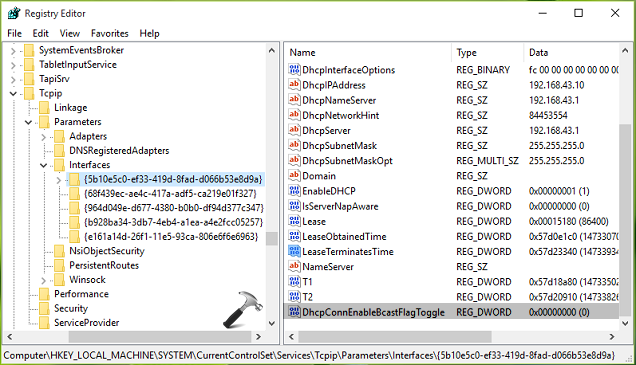
5. In the right pane, do a right click and select New > DWORD Value. Name the newly created registry DWORD (REG_DWORD) as DhcpConnEnableBcastFlagToggle. Double click on it to modify its Value data:
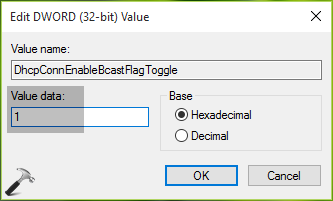
6. Put the Value data equals to 1 and click OK. Close the Registry Editor and reboot, the problem should be fixed after a restart.
Video fix
Here’s the video illustration of above mentioned fix:
Hope this helps!


![The mapped network drive could not be created [Detailed fix]](https://www.kapilarya.com/assets/Network-Drive-768x511.jpg)

![Stop sharing a folder in Windows 11 [Guide]](https://www.kapilarya.com/assets/Network-768x522.png)
Dude, you made my day. Have been searching for a fix for my wi fi problem since a few days after my windows upgrade to Win 10. Your fix 2 worked for me without any problem. So nice of you for posting with screenshots. Really helped. Thanx a ton..
^^ Glad we could help 😎
Man, why couldn’t post this 2 months backk… I have been thinking to downgrade to win 7, but I thought I wanna give a last try for solving my prob. And Voila!!! U posted a perfect solution for this problem. So much thanks to u…
I searched in many websites… But in ur website it is crystal clear and focussed on fixing the prob with nice screenshots… Kudos for ur effort…..And hope u maintain this site like this only ……
^^ Happy to help, thanks for your feedback ☺️
I still have the same problem. Have tried the above with no luck. I have a realtek PCIe GBE Family controller, (Driver ver 9.1.404.2015, date 4/5/2015) and a Media Tek 802.11n wireless lan card, (Driver ver 5.0.57.0, date 5/18/2015). Both have a message under events in their properties that further installation is required. Any assistance would be much appreciated.
^^ The drivers seems outdated, update them using steps mentioned here: https://www.kapilarya.com/how-to-manually-update-device-drivers-in-windows-10. Then retry steps mentioned here.
Updated the drivers through device manager, though the wireless driver was the latest version. Went back through the steps above and still have the same issue. I also removed all instances of zone alarm as i read that also could cause problems. This all happened after the computer updated overnight on the 5th Oct. I now have a whole lot of files that say they were installed on that date. Is it possible that a virus has disabled a service and this is causing the issue?
^^ Yes, it might be possible. Have you installed Anniversary Update on that date? Because this update has caused several issues to some systems, so it might be culprit as well. Another thing you can try restore your system to some earlier date, that may be helpful, IMO.
I would have restored to an earlier date but they all seem to have been deleted. Don’t have anniversary update installed.
Thanks man .
It worked ..
Thank you very much.
^^ Glad it worked 😊
Mine is a wired ethernet connection on a PC I migrated from Windows 8 a while back. Everything was fine until about a month ago. I tried evrything listed here and no luck. Then I remembered Eric Campfens’ comment about Zone Alarm. I uninstalled it and was able to connect. Zone Alarm probably did an update sometime back and it created the issue. However, I really appreciated your clear and concise instructions. I have rusty PC skills so your directions we perfect for me to work with. Too many gear heads don’t talk at the layman’s level so their “help” is pretty much worthless to me. Keep up the good work, Kapil! (And thank you, Eric for the side comment!)
^^ Thanks for your feedback, Norman! Much appreciated 😊
I had a wired ethernet that stopped working for last two days. I spent lot of time reading internet posts but nothing worked finally got your page and Step-1 to 4 provided in your post worked just like charm. You made my day. Quit happy and satisfied now only because of your expert advice.
Thank you & Regards
^^ Awesome 😎
why Iam get this problen again 3 day after reset windows
Hi I have a VPN client that i had checked…After I unchecked, and followed above instructions, I got my WiFi connection going…However, I do still want to use VPN, and please advise. Thank you.
^^ It seems something is wrong with your VPN client/connection. Suggest you to re-setup them.
Thanks, it works with my wifi, but does not work with ethernet, please show me how to fix this for ethernet.
^^ Same method is applicable to Ethernet connection.
Man, Thanx a lot…i spent two days tryin to figure out the problem…the first method worked great…thanx angain
^^ Happy to help 😎
Thanks so much!!!
Fix 1 – worked Thank you
^^ Glad to help!
After 5 days of reading wrong or incoherent advice, I followed your directions and fixed the problem in10 minutes. Thanks.
^^ Thanks for awesome feedback!
the above didnt work for me. after desperately searching around and testing any remedy i can get my hands on, finally this work:
Control Panel\System and Security\Administrative Tools\Services\WLAN AutoConfig
select startup type as “Automatic”, apply and restart the system.
worked like magic.
^^ Thanks Joe for your inputs! Glad the issue is resolved finally 😀
Thanks so much. It took care of my problem. I have tried other suggestions only to waste my time. First method worked… Thanks again.
^^ Glad it helped 😊
Thank you, sir. Nothing else worked but this did! :)
^^ Thank you Logan for your feedback 👍
I tried both the options but it didn’t work out.
I tried both for my windows 10 machine where I get “could not bind the ip protocol stack to the network adapter” when fixing no internet no connections aree available diagnostics.
In Fix2 usingf regedit, the step 4
HKEY_LOCAL_MACHINE\SYSTEM\CurrentControlSet\Services\Tcpip\Parameters\Interfaces I have many more entries 11 (your example shows 5) where one of them matches the copied value from step 3 where I added DhcpConnEnableBcastFlagToggle per step 5. However there is also did not solve the problem after reboot.
So still looking for a solution. Yours looked like it would solve the problem I am having since almost 2 weeks now where suddenly after several months of upgrading to win10 where all worked fine, I lost Ethernet connectivity, but unfortunately these did not solve the problem.
^^ Go ahead and use Network Reset, see if that helps you: https://www.kapilarya.com/how-to-reset-network-settings-to-default-in-windows-10
omg 1 of the best tutor about fix error wifi on windows 10, thx god finally i found this web
Note: if u guys stuck in steps 4 u can jump to step 5 and then restart ur computer. after that booomm ur wifi icon appear
^^ Thanks for awesome feedback 😊
There´s no doubt you’re an expert my friend , as mentioned in many replies “you make my day”, etc.. etc..
Root Cause: VPN third party called “Hide.me”
Solution as per in fix 1, I just unchecked these two items: “ANOD Network Security Filter Driver” and “Microsoft Network Adapted Multiplexor Protocol”
Done!
Many Thanks!
^^ You’re most welcome Alex 😊
I have this problem and tried all these fixes but still no luck.
^^ Try Network Reset: https://www.kapilarya.com/how-to-reset-network-settings-to-default-in-windows-10
You are a real genius, thanks a lot.
I had to uninstall a proxy adapter installed there.
^^ Cool 😎
Many, many thanks
Hi Kapil, I just wanted to say thank you so much for your help. All my computers and laptops were facing this problem after the windows update. Following your steps, we managed to solve this issue. You’re truly a live saver. Real genius work!!!
^^ Thank you for the awesome feedback 😊
Thank you SO much. My laptop was working one moment, stopped the next. You fox did the trick. Since I live on this laptop, you really saved me!
^^ Glad to hear it helped 😊
Thank you for the help! I was very close to factory reset my laptop.
It would be interesting to hear how you came to that conclusion.
Thank you so much again!
^^ Glad to receive the awesome feedback from you!
Have been having problems with connectivity to the internet. My wifi card is fried, so had been using a dlink USB dongle connected to a USB port. That stopped connecting, so attached a 802.11n USB wireless cardof Ralink Technology Corp with a mediated inc driver version 5.1.16.0 dated 06.06/14.I am using windows 10 ver 1511 64 bit OS. Troubleshooter shows adapter driver is out of date. Searched for updated driver ( auto) , says already have the most recent driver. Says Windows could not auto bind the IP protocolstack to the network adapter. Device manager says working fine, uninstalled and rebooted, no change. Reset network to default using admin command prompt, all OK except after ipconfig /renew comes up with – This op failedas no adapter is in the state premissible for this operation. If I connect the USB wireless card, or remove it, the laptop crashes and says WDF_VIOLITION and restarts. Help. Help .Run out of all options.
Fix2 just worked for me. My Yoga 900 / Win 10 wifi adapter was working 2 days ago, not yesterday. The regedit fix just worked! Thanks for your help and clear instructions!
^^ Glad it worked perfectly 😎
Fixed mine after stupid windows 10 creator forcing the update which I don’t want.
Thank you a million, solution 1 worked for me
you made my day.. I’m speechless
^^ Thanks a lot for awesome feedback 😎
thaaaanx
^^ 👍
Kapil — Greetings from the USA. Have spent a week trying to resolve my intermittent network adapter issue with no luck, came across your fix and all seems to be working steadily now. Thank you so much and extra thanks for such clear instructions. My first venture into registry editing!!! I am bookmarking your site.
^^ Glad I could help 😎 Appreciate your feedback 😊
After installing the patch KB4022715 for windows 10 version :1607, few machines Network port are not working. I have tried installing the latest driver and few steps mentioned in the other page . In diagnose test the error promoted “windows couldn’t automatically bind the ip protocol stack to the network adapter” .
I had followed the steps mentioned in the below page also , but no luck . Please help us. almost 70 machines got effected on this
^^ Try installing KB4022716 and see if it makes any differences in the situation.
Hi Kapil,
I tried to install the KB4022716 patch , but it is saying “The update is not applicable to this computer “
^^ Hmm, I just noticed you’re still on Anniversay Update and KB4022716 is for Creators Update (V1703). So can you try upgrade to V1703? I understand it would difficult for you to update 70 machines; so try updating single machine and then check. If it works, go ahead 😊 Good luck!
ZONE alarm was the culprit. Uninstalled it and boom!!
^^ Thanks for sharing this 👍
I tried these steps, and still had no WiFi. I then started the “WLAN AutoConfig” service, and set it to Automatic. It worked 100%. Start > type “Services” > find “WLAN AutoConfig” in the list, right click and select Start. Thereafter, right click again, select Properties and change Startup Type to Automatic. Hope this helps somebody!
^^ Thanks for your inputs, Shaun 😊
Thanks Kaps.
After strulling 3 hours not get solution then find the error and search. and follow the steps as per blog and genuine issue has been resolved.
Thank you so much kaps.
^^ Happy to help Sourabh 😎
Man , thanks a lot , i was just so worried about all this and boom it workes perfectly 😂
^^ Thanks a lot Anuj, for your feedback 😎
THANK YOU!
For a non-techie, this was so easy to follow and worked instantly. You saved my butt!!!
^^ Glad it worked for you 😊
Thanks so much guys.
Took four hours of searching to succeed.
It was at the below point that it began working:
4. Moving on, in your network adapter property sheet, under This connection uses the following items section, keep only these entries checked and uncheck remaining ones:
Thanks a million X x x x
^^ You’re most welcome!
In services clicked auto for wlan and ticked only items in adapter properties and it worked. Thanks for your info. Keep up the good work.
I had this occur and spent 2 days diagnosing. It was caused by the removal of Checkpoint VPN client. Reinstalling fixed the issue, super frustrating.
^^ Glad you sorted it finally, thanks for posting here!
Step 1 worked first time. Checked the Registry entries (step 2) just to be sure they were correct. Wireless now connects to the inet. Been working on this all evening. THANX!!!
^^ Glad it helped, Mike 😎
Hey, Fix 1 worked. Awesome. I was facing wifi issue from many days. I almost came to last step to re-install my OS. But your fix worked. Thanks a LOT!!!!
Fix 2 worked – wow – how was this worked out?
^^ Happy to help 😊😎
Thanks alot man
^^ Glad to help you!
How do you know which registry subkey’s servicenane to use in step 3 of the second method? I have sub keys: 2 and 15
But i dont know which servicename to paste onto the registry key.